Table of Contents >> Show >> Hide
- What Exactly Is a Fluid Simulation Business Card?
- Why This Is Cooler Than It Has Any Right to Be
- The Hardware: Small Board, Big Personality
- The USB-C Trick: A Port Without a Connector
- The Software: FLIP Physics in Your Pocket
- Design Lessons You Can Steal (Respectfully)
- How You’d Build Something Like This
- Where This Concept Goes Next
- Final Thoughts
- Experiences: What It’s Like Living With (and Showing Off) Flowing LEDs
Most business cards are designed to be forgotten. You hand them out, they get politely pocketed, and later they live out their
days in a drawer with expired coupons and a mysterious Allen key. But every once in a while, someone builds a card that refuses
to be ignoredbecause it literally moves in your hand.
“LEDs That Flow” is that kind of flex: a business-card-sized PCB that runs a fluid simulation on a 21×21 LED grid. Tilt it and the
pixels slosh like water in a glass. Flip it and the “liquid” tumbles. Shake it and it wakes up like a tiny, overachieving firefly.
It’s part conversation starter, part physics demo, and part “yes, I really do this for fun.”
What Exactly Is a Fluid Simulation Business Card?
The idea is beautifully simple: take a grid of LEDs and treat them like a little window into a physics world. The “flip-card”
design looks like a normal professional business card on the frontname, role, contact infothen turns into a miniature light
sculpture on the back. That back side is packed with a 21×21 matrix (441 total LEDs), and the animation isn’t just a looping GIF.
It’s computed in real time using sensor input, so the motion responds to how you hold the card.
Under the hood, the card reads motion data from an accelerometer and feeds it into a fluid simulation method called FLIP
(Fluid-Implicit Particle). Instead of rendering a pre-baked animation, it updates the state of the “fluid” continuously, then maps
that state onto the LED grid so the light appears to pour, settle, and swirl.
Why This Is Cooler Than It Has Any Right to Be
Real-time simulation is normally the kind of thing you do on a desktop GPU, not on something the size of a slice of toast’s
business-casual cousin. Even if you simplify the physics, you still have to do a lot of math quickly, keep everything stable, and
make it look smoothwhile running on a tight power budget and driving hundreds of LEDs without turning the card into a hand
warmer.
That’s why this project hits a sweet spot: it’s not just “a lot of LEDs.” It’s a hardware design problem (power, layout, IO),
a firmware problem (timing, refresh, concurrency), and a simulation problem (stability, believable motion). It’s also a weirdly
effective networking tool, because the moment someone sees it, they ask the one question you want people to ask:
“How did you do that?”
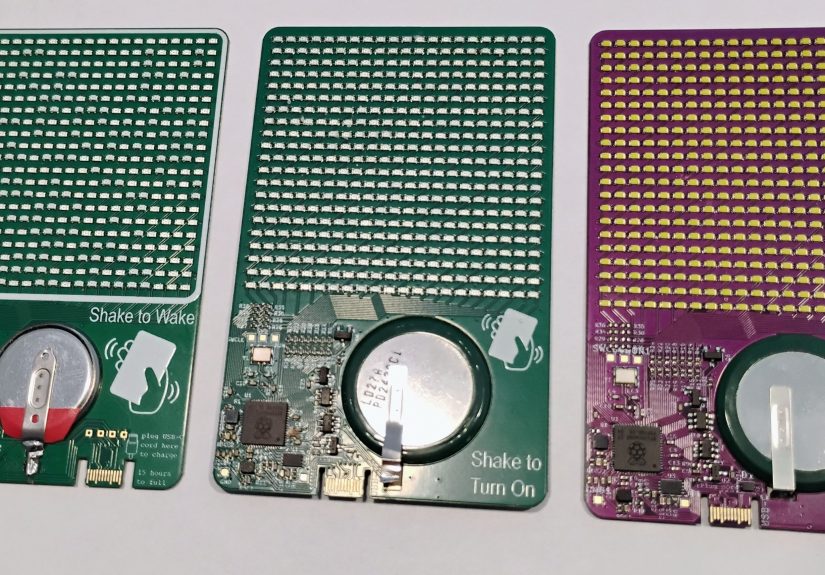
The Hardware: Small Board, Big Personality
1) The Microcontroller Brain
At the center is an RP2350 microcontrollerthe same family used on Raspberry Pi Pico 2 boards. It’s a dual-core chip that can run
up to 150 MHz, and it’s built for the kind of deterministic timing you want when you’re refreshing displays and sampling sensors.
Just as important: it includes Raspberry Pi’s Programmable I/O (PIO) subsystem, which lets you offload precisely timed pin
toggling to dedicated state machines. Translation: your CPU cores can focus on simulation math while the PIO handles “making
the LEDs behave.”
In a project like this, that division of labor matters. Driving a dense LED arrangement often means you’re either (a) burning CPU
cycles flipping pins, or (b) getting clever with peripherals. This card chooses clever.
2) 441 LEDs Without 441 GPIO Pins
A 21×21 LED matrix sounds like it would demand a scary number of pins. That’s where charlieplexing enters, wearing a cape and
holding a spreadsheet. Charlieplexing is a multiplexing technique that exploits tri-state GPIO (HIGH, LOW, or “high impedance”)
so that N pins can control up to N² − N LEDs. The trade-off is complexity: you can’t just “turn on LED #317.”
You’re constantly scanning patterns fast enough that the human eye sees a stable image.
The flip-card firmware leans on charlieplexing to make the giant LED grid feasible, and then uses PIO to help stream the control
signals without chewing up both CPU cores just to blink lights. This is the embedded equivalent of hiring a stage crew so the actor
can actually act.
3) Motion Sensing: The Card Knows Which Way Is “Down”
The illusion of fluid depends on gravity, so the card needs to know its orientation. That’s why it includes a compact 3-axis
accelerometer (commonly used in phones, wearables, and motion-triggered gadgets). With the accelerometer’s readings, the firmware
can estimate tilt direction and apply gravity forces in the simulation so the “water” slides toward the lower edge of the card.
Bonus: motion detection also allows the card to wake on movement, which is a nice trick for battery life and for the “wow, it’s
alive” factor.
4) Memory and the “Tiny Computer” Problem
Simulations and frame buffers cost memory, and microcontrollers don’t have infinite amounts of it. The flip-card build includes an
external memory chip (documented as 32 Mb), which can help with buffering, simulation state, and display mapping. In practical
terms, it’s one of the pieces that turns “cool idea” into “smooth demo,” because stutters are the enemy of believable motion.
5) Power: The Part Nobody Brags About (But Everyone Learns)
Here’s the secret: power is usually what makes ambitious wearable-ish projects quietly sad. The flip-card firmware documentation
notes that the simulation uses both cores at 150 MHz and the board runs around 40 mA, with much of that attributed to the
controller rather than the LEDs. It also calls out a low-power dormant state reducing usage to roughly 1.5 mA, yet the card still
lasts only a few days in sleep mode before needing a rechargebecause ultra-low-power firmware on new chips often depends on
driver/library support catching up.
If you’ve ever built a battery device, you’ll recognize this arc:
“It works!” → “Why is it dead already?” → “Oh right, physics.”
The USB-C Trick: A Port Without a Connector
One of the neatest details in this whole story is how the card handles charging and programming. USB-C connectors are wonderful,
but they add thickness, cost, mechanical constraints, and assembly steps. Some projects sidestep that by using a PCB edge design
that mates directly with a USB-C cableessentially turning the board itself into the “connector.”
This approach has real constraints: the board thickness often needs to be around 0.6–0.8 mm (instead of the common 1.6 mm), and
surface finish matters because you don’t want rough plating damaging a cable’s connector. ENIG (electroless nickel immersion gold)
is frequently recommended for durability and smooth contact surfaces. It’s the kind of hack that feels illegal until you realize the
“illegal” part is mostly just “non-default PCB settings.”
The result is delightfully practical: you can plug the card into a USB-C cable via a cutout/edge interface, charge it, and flash new
firmware without a bulky port. It’s minimalist industrial design… with a side of “please unplug gently.”
The Software: FLIP Physics in Your Pocket
What FLIP Means (Without the Graduate-School Headache)
FLIP stands for Fluid-Implicit Particle. It’s a hybrid technique that mixes grid-based (Eulerian) fluid simulation with particles
that carry velocity and help preserve detail. A classic related approach is PIC (Particle-In-Cell). PIC can be stable, but it tends
to damp out motion and lose lively detail. FLIP, meanwhile, adds changes from the grid back into particles, which keeps motion
crispsometimes too crisp, introducing noise. A common trick is blending: a little PIC for stability, mostly FLIP for detail.
On a business card, you’re not simulating ocean waves. You’re simulating the idea of liquidthe satisfying “pile up here, pour
there” behavior that your brain reads as fluid. The project’s simulation crate documentation even notes that the current simulation
doesn’t yet do waves or splashes. But honestly? For a handheld LED grid, “smooth slosh” already delivers the magic.
Embedded Rust, Concurrency, and Not Losing Your Mind
The firmware is written in Rust and centers around the Embassy framework, a popular approach for async embedded Rust. Whether you
write in C, C++, Rust, or interpretive hieroglyphics, you still face the same reality: display refresh needs predictable timing,
sensor reads need regular sampling, and simulation steps need consistent updates.
This is where the RP2350’s dual cores and PIO shine. With the LED driving handled efficiently and the simulation split across both
cores, the firmware can keep the illusion smooth instead of flickering or “tearing” like a tiny LED television with stage fright.
A Browser Simulator for Faster Iteration
The project also includes a WASM (WebAssembly) simulator used for debugging simulation behavior. That’s a smart workflow move:
testing a physics tweak in a browser is faster than reflashing a microcontroller every time you want to adjust a constant. If you’ve
ever spent an evening doing “compile → flash → test → realize you changed the wrong variable → repeat,” you know why this matters.
Design Lessons You Can Steal (Respectfully)
Lesson 1: “More LEDs” Is a Trap Unless You Plan the Drive Method
LED matrices are deceptively demanding. You’re fighting duty cycle (because multiplexing means each LED is on only part of the
time), current limits, and refresh rates. Time-multiplexing structures can create great display performance, but you need solid
timing discipline or you’ll see flicker, uneven brightness, or ghosting.
Charlieplexing saves pins but adds a layer of “pin state choreography.” For small arrays, it feels clever. For hundreds of LEDs, it
becomes a project management philosophy: design the wiring, design the scan schedule, and then design your patience.
Lesson 2: Sensors Turn a Display Into an Experience
A static animation is neat. A responsive animation is memorable. The accelerometer is the difference between “look, pretty lights”
and “wait, it’s reacting to me.” That interactivity is exactly what makes this card work as a social object: people don’t just look
at it; they play with it.
Lesson 3: Mechanical Choices Aren’t Optional
On paper, a “connectorless USB-C edge” sounds like a meme. In practice, it’s mechanical engineering: board thickness tolerance,
edge plating quality, strain relief (or lack thereof), and how the user handles insertion/removal. A clever electrical shortcut
becomes a reliability question very quickly. The best version of this design is the one that assumes the user will treat the card
like a normal object… because they will.
Lesson 4: Power Optimization Is a Roadmap, Not a Checkbox
The firmware notes point out that deeper power-domain support exists on the RP2350, but not all of it is accessible yet through
current Rust crates. That’s a normal reality in embedded: hardware evolves, toolchains chase it, and your first working version is
usually not your final battery-life story.
How You’d Build Something Like This
If you want to build your own “flowing LEDs” card, the broad path looks like this:
- Start with open hardware files. A KiCad project with schematic, layout, and production outputs saves months of work.
- Plan manufacturing early. Thin PCBs, dense LED placement, and charlieplex routing demand careful fab rules.
- Pick a sane flashing workflow. The flip-card firmware build notes describe using picotool and a USB mass-storage bootloader approach.
- Prototype the simulation off-device. A browser/WASM simulator is a huge quality-of-life win.
- Test power modes like it’s your job. Because once you hand someone the card, it becomes your job.
One practical tip that shows up in the firmware instructions: compile and flash in release mode. Embedded builds can behave very
differently when optimizations are offespecially when you’re doing real-time simulation and display refresh. Debug builds can be
the difference between “smooth liquid” and “choppy oatmeal.”
Where This Concept Goes Next
The current demo is already delightful, but it also hints at a future where “business card” becomes a platform. Once you’ve got a
dense LED array, motion sensing, and a programmable microcontroller, you’re one firmware update away from:
- Interactive mini-games (yes, someone will put Snake on ithumanity is consistent if nothing else).
- Physics variations: sand, lava, smoke, fireworks, or “goo” with adjustable viscosity.
- Custom branding: your logo appearing as a “container” that the liquid fills.
- Better fluid behavior over time: waves, splashes, and more complex boundary interactions.
And as embedded Rust and RP2350 tooling mature, the power story will likely improve toomaking the card more “daily carry” and less
“charge it like a Tamagotchi with a physics degree.”
Final Thoughts
“LEDs That Flow” is a reminder that engineering can be playful without being pointless. A business card doesn’t have to be a flat
rectangle that begs for recycling. It can be a tiny, interactive proof of skill: hardware design, firmware architecture, simulation
math, manufacturing constraints, and a sense of humorall laminated into a format people are already primed to accept in their
hands.
In other words: it’s not just a card. It’s a handshake you can tilt.
Experiences: What It’s Like Living With (and Showing Off) Flowing LEDs
The first time you demo a fluid-simulation card to someone, you learn a universal truth: nobody holds it “correctly.” They don’t
hover it delicately like a museum artifact. They grip it like a normal object, then immediately start flipping it like a poker chip,
tilting it like a tiny steering wheel, and shaking it like they’re trying to get ketchup out of a bottle. And honestly? That’s the
best product testing you could ask for, because it tells you whether your illusion survives chaos.
In maker circles, the moment of delight usually happens in two phases. Phase one: “Oh wow, it lights up.” Phase two: “Wait… it’s
reacting.” People’s brains are excellent at recognizing physical behavior, so when the LEDs “settle” toward the bottom edge as you
tilt, the effect feels weirdly real even though it’s just light. You’ll watch someone turn the card slowly, like they’re trying not
to spill imaginary water. That’s when you know you’ve nailed it: they’ve stopped thinking about electronics and started thinking
about physics.
If you’ve ever built LED matrices, you’ll also recognize the behind-the-scenes drama that never makes it into the glamour shots.
There’s the “ghosting gremlin,” where a few LEDs flicker faintly because your scan timing is off by a hair. There’s the “brightness
bargaining stage,” where you accept that multiplexing means trade-offs: you can have bright, stable, low-powerpick two. And then
there’s the “why does it only glitch when someone is watching?” phenomenon, which is either an electromagnetic mystery or the
universe’s sense of comedic timing.
Debugging the simulation side has its own flavor of fun. Early versions of a fluid sim often look like confetti, not water.
Particles escape boundaries. The “liquid” clumps into awkward shapes. Gravity feels like it’s set to “Moon mode,” and your tiny
virtual container becomes a zero-g rave. The path from “math is happening” to “this looks like something you’d drink” is mostly
about tuning: damping, viscosity, boundary handling, and how aggressively you smooth the display mapping so motion reads as fluid
instead of noise.
The most unexpectedly satisfying moment is when someone tries to use the card like a toy in a boring situation. You’ll see it at a
meetup while someone waits for a talk to start, or at a table while people are making small talk. They’ll tilt it under the table
like they’re sneaking a fidget toy into a meeting, and it’s hard not to grinbecause the card is doing exactly what you hoped:
turning idle time into curiosity. It’s a little reminder that good engineering isn’t always about efficiency. Sometimes it’s about
making a person say, “Okay, that’s ridiculously cool. Tell me everything.”
And if you’re the builder, you’ll develop a sixth sense for practicalities. You’ll learn how people plug and unplug the USB-C edge,
and you’ll start casually coaching them“pull straight, not sideways”like a sommelier giving cable etiquette. You’ll also discover
that the card is a fantastic icebreaker for the right audience. Instead of “So, what do you do?”, you get “How are you driving all
those LEDs?” and “Is that real fluid simulation?” Those are better questions. Those are your people.
In the end, the real experience of a flowing-LED business card is the combination of engineering pride and social chemistry. It’s a
functional identity object that says: I build things that work, and I build things that are fun. If you’re lucky, it’s also the kind
of artifact that gets remembered long after the eventbecause it doesn’t live in a drawer. It lives in someone’s pocket, waiting
for the next time they want to show a friend a tiny, glowing puddle of physics.