Table of Contents >> Show >> Hide
- What “Under $300” Really Means (And What It Doesn’t)
- Step Zero: Do the Basement Moisture Reality Check
- Budget-Friendly Options That Look Like a Big Deal
- Your Under-$300 Shopping List (Example Budget)
- How to Make the Makeover Last: Prep Like a Pro
- Painting Plan: A Weekend Timeline That Works
- Design Ideas That Look Expensive (But Aren’t)
- Common Mistakes That Blow the Budget (Because You Have to Redo Everything)
- Basement Humidity: The Unsexy Secret to a Long-Lasting Finish
- Maintenance: Keep It Looking Fresh Without Babying It
- Real-World Experiences to Expect (500+ Words of “Yep, That Happened”)
- Conclusion: Your Basement Floor Can Be Cheap and Good
- SEO Tags
Basement floors have a special talent: they can make a perfectly nice home feel like a slightly damp parking garage. If your slab is stained, dusty, or just plain “sad gray,” you don’t have to drop thousands on tile or hire a crew with mysterious machines. A <$300 basement floor makeover is absolutely doableif you treat the project like a mini science experiment (moisture!) and not like a reality show makeover (drama!).
This guide breaks down a budget-friendly approach inspired by the kind of viral DIY floor transformations you’ll see on Hometalk-style projects: clean hard, patch smart, paint with the right coating, and add a stencil pattern that makes your guests say, “Wait… that’s concrete?”
What “Under $300” Really Means (And What It Doesn’t)
“Under $300” usually means you’re upgrading the look and feel of a typical basement spacelaundry area, rec room, workshop, playroomusing paint/coating and optional stenciling. It does not mean you’re fixing:
- Active water leaks, flooding, or standing puddles after rain
- Hydrostatic pressure (water pushing through the slab)
- Major heaving, crumbling concrete, or loose/spalling areas everywhere
Those problems can ruin any coating, no matter how pretty the color name sounds (“Moonlit Greige,” I’m looking at you). The good news: you can still do the makeoverjust handle moisture and repairs first.
Step Zero: Do the Basement Moisture Reality Check
Before you buy paint, do one quick test. It’s cheap, it’s easy, and it can save you from the heartbreak of peeling paint in three months.
The Plastic Sheet Moisture Test (Cheap and Surprisingly Useful)
- Sweep and vacuum a small area of the floor.
- Tape down a square of plastic sheeting (about 18″ x 18″ to 2′ x 2′) with duct tape along all edges.
- Leave it for at least 16–24 hours.
- Check for condensation under the plastic or darkened concrete.
If you see moisture, your floor is telling you: “I’m not ready for paint yet.” That doesn’t mean you’re doomedit means you may need better dehumidification, improved drainage outside, crack sealing, or a coating system designed for damp conditions.
Budget-Friendly Options That Look Like a Big Deal
Option A: “Clean + Coat” (Fastest, Most Budget-Friendly)
This is the simplest route: prep the concrete and roll on a concrete floor coating (often labeled 1-part epoxy acrylic or concrete floor paint). It’s great for utility basements, laundry areas, and workshops.
Option B: “Paint + Stencil” (The Hometalk-Style Wow Factor)
This is the crowd-pleaser: a base coat plus a repeating stencil pattern that mimics tile, encaustic cement, or a “painted rug.” You spend more time on your knees, but you spend way less money than actual tile.
Option C: “Epoxy Kit” (Durable, But Prep Is Non-Negotiable)
Two-part epoxy systems can be extremely tough, but they’re picky about prep and moisture. Many DIY kits include cleaner/degreaser and etch materials; always follow the label for basement use.
Your Under-$300 Shopping List (Example Budget)
Prices vary by region and floor size, but here’s a realistic shopping plan for a small-to-medium basement area (roughly 200–350 sq ft):
- Cleaner/degreaser (and scrub brush): $10–$25
- Concrete crack filler/patch: $10–$30
- Concrete etcher or alternative prep solution (only if recommended for your coating): $10–$25
- Bonding primer (optional but helpful): $25–$45
- Concrete floor paint / 1-part epoxy acrylic: $35–$70 (1–2 gallons depending on coverage)
- Stencil (optional): $20–$45
- Stencil tools (small roller/foam roller, painter’s tape, tray liners): $10–$25
- Clear sealer/topcoat (optional but recommended for stenciled floors): $25–$60
Typical total: $180–$295, depending on what you already own (rollers, tape, knee padsyes, knee pads count as “equipment,” not “optional luxury”).
How to Make the Makeover Last: Prep Like a Pro
Every good floor makeover is 70% prep, 25% patience, and 5% standing back to admire your genius. Here’s how to do the prep without losing your spirit.
1) Clear the Room (And Be Honest About Old Adhesive)
Remove everything. If there’s old carpet glue or mystery gunk, scrape it. Paint will not bond to “mystery.” It will only bond to clean, sound concrete.
2) Deep Clean and Degrease
Basement floors collect detergent spills, oil drips, and dirt that looks like dust but behaves like grease. Use a concrete-safe cleaner/degreaser, scrub thoroughly, and rinse well. If the water beads up, you may have an existing sealer or contamination that needs additional prep.
3) Patch Cracks and Pits (Don’t Skip This)
Small cracks become big eyesores once painted, because paint highlights edges. Fill hairline cracks and patch chips. For larger cracks, follow a repair method that includes cleaning out loose material so the repair can bond properly.
4) Etch or Mechanically Scuff (Only If Your Product Requires It)
Some coatings want etched concrete; some prefer sanding/scuffing; some want a specific cleaner profile. The goal is the same: make the concrete slightly porous so primer/paint can grip.
Important: Always follow the coating manufacturer’s basement instructions. Certain epoxy kit directions may treat basement floors differently than garages, especially regarding etching and moisture concerns.
5) Vacuum Like You’re Being Paid Per Dust Particle
After etching or sanding, vacuum thoroughly. Dust is the silent villain of paint adhesion. It’s not dramatic, but it is relentless.
Painting Plan: A Weekend Timeline That Works
Day 1: Prep + Repairs
- Scrape residue, sweep, vacuum
- Degrease, scrub, rinse, let dry
- Patch cracks/pits; let repairs cure as directed
- Do moisture test if you haven’t already
Day 2: Prime + Base Coat
If you’re using a bonding primer, apply it according to label directions (temperature/humidity matter). Then roll your base coat. For a stenciled look, choose a base color that acts like “grout” or “tile background” (often light gray, warm white, or a soft greige).
Day 3: Stencil Party (A.K.A. The Kneepad Olympics)
Once the base is fully dry, stencil your pattern.
Stencil tips that keep it crisp
- Use less paint than you think. Too much paint = bleed under the stencil.
- Secure the stencil. Painter’s tape or repositionable spray adhesive can help (use only if compatible with your base coat).
- Work in sections. Don’t trap yourself in a corner unless you enjoy crawling like a confused crab.
- Plan pattern alignment. Snap chalk lines if needed so the pattern doesn’t slowly drift into chaos.
Day 4 (Optional): Seal It
If the space will see foot traffic, rolling carts, kids, or anything with a hobby attached, consider a clear topcoat/sealer that’s compatible with your paint. For stenciled floors, a sealer helps protect the pattern from scuffs and makes cleaning easier.
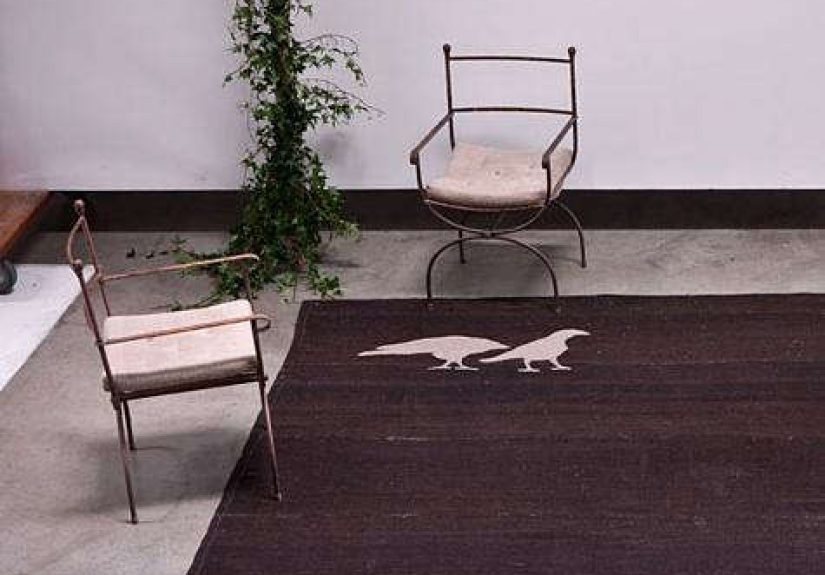
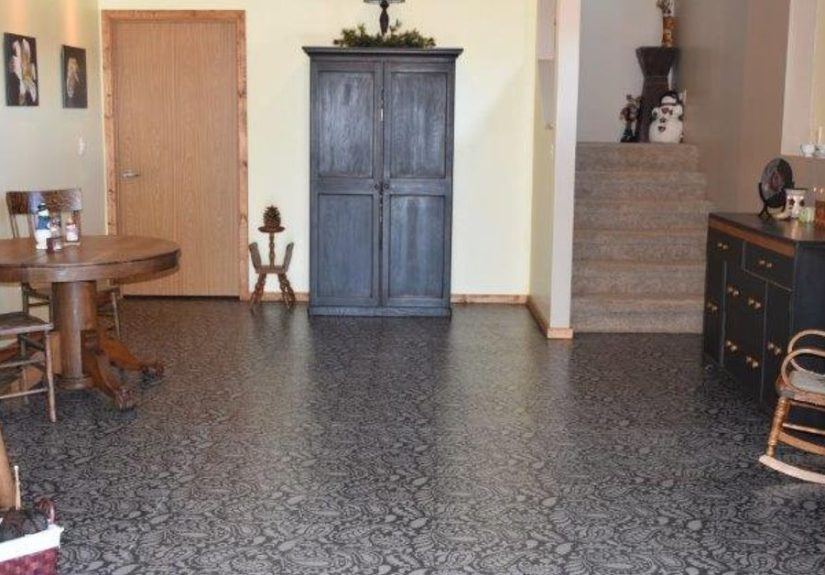
Design Ideas That Look Expensive (But Aren’t)
Faux Tile Pattern
Choose a repeating “tile” stencil with a classic geometric or encaustic vibe. Pair a light base with a darker stencil color for contrast.
Painted Rug Zone
Stencil a rectangle “rug” area in the center of the room, then leave the surrounding floor a solid color. It’s forgiving (less stenciling) and looks intentional.
Border + Solid Center
Add a stencil border around the perimeter like fancy wallpaper… but on the floor. It’s a good compromise if you want style without doing the whole slab.
Common Mistakes That Blow the Budget (Because You Have to Redo Everything)
- Skipping the moisture test. Moisture is the #1 reason basement floor paint fails.
- Painting over dust. The paint will bond to dust, and the dust will not bond to concrete.
- Using wall paint. Floors need floor-rated coatings that handle abrasion.
- Rushing dry times. “It feels dry” is not the same as “it’s cured.”
- Ignoring humidity control. Basements love humidity. Paint does not.
Basement Humidity: The Unsexy Secret to a Long-Lasting Finish
If your basement runs damp, a dehumidifier can be the difference between “Pinterest-perfect floor” and “why is it bubbling?” Many home health and moisture resources recommend keeping indoor relative humidity in a safer range (often around 30–50%) to reduce mold growth and moisture issues. For basements, consistent control matters more than occasional heroic efforts.
Maintenance: Keep It Looking Fresh Without Babying It
- Sweep or vacuum grit regularly (grit = sandpaper under your shoes)
- Use mild cleaner; avoid harsh chemicals unless your coating allows them
- Add felt pads under furniture legs
- Place mats by exterior doors and near laundry areas
- Touch up chips early before moisture creeps underneath
Real-World Experiences to Expect (500+ Words of “Yep, That Happened”)
Even when you follow the steps, a budget basement floor makeover has a very specific emotional arckind of like assembling furniture, but with more fumes and fewer tiny Allen wrenches (usually). Here are the most common “experiences” DIYers run into so you can feel prepared instead of personally attacked by concrete.
Experience #1: The Floor Is Dirtier Than You Think. You’ll sweep. You’ll vacuum. You’ll feel proud. Then you’ll scrub with degreaser and the rinse water will look like you rinsed a barbecue pit. Basements collect fine dust, detergent residue, and old spills that dry invisibly until you try to paint. The solution isn’t magicalit’s just extra cleaning. Plan for it. Put on a playlist. Accept that your scrub brush is now a supporting character in your life story.
Experience #2: Cracks Become “Louder” the Nicer the Floor Gets. Before paint, small cracks are background noise. After paint, they look like dramatic eyeliner. That’s why patching feels so worth it. The “aha” moment is when you realize you don’t have to fix the entire basementjust the spots your eyes land on and the defects that could affect adhesion. Many DIYers patch, sand, and patch again, especially if the first pass shrinks a bit. This is normal. Concrete is humbling like that.
Experience #3: Stenciling Is Easy… One Tile at a Time. The first stencil impression is thrilling. The tenth is still fun. The fiftieth makes you question your choices. By the hundredth, you are basically a medieval artisan. The trick is pacing: do a few rows, take breaks, keep paint light on the roller, and don’t try to “fix” tiny imperfections while the paint is wet. Most floors look better from standing heightbecause that’s how humans typically experience floors unless they’re looking for a missing sock.
Experience #4: Dry Time Is a Lifestyle. You’ll want to move the washer back. You’ll want to set up the storage shelves. The paint will whisper, “Not yet.” Humidity and temperature affect drying and curing, especially in basements. Many DIYers end up running a dehumidifier and fans, not because they’re impatient (okay, sometimes they are), but because steady airflow makes a noticeable difference. The payoff is huge: better hardness, fewer scuffs, and less tackiness underfoot.
Experience #5: The Finished Floor Changes the Whole Basement. This is the best part. A bright, clean-looking floor makes the space feel larger and more intentional. It also makes lighting work harder for youyour basement stops feeling like a cave and starts feeling like a room. People often report that once the floor is done, they suddenly care about the walls, the shelving, and the laundry corner “because now the floor is judging everything else.” That’s normal too. Congratulations, you’ve unlocked the “one more project” expansion pack.
Conclusion: Your Basement Floor Can Be Cheap and Good
A basement floor makeover under $300 isn’t about cutting cornersit’s about spending your money where it matters: cleaning, prep, and the right coating system for concrete. Add a stencil if you want the wow factor, seal it if you want longer life, and keep humidity under control so your hard work doesn’t peel off like a sunburn.