Table of Contents >> Show >> Hide
- Quick Snapshot
- Why This No-Bake Mousse Pie Works
- Ingredients
- Equipment You’ll Want (Nothing Weird)
- Step-by-Step: How to Make No-Bake Chocolate Mousse Pie
- Flavor Variations (Because You’re Allowed to Be Extra)
- Make-Ahead, Storage, and Freezing
- Troubleshooting: Common Mousse Pie Drama (Solved)
- FAQ
- Final Thoughts
- My Real-Life No-Bake Chocolate Mousse Pie Experiences (The Honest, Chocolate-Stained Version)
If you’ve ever wanted a dessert that looks like you hired a pastry chef but actually requires zero oven time and only the level of effort you can spare while wearing socks with holes, meet your new best friend: no-bake chocolate mousse pie.
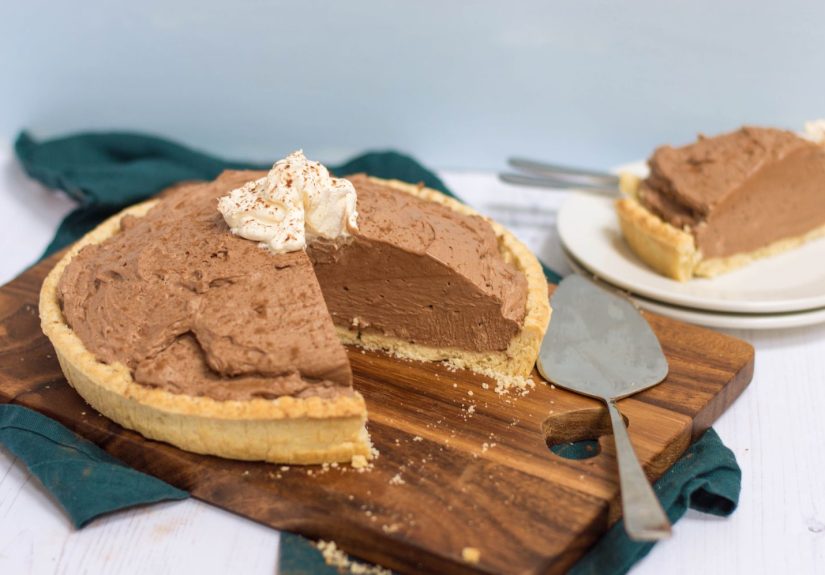
This pie hits the sweet spot between “airy mousse” and “decadent chocolate pie,” with a crisp cookie crust, a cloud-like chocolate filling, and a whipped cream finish that makes people say, “Wait… you made this?” (Yes. You did. Accept your crown.)
Quick Snapshot
- Skill level: Easy (with one “don’t panic” moment while melting chocolate)
- Active time: ~25 minutes
- Chill time: 6 hours (or overnight for peak smugness)
- Makes: 1 (9-inch) pie, 8–10 slices
- Flavor vibe: Deep chocolate + light mousse + crunchy crust
Why This No-Bake Mousse Pie Works
The magic here is a simple technique: you make a quick chocolate base (think ganache-adjacent), cool it to the right temperature, then fold it into whipped cream. That folding step traps air, creating mousse texture without turning your kitchen into a science fair.
A couple of smart details keep the pie sliceable (not spoon-only, though spoon-only is a valid lifestyle):
- Cold cream + gentle folding = stable, fluffy mousse.
- Quality chocolate = smoother melt and cleaner flavor.
- Optional gelatin “seatbelt” = extra structure if your fridge runs warm or you’re transporting it.
Ingredients
For the No-Bake Chocolate Cookie Crust
- 24–26 chocolate sandwich cookies (like Oreos), filling included
- 5 tablespoons unsalted butter, melted
- Pinch of salt (optional, but highly recommended for “wow” factor)
For the Chocolate Mousse Filling (Egg-Free)
- 10 ounces semi-sweet or bittersweet chocolate, finely chopped (bars melt best)
- 1 1/4 cups heavy whipping cream, divided (cold)
- 2 tablespoons powdered sugar
- 1 teaspoon vanilla extract
- 1/8 teaspoon fine salt
- 1 teaspoon espresso powder (optional, makes chocolate taste more “chocolate”)
Optional (But Helpful) Stabilizer
- 1 teaspoon unflavored gelatin
- 1 tablespoon cold water
For the Topping
- 3/4 cup heavy whipping cream (cold)
- 1 1/2 tablespoons powdered sugar
- 1/2 teaspoon vanilla extract
- Chocolate curls, shaved chocolate, cocoa powder, or cookie crumbs
Chocolate note: If you’ve ever melted chocolate chips and ended up with something that looks like a questionable craft project, you’re not imagining it. Chocolate bars often melt more smoothly than chips because chips commonly contain stabilizers meant to help them hold their shape.
Equipment You’ll Want (Nothing Weird)
- 9-inch pie dish
- Food processor (or a zip-top bag + rolling pin + determination)
- Electric mixer (hand or stand)
- Mixing bowls
- Rubber spatula (for folding like a gentle, loving librarian)
- Microwave-safe bowl or a double boiler setup
Step-by-Step: How to Make No-Bake Chocolate Mousse Pie
1) Make the Cookie Crust
- Crush cookies into fine crumbs (food processor: easiest; rolling pin method: therapeutic).
- Mix crumbs with melted butter (and a pinch of salt if using) until it resembles wet sand that would absolutely ruin your day at the beach.
- Press firmly into a 9-inch pie dish, up the sides. Use the bottom of a measuring cup to pack it in.
- Chill the crust for at least 20 minutes while you make the filling.
Optional: If you’re not strictly “no-bake,” baking the crust for 8–10 minutes makes it extra crisp. But this recipe is built to work without turning on the oven.
2) Make the Chocolate Base (The “Don’t Panic” Part)
- In a microwave-safe bowl, combine chopped chocolate with 1/2 cup of the heavy cream.
- Microwave in 20–30 second bursts, stirring well each time, until melted and smooth. (Or melt over a double boiler.)
- Stir in vanilla, salt, and espresso powder (if using). Let the mixture cool until it’s lukewarmnot hot, not cold, just “warm hoodie weather.”
3) Optional Gelatin “Seatbelt” (Recommended for Clean Slices)
- Sprinkle gelatin over cold water in a small bowl. Let it stand 5 minutes to bloom.
- Microwave for 8–10 seconds until just melted (not boiling). Cool for 1 minute.
- Whisk the melted gelatin into the lukewarm chocolate mixture until fully combined.
4) Whip the Cream
- In a cold bowl, beat the remaining 3/4 cup heavy cream with powdered sugar until medium peaks. (It should hold shape but still look silky.)
5) Fold Like You Mean It (Gently)
- Scoop about 1/3 of the whipped cream into the chocolate and stir to lighten it. (This prevents the chocolate from bulldozing your fluff.)
- Add the lightened chocolate mixture back into the remaining whipped cream and fold with a spatula until no streaks remain. Stop as soon as it’s uniformovermixing deflates the mousse.
6) Fill, Chill, and Become a Legend
- Spoon mousse into the chilled crust and smooth the top.
- Refrigerate for at least 6 hours (overnight is best) until set.
7) Top It Off Right Before Serving
- Whip topping cream with powdered sugar and vanilla to soft/medium peaks.
- Dollop, swoosh, or pipe it on top. Finish with chocolate curls, cocoa, or cookie crumbs.
Flavor Variations (Because You’re Allowed to Be Extra)
Mocha Mousse Pie
Add 1–2 teaspoons espresso powder to the chocolate base and top with a dusting of cocoa. It tastes like dessert and coffee had a very successful meeting.
Mint-Chocolate Mousse Pie
Add 1/4 teaspoon peppermint extract (go easypeppermint is powerful) and garnish with chocolate shavings.
Peanut Butter Chocolate
Swirl 1/3 cup creamy peanut butter into the mousse after it’s folded (don’t fully mixlet it marble).
“Fancy Dinner Party” Raspberry
Serve slices with fresh raspberries or a quick raspberry sauce. Chocolate + tart berries = instant sophistication.
Grown-Up Version
Add 1–2 tablespoons coffee liqueur or orange liqueur to the chocolate base. (It won’t taste boozy, it’ll taste “mmm, what is that?”)
Make-Ahead, Storage, and Freezing
- Make-ahead: Perfect for making the day before. Chill overnight for the cleanest slices.
- Refrigerator: Keep covered for up to 3 days. The crust softens slightly over time, but it’s still delicious.
- Freezing: Freeze the pie (without whipped topping) tightly wrapped for up to 1 month. Thaw overnight in the fridge. Add topping before serving.
Troubleshooting: Common Mousse Pie Drama (Solved)
“My mousse turned grainy.”
Usually the chocolate got too hot or seized, or cold ingredients hit warm chocolate too fast. Melt gently, stir often, and let chocolate cool to lukewarm before folding.
“It’s not setting.”
Give it timethis pie is a “chill and think about what you’ve done” dessert. If it still feels loose after 6 hours, your whipped cream may have been under-whipped or your fridge may be warm. Next time, use the gelatin option.
“My crust crumbled when slicing.”
Press the crust firmly, and chill it before filling. If you want extra stability, chill longer or add a tablespoon more butter.
“My whipped topping wept.”
Whip topping right before serving. If you need it earlier, stabilize with a tablespoon of mascarpone or a spoonful of powdered sugar.
FAQ
Is chocolate mousse pie the same as French silk pie?
They’re cousins. French silk is typically richer and often involves eggs and butter for that ultra-velvety texture. This no-bake mousse pie is lighter, egg-free, and built around whipped cream plus melted chocolate.
Can I use milk chocolate?
You can, but it’ll be sweeter and softer. If you go milk chocolate, add a pinch more salt and consider gelatin for structure.
Can I make it gluten-free?
Yepuse gluten-free chocolate sandwich cookies (or a gluten-free chocolate wafer crumb crust). The filling is naturally gluten-free (just check labels).
How do I get clean slices?
Chill overnight, use a sharp knife, and wipe it between cuts. For extra clean edges, warm the blade under hot water, then dry it.
Final Thoughts
A great no-bake dessert should do three things: save your time, impress your people, and taste like it cost more than it did. This No-Bake Chocolate Mousse Pie checks all three boxeswith room for whipped cream on top.
Make it for birthdays, holidays, random Tuesdays, or any day you feel like proving that “no-bake” can still mean “wow.”
My Real-Life No-Bake Chocolate Mousse Pie Experiences (The Honest, Chocolate-Stained Version)
The first time I made a no-bake chocolate mousse pie, I treated the melted chocolate like it was a racecar: I poured it straight into whipped cream while it was still hot, full send, zero caution. The result was not mousse. It was… chocolate confetti. Tiny flecks of chocolate everywhere, like my pie had developed a flaky personality. It still tasted good (because chocolate is basically delicious even when it’s being dramatic), but the texture was closer to “whipped cream with crunchy surprises” than “silky cloud filling.”
The fix was almost annoyingly simple: patience. Let the chocolate cool to lukewarm. Not “set into a brick,” just “safe to touch.” The moment I started treating that cooling time like part of the recipe instead of an optional suggestion, everything changed. The mousse turned glossy and smooth, and suddenly I understood why people get emotional about desserts.
Then came the crust era. I tried a graham cracker crust once because I was out of chocolate cookies, and I figured, “Crust is crust, right?” Wrong. The pie was still great, but the flavor balance shiftedless “chocolate-on-chocolate luxury,” more “chocolate wearing a beige sweater.” Totally fine if that’s your vibe, but if you want maximum chocolate impact, the cookie crust is the way. Now I keep a backup sleeve of chocolate sandwich cookies in the pantry like it’s emergency equipment.
Transporting this pie is its own sport. I once brought it to a get-together in warm weather and learned that mousse has feelings about temperature. It didn’t melt into soup, but it softened enough that slices leaned slightly, like they were tired. That’s when I became a gelatin believernot because gelatin is “necessary,” but because it’s comforting. Like wearing a seatbelt even if you’re just driving to the grocery store. If I know the pie will sit out for a bit, or ride in a car, I add the gelatin. The slices stand tall. I stand tall. Everyone wins.
Toppings are where the fun happens. I’ve gone full classic (whipped cream + chocolate curls), and I’ve also taken the chaotic good route: crushed peppermint candies in December, raspberries in summer, toasted nuts when I wanted crunch, and one memorable moment with flaky salt that made people pause mid-bite and go, “Waitwhat is that?!” (Answer: it’s the salt. Salt is the plot twist.)
My favorite “pro move” is making the pie the night before and decorating right before serving. Overnight chilling turns the mousse into something sliceable and luxurious, and the topping stays fresh and fluffy. It also lets you act extremely casual at dessert time, like you didn’t plan ahead, when you absolutely did. And if someone asks for the recipe, you get to say the most satisfying sentence in home baking: “It’s no-bake.” Then you watch their eyebrows rise.