Table of Contents >> Show >> Hide
- Why Test a New Look with Paper First?
- Meet the Space: Our Foyer “Before”
- Choosing the Right Paper for Your Walls
- Tools and Materials Checklist
- Step-by-Step: How We Installed the Paper Wall
- Styling the New Papered Wall
- Real-Life Pros and Cons After Living with It
- Progress Report Numero Uno: What’s Next?
- Bonus: Extra Experiences from Testing a New Look with Paper
If you’ve ever stared at your foyer walls and thought, “I want something fun here, but what if I hate it next week?” this one’s for you. Instead of committing to pricey wallpaper or a full repaint, we’re kicking off Progress Report Numero Uno with a budget-friendly, low-commitment hero: paper.
Using wrapping paper, kraft paper, or other decorative paper as a temporary wall treatment is one of those tricks that feels a little bit like cheating in the best way. You get bold pattern, instant personality, and Instagram-ready photos without signing a long-term lease with your walls. When you’re done, you peel it down, patch a few tiny holes (if any), and move on to the next idea. Remodelaholic energy, right?
This progress report walks through why paper is such a smart “test drive” for a new look, how to choose the right paper, and the exact steps to transform a blah entry into a welcoming moment. Think of it as a dress rehearsal for your dream foyer.
Why Test a New Look with Paper First?
There’s a reason decorators and DIY bloggers keep returning to paper-based wall treatments: they’re fast, flexible, and surprisingly polished when done well. Instead of agonizing over swatches and making a forever decision, you can tape, starch, or lightly glue paper to the wall and see how that dramatic pattern actually behaves in your space.
- Budget-friendly experimentation: A few rolls of wrapping paper or kraft paper are usually far cheaper than rolls of traditional wallpaper or gallons of paint, especially if you’re just doing an accent wall.
- Renter- and commitment-friendly: Many paper methods are completely removable. You can use painter’s tape, double-sided tape, or light adhesive that peels off without wrecking the wall when your lease (or your attention span) runs out.
- Big impact, tiny timeline: A foyer or single hallway wall can typically be “papered” in an afternoon. You get that before-and-after satisfaction fast, which is very motivating when you’re mid-remodel and surrounded by half-finished projects.
- Pattern test drive: You might adore a bold floral or graphic stripe on Pinterestbut living with it in real life is another story. Paper lets you test the pattern scale, color, and vibe with the actual light and furnishings you have.
Think of this as visual prototyping. Instead of guessing how your “after” will look, you mock it up on the cheap, then refine from there.
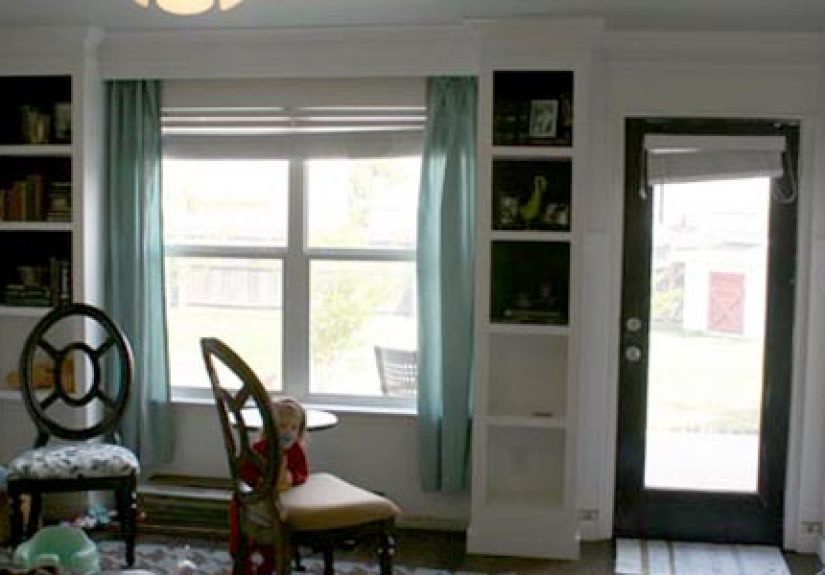
Meet the Space: Our Foyer “Before”
Like a lot of builder-basic foyers, the starting point here is… fine. Beige-ish walls, basic trim, a scuffed up baseboard or two, and a lonely little console table that’s doing its best. The bones are good, but the personality meter is firmly set to “waiting room.”
The goals for Progress Report Numero Uno are simple:
- Create a focal wall that sets the tone as soon as you open the front door.
- Add pattern and texture without committing to expensive wallpaper or major carpentry.
- Test colors that might influence future choices for paint, trim, and decor.
Instead of hauling out a paint sprayer or renting scaffolding, we’re rolling out paper and seeing what happens.
Choosing the Right Paper for Your Walls
Picking the right paper is half the funand half the battle. Not all paper is created equal when it’s going on a vertical surface. Here’s what to keep in mind before you fill your cart.
Wrapping Paper vs. Craft Paper vs. Temporary Wallpaper
Wrapping paper is usually the most affordable and most patterned option. It comes in endless colors and designs, from minimal stripes to wild florals. Look for heavier, matte paper that feels closer to gift wrap from a boutique than slick dollar-store foil; thicker paper tends to wrinkle less and hide minor wall imperfections better.
Kraft or builder paper gives a more subtle, textural effect. Think warm brown, soft gray, or even white rolls. You can leave it plain for a Scandinavian vibe, stamp a pattern on it yourself, or use it as a neutral backdrop for art and mirrors.
Temporary or peel-and-stick wallpaper is basically the dressed-up cousin of the paper approach. It costs more but is designed for walls from the start. If you’re nervous about DIY methods, a ready-made peel-and-stick option might be a good next phase after this paper test run.
What to Look For in a Pattern
Before you fall head over heels for that tiny flamingo or banana print, think about how it will read in your foyer:
- Scale: Small repeating patterns are easier to align and more forgiving on narrow walls. Large-scale patterns can be stunning but often demand precise placement.
- Color palette: Pull hues already found in your flooring, stair railing, or front door. This helps the new wall feel intentional instead of random.
- Direction: Is the pattern obviously vertical or horizontal? Make sure it aligns with the height and shape of your wall so it doesn’t feel “off.”
Lay a sample of your paper on the wall with painter’s tape and look at it morning, afternoon, and evening. If you still love it after a full day of weird shadows and overhead lighting, it’s a keeper.
Tools and Materials Checklist
For a basic paper wall treatment in a foyer or hallway, gather:
- Decorative or kraft paper rolls (enough to cover your chosen wall with a little extra for trimming)
- Painters tape or double-sided tape (for a purely temporary option)
- Optional: liquid starch or wallpaper paste if you want a slightly stronger hold
- Measuring tape and a straightedge or level
- Sharp utility knife or scissors
- Pencil for marking cut lines
- Plastic smoothing tool or old credit card to push out bubbles
- Step stool or ladder, depending on ceiling height
Once everything is staged, it’s basically like wrapping a very large, vertical giftjust with fewer bows and more awkward stretches.
Step-by-Step: How We Installed the Paper Wall
1. Prep and Measure the Wall
Start by removing artwork, nails, and outlet covers. Wipe down the wall to clear dust and lingering fingerprints. If you have any glaring nail holes or dents, patch and lightly sand them; paper hides a lot, but it’s not magic.
Measure the width and height of your wall. Add two to four extra inches to your paper length so you have a little wiggle room at the top and bottom for trimming.
2. Cut the Paper into Panels
Work panel by panel rather than trying to handle one massive piece. Cut strips slightly longer than your wall height. If you’re working with a patterned paper, pay attention to where the pattern repeats so you can match it from strip to strip and avoid obvious seams.
3. Decide on Your Adhesive Method
There are a few ways to get the paper onto your wall, and each one offers a different level of commitment:
- Painter’s tape only: Tape around the edges and at a few spots in the middle. This is the easiest to remove but works best on smaller sections or lightweight paper.
- Double-sided tape: Ideal for accent walls; it holds more securely than painter’s tape but is still removable on most painted surfaces.
- Liquid starch or light adhesive: Brush a thin layer on the wall, apply the paper, then smooth. This technique gives a more wallpaper-like look and can often be removed later with warm water and patience.
For this first progress report, a mix of double-sided tape on seams and painter’s tape along the top and bottom provides a good balance between stability and reversibility.
4. Hang the First Panel
Use a level to draw a light vertical line where your first seam will land. This ensures your entire project doesn’t slowly tilt into chaos. Starting at the top, line up the paper with the ceiling or crown molding, leaving an extra inch to trim. Secure the top edge, then gently press the rest of the panel down the wall, smoothing from the center outward to remove bubbles.
Trim the extra at the bottom using a straightedge and sharp utility knife for a crisp finish.
5. Add Additional Panels
Repeat the process with the next panel, carefully aligning the pattern or keeping a consistent gap if you’re deliberately spacing panels. Overlap edges slightly if needed, or butt them together for a seamless look. Work your way across the wall, stepping back now and then to double-check alignment and pattern flow.
6. Tackle Corners, Outlets, and Switches
For corners, wrap the paper slightly around the edge so you don’t see a raw seam. Around outlets and switches, press the paper gently over the plate area, cut an X from corner to corner, and trim away the excess before reinstalling the cover. It sounds fussy, but it gives a surprisingly professional finish.
Styling the New Papered Wall
Once the last bubble is smoothed out and your tools are put away, it’s time for the fun part: styling. This is where the paper really earns its keep.
- Add a simple console: A slim table or chest anchors the wall and gives you a spot to drop keys and mail.
- Layer in a mirror: A round or arched mirror centered on the papered wall reflects light and shows off the pattern behind it.
- Bring in greenery: A potted plant or simple vase of branches softens the pattern and adds life.
- Use baskets and hooks: If your foyer also works as a drop zone, tuck baskets under the console and hang a few hooks nearby to keep things contained without cluttering the pattern.
The goal is to let the paper be the star without overwhelming the eye. A few well-chosen pieces go further than overloading the wall with decor.
Real-Life Pros and Cons After Living with It
What Worked Beautifully
The biggest win is the immediate mood shift. Where the foyer once felt like a pass-through, it now functions as a welcome moment. The pattern creates a “ta-da” effect when the front door opens, and it photographs wonderfully for progress posts and project updates.
Practically speaking, the paper also hides minor scuffs and fingerprints better than a flat painted wall. In a high-traffic entry, that’s a very welcome bonus.
What We’d Tweak Next Time
A few lessons showed up once we lived with the wall for a bit:
- Seams are everything: Tiny gaps or overlaps become more noticeable over time, especially with bold geometric patterns. Next round, we’d mark seam lines more carefully and cut with an even sharper blade.
- Light matters: Some glossy papers can throw reflections or highlight wrinkles in bright daylight. A matte finish tends to be more forgiving.
- Durability zone check: In areas where kids toss backpacks or where dogs brush by the wall, tape-only sections may need periodic touch-ups. A stronger adhesive or a chair rail to protect the lower portion could help.
Overall, though, the experiment passes the real-life test: the foyer feels more finished, more intentional, and more “us,” all without a huge expense or long-term commitment.
Progress Report Numero Uno: What’s Next?
This paper wall is just the first chapter. With the pattern in place, it’s much easier to see what the space wants next. The updated plan might include:
- Painting the remaining walls in a coordinating neutral or soft color pulled from the paper.
- Adding simple trim or board-and-batten below the paper line to protect high-traffic areas.
- Updating the light fixture to something that echoes the style of the patternmaybe a modern globe or small lantern.
- Swapping the rug for one that balances the color and style of the new feature wall.
Because the paper is removable, there’s no pressure to get everything perfect on the first try. Instead, you’re free to treat your foyer like a design labexperimenting, editing, and upgrading as you go.
Bonus: Extra Experiences from Testing a New Look with Paper
After playing with paper in an entryway, a funny thing happens: you start eyeing every underused corner of the house and wondering what a bold pattern could do there. Small powder rooms, the back of bookcases, stair risers, even the inside of closet doors all become potential test zones.
One of the biggest takeaways from experimenting this way is how much confidence you gain as a DIY decorator. Hanging paper on a wall looks intimidating at first, but by the time you’ve measured, cut, and smoothed a few panels, you realize it’s actually pretty forgiving. A misaligned seam can be recut; a wrinkled strip can be replaced. Because the materials are inexpensive, the stakes stay low and the fun stays high.
There’s also a practical rhythm that develops. The first panel often feels clumsy and slow. You triple-check the level, fuss with adhesive, and step back every five minutes to make sure nothing is crooked. By panel three or four, you’re gliding: measure, cut, tape, smooth, trim, repeat. That flow makes it easy to tackle other wall-related projects later, whether it’s installing peel-and-stick wallpaper, painting stripes, or adding decorative molding.
Another unexpected benefit is how clearly paper reveals the “personality gaps” in a room. With a plain wall, it’s easy to ignore awkward proportions or underwhelming fixtures. Once you add a strong pattern, you instantly see which elements feel too small, too dark, or out of style. Maybe your skinny console suddenly looks wimpy against a dramatic print. Maybe the builder-grade light fixture feels out of place next to a chic botanical pattern. Paper acts like a spotlight, showing where you’ll get the best return on your next upgrade.
Experimenting with paper is also a great way to involve the whole household in the design process. Kids can help choose patterns for a mudroom or playroom. Partners who normally shrug at decor decisions might suddenly have opinions when they see a bold stripe taped to the foyer wall. Because the change is reversible, everyone is more willing to take creative risks and see how they land.
Finally, there’s the emotional side: a simple papered wall can make your home feel more loved, even in the middle of a long remodel. While you’re waiting on contractors, saving up for new flooring, or deciding on kitchen cabinets, it’s incredibly satisfying to have at least one corner that looks pulled together and intentional. Every time you walk through the front door and spot that patterned wall, it’s a small reminder that progress is happeningone roll of paper at a time.
That’s the heart of Progress Report Numero Uno: not perfection, but momentum. Testing a new look with paper is a fun, flexible way to move your home toward the style you want, while keeping room for changes, experiments, and the next great idea.