Table of Contents >> Show >> Hide
- Start With the Two Questions That Decide Everything
- Know Your Wall: Studs, Drywall, and the Big Misunderstanding
- Pick Your Support System (Then Space It Correctly)
- The Spacing Rules of Thumb (And the Smart Exceptions)
- Stop Shelf Sag Before It Starts (Because Gravity Is Patient)
- Fasteners and Anchors: Choose the Right Muscle for the Job
- Step-by-Step: Layout Shelves Like a Person Who Never Wants to Re-Do This
- Real-World Examples (So This Isn’t Just Theory With Nice Hair)
- Common Problems and Fixes (Because Shelves Love Drama)
- Conclusion: The Shelf Spacing Cheat Sheet You’ll Actually Use
- Bonus: of Real-World Shelf Spacing Experiences (So You Can Skip the Pain)
Shelves are supposed to hold your stuffquietly, confidently, and without slowly turning into a sad banana.
If your shelf is sagging, wobbling, or (worst-case) threatening to launch your favorite mug into a dramatic slow-motion dive,
the fix usually isn’t “stronger vibes.” It’s spacing: the right distance between supports, the right fasteners for your wall,
and a shelf that’s built for the job.
This guide walks you through how to properly space shelf brackets, standards, and wall supports so your shelves stay level,
carry real weight, and look clean while doing it. We’ll cover stud spacing, bracket placement, sag prevention, anchor choices,
and real examplesfrom book shelves to floating shelves to garage storage. Let’s make your shelves boring (in the best way).
Start With the Two Questions That Decide Everything
Before you measure anything, answer these:
- What will this shelf hold? (Light décor? Books? Dishes? Tools? A small boulder collection?)
- What is the wall made of? (Drywall over wood studs? Drywall over metal studs? Plaster? Masonry?)
Shelf spacing isn’t one-size-fits-all. A 36-inch shelf holding two picture frames can get away with a lot.
A 36-inch shelf holding cast-iron pans needs the support plan of a tiny bridge.
Quick “Real Life” Weight Estimation (No Spreadsheet Required)
You don’t need perfect mathjust a realistic guess. Try these common loads:
- Books: A packed foot of books can weigh roughly 20–35 pounds (textbooks and hardcovers are the gym bros of the bookshelf).
- Dishes: Stacks of plates and bowls add up fastespecially if you love stoneware that could survive re-entry.
- Pantry goods: Cans are deceptively heavy and love to cluster in the middle.
- Garage storage: Tools + hardware bins + “I’ll need this someday” items = heavy, uneven loads.
When in doubt, assume you’ll load it heavier later. Shelves have a strange habit of becoming storage magnets.
Know Your Wall: Studs, Drywall, and the Big Misunderstanding
Drywall is not structural. It’s basically a neat, paintable wrapper around the framing that is structural.
If you can hit studs, do itespecially for shelves that hold anything heavier than a few lightweight décor items.
Typical Stud Spacing (Why Your Tape Measure Keeps Seeing the Same Numbers)
In many U.S. homes, wall studs are typically spaced 16 inches on center, and sometimes 24 inches on center.
That spacing matters because your best wall supports usually land in studs.
How to Find Studs Without Turning Your Wall Into Swiss Cheese
- Stud finder: Fastest option. Scan slowly and mark edges, then mark the center.
- Outlet/switch clue: Electrical boxes are often mounted to one side of a studcarefully verify before drilling.
- Magnet trick: A strong magnet can locate drywall screws/nails where the drywall is fastened to studs.
- Tap test + flashlight: Knocking and raking light can sometimes reveal fastener dimples.
Safety note: Walls can hide wiring and plumbing. If something feels “different” when drilling, stop and reassess.
Pick Your Support System (Then Space It Correctly)
1) Traditional Brackets (Visible Supports)
Brackets are the classic choice: easy to install, easy to adjust, and available in everything from minimalist steel
to ornate iron that screams “I own at least one antique globe.” The spacing goal is simple: reduce the span that can sag,
and make sure the end overhang doesn’t act like a lever.
2) Standards and Brackets (Vertical Rails)
This system uses vertical standards (rails) screwed into the wall, then brackets that hook into the standards.
It’s great for closets, offices, pantries, and anywhere you want adjustable height.
The key is spacing the standards properlyusually aligning them with studs for strength.
3) Cleats and Ledger Boards (Hidden Strength With Simple Parts)
If your studs don’t fall where you want supports, a ledger board can help:
screw a sturdy board into multiple studs, then attach brackets or shelf supports to that board.
It’s not “floating,” but it is extremely strongand strength is always in style.
4) Floating Shelves (Invisible Supports, Visible Risk If Done Wrong)
Floating shelves look amazinguntil they tilt like a sinking ship.
Most floating systems rely on a hidden bracket that must be anchored securely (ideally into studs or solid blocking).
Floating shelves also amplify leverage: the deeper the shelf, the more force it puts on the wall attachment.
The Spacing Rules of Thumb (And the Smart Exceptions)
Here’s the part you came for: practical spacing that works in real homes.
Treat these like cooking guidelines: you can improvise, but don’t ignore physics.
Bracket Placement Basics
- Put supports near both ends of the shelf, and keep end overhang modest (a common target is roughly 6–9 inches max).
- Add supports as the load increases: books, dishes, and tools deserve more brackets than candles and tiny plants.
- Shorter span = less sag. When you reduce the distance between supports, you dramatically reduce bending.
Common Spacing Targets (Practical, Not Precious)
Use this as a starting point:
| Use Case | Support Spacing Goal | Notes |
|---|---|---|
| Light décor (frames, small plants) | 24–36 inches between supports | More spacing can work if the shelf is thick and stiff. |
| Books, pantry goods | 16–24 inches between supports | Heavier + denser loads sag faster than you expect. |
| Dishes, appliances, garage storage | Support at every stud when possible | Use stout brackets and strong fasteners; avoid “drywall-only” installs for heavy loads. |
| Standards/rails system | Mount standards into studs (often 16 inches apart) | Add a center standard for heavy loads and long spans. |
| Floating shelves | Hit studs or add blocking/ledger support | Deep shelves increase leveragestrong mounting matters more than perfect symmetry. |
When You Should Tighten Spacing (Even If It’s Annoying)
- Long shelves: A 72-inch shelf with only two brackets is basically asking for a center dip.
- Thin shelves: Thin boards bend more; reduce span or increase thickness.
- Less-stiff materials: Particleboard and low-density MDF sag faster than quality plywood or solid lumber.
- Uneven loading: If heavy items cluster in the middle, the middle needs support.
Stop Shelf Sag Before It Starts (Because Gravity Is Patient)
Shelf sag is just beam deflection with better PR. You can fight it three ways:
increase shelf stiffness, reduce span, or reduce load.
Most people choose the first two because “reduce load” is emotionally difficult.
A Simple Sag Target That Helps You Design
Many woodworkers aim for a shelf that sags no more than about 0.02 inches per foot (initially),
because that tends to look acceptableand sag can increase over time under constant load.
You can also use online “sag calculators” to estimate deflection for different materials and spans.
Material Choices That Affect Span
- Solid wood: Strong and attractive, but can still sag if thin or long. Choose thicker boards for longer spans.
- Plywood: Good stiffness for the price; quality matters. Thicker plywood (and proper edging) improves performance.
- MDF/particleboard: Flat and smooth, but prone to sag unless thick and well-supported.
Stiffness Hacks That Look Like Craftsmanship (Not Panic)
- Add a front edge (nosing): A thicker strip along the front edge can increase stiffness dramatically.
- Go thicker: Even a small thickness increase can noticeably reduce sag.
- Add a center bracket: The simplest anti-sag upgrade for long shelves.
- Use a cleat: A continuous cleat along the back edge adds support across the entire length.
Fasteners and Anchors: Choose the Right Muscle for the Job
The bracket spacing can be perfect and the shelf can be thick, but if the fasteners are wrong, the system fails at the wall.
Think of fasteners as the “handshake” between shelf and housemake it a confident one.
Best Case: Screws Into Studs
For heavy shelves, driving screws into studs is the gold standard. Use screws long enough to pass through bracket holes,
drywall, and bite securely into framing. Pilot holes help prevent splitting and make installation cleaner.
When You Can’t Hit Studs: Use the Right Anchor (Not a Hope and a Prayer)
If a shelf must go where studs don’t, choose anchors that match the load and wall type.
Heavy-duty toggle-style anchors can offer strong holding power in drywall, but ratings vary by product and conditions.
Also: a shelf creates leverageso treat anchor ratings as “best case,” not “guaranteed for your heaviest cast-iron collection.”
- Toggle-style anchors: Great for heavier loads in drywall when installed correctly.
- Molly bolts: Useful for medium loads; they expand behind the wall.
- Self-drilling anchors: Convenient for light to medium loads; not the best choice for high leverage shelves.
Pro tip: If you’re forced to use anchors for a shelf that will hold real weight, consider switching to a
ledger board so you can tie into multiple studs and spread the load.
Step-by-Step: Layout Shelves Like a Person Who Never Wants to Re-Do This
-
Mark shelf height and length.
Use painter’s tape or a pencil line. Step back and eyeball ityour eyes catch weird heights faster than your level does. -
Locate studs and mark centers.
Confirm by measuring typical spacing and verifying with a second method if needed. -
Decide support spacing.
Place supports near both ends, then add more based on load and span. For heavy shelves, aim for studs whenever possible. -
Pre-drill and mount brackets/standards.
Keep everything plumb and level. Tighten firmly, but don’t crush drywall. -
Install the shelf and secure it.
Many brackets allow you to screw up into the shelf from below so it doesn’t shift. -
Test gradually.
Add weight slowly and watch for movement. Better to learn early than after you’ve loaded every cookbook you own.
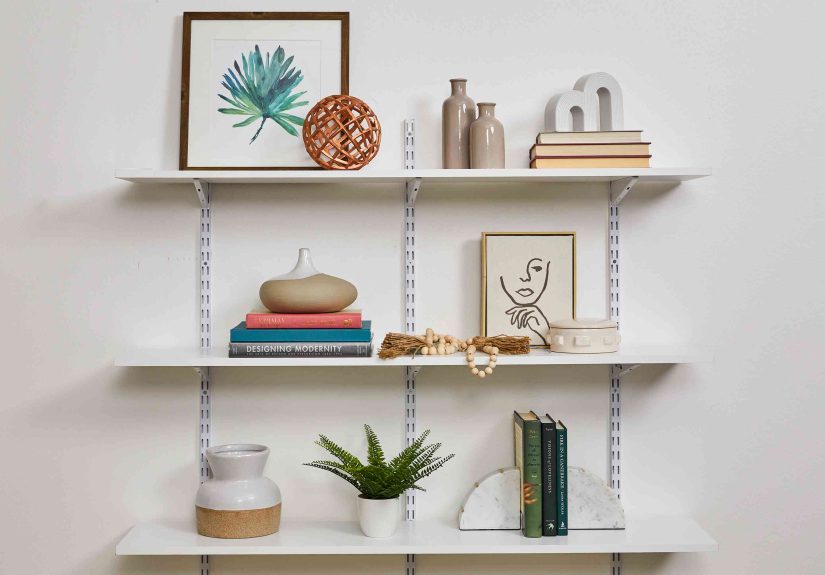
Real-World Examples (So This Isn’t Just Theory With Nice Hair)
Example 1: A 6-Foot Closet Shelf for Clothes and Storage Bins
You want a 72-inch shelf, 12 inches deep. The load is moderate to heavy (folded clothes, bins, maybe a suitcase).
Here’s a safe approach:
- Use a stiff shelf material (quality plywood or solid wood; avoid thin particleboard).
- Place brackets at the studs along the run (often every 16 inches if studs line up), or at least every 16–24 inches.
- Add a cleat along the back for continuous support and to reduce wobble.
- If the shelf is thin, add a front nosing strip to fight sag.
Example 2: A 36-Inch Floating Shelf in the Kitchen
Floating shelves look cleanbut kitchens add weight (plates, bowls, jars) and humidity.
For a 36-inch floating shelf:
- Use a floating bracket system that can be mounted into studs.
- If studs don’t land where you need the bracket, add blocking (best during remodel) or use a ledger strategy.
- Keep the shelf depth reasonable if it’ll hold heavy items. Deeper shelves increase leverage.
- Store heavier items closer to the wall line, not out at the front edge.
Example 3: A Garage Shelf for Tools and Hardware Bins
Garage shelves should be built like they’re holding secrets. For heavy storage:
- Mount supports into studs (or masonry with appropriate anchors).
- Use heavy-duty brackets and consider a continuous ledger board.
- Reduce span aggressivelysupports at every stud is common here.
- Don’t rely on drywall anchors for high loads in a garage environment.
Common Problems and Fixes (Because Shelves Love Drama)
Problem: Studs Don’t Line Up With Your Dream Shelf Location
- Solution A: Use a ledger board anchored into multiple studs, then mount brackets wherever you want.
- Solution B: Switch to a standards/rail system aligned with studs and adjust shelf placement with brackets.
- Solution C: Move the shelf slightly (yes, sometimes the wall wins).
Problem: Shelf Is Already Sagging
- Add a center bracket or additional supports.
- Rebuild with thicker material or add a stiff front nosing strip.
- Redistribute heavy items closer to the wall or across the length.
Problem: Shelf Feels Wobbly Even If It’s Level
- Make sure brackets are tight and seated correctly.
- Add a back cleat or side supports (especially in closets or alcoves).
- Confirm fasteners are in studs (or upgrade anchors if they’re not).
Conclusion: The Shelf Spacing Cheat Sheet You’ll Actually Use
Properly spacing your shelves and wall supports is the difference between “clean, confident storage” and
“why is my shelf slowly bowing like it’s apologizing?” Here’s the simple takeaway:
- Hit studs whenever possibleespecially for books, dishes, pantry goods, and anything heavy.
- Shorten the span to reduce sag: add brackets, standards, or a center support as loads rise.
- Keep end overhang small so the shelf doesn’t act like a lever.
- Choose stiff materials (or reinforce them) for longer shelves.
- Use anchors wisely, and remember that shelves create leverage that can defeat “best-case” ratings.
Do it once, do it right, and your shelves will quietly hold your life togetherliterally. And emotionally.
Mostly literally.
Bonus: of Real-World Shelf Spacing Experiences (So You Can Skip the Pain)
If you hang enough shelves (or just watch enough people hang shelves), you start seeing the same patterns.
The first is optimism: “Two brackets should be fine.” The second is gravity: “That was adorable.”
Here are some experience-based lessons pulled from common installsclosets, kitchens, living rooms, and the occasional
“why is there a shelf there?” moment.
Lesson 1: The center always tells the truth. People often mount a shelf with great-looking end brackets and assume
the job is done. Then they load the shelf, step back, and notice the middle drooping like it just heard bad news.
That’s because the middle of the span is where deflection shows up first. If your shelf is longer than a couple of feet and
you’re storing anything dense (books, canned goods, stacks of plates), a center support is not “extra”it’s the difference
between a crisp line and a slow curve.
Lesson 2: Drywall anchors aren’t villainsmisuse is. Heavy-duty anchors can work well in drywall when installed correctly,
but shelves create leverage, which means the wall fasteners aren’t just holding weight; they’re resisting a twisting force.
A floating shelf loaded with dishes can turn “plenty strong” anchors into “why is this loosening?” over time. The smarter
move is either hit studs or use a strategy that spreads load (like a ledger board), especially for deep shelves.
Lesson 3: The prettiest bracket spacing isn’t always the safest. Symmetry is nice, but shelves don’t care about your design mood board.
If studs are off-center, the strongest install might put brackets where the studs are, even if the spacing looks slightly uneven.
Many people compromise by adding an extra bracket so the shelf is both strong and visually balanced. Think of it as
“design supported by physics,” which is the best kind of design.
Lesson 4: Overhang is sneaky. A shelf that sticks far past the bracket edge is basically a lever.
It may look fine empty, but once weight lands near the front edge, the wall attachment takes a bigger hit than expected.
In real homes, people don’t always place items politely against the wall. They set them near the front because it’s easier to grab.
Keeping end overhang modestand choosing brackets sized for the shelf depthprevents that slow, inevitable tilt.
Lesson 5: Most “shelf failures” are really planning failures. The materials were too thin, the span was too long,
the supports weren’t in studs, or the load was underestimated. The best installs start with honest assumptions:
“Yes, I will probably put too many books here,” and “Yes, my family will ignore my ‘lightweight items only’ suggestion.”
Design for the shelf’s future personality, not its current empty promise.
If you build with those lessons in mindshort spans, strong mounting, reasonable overhang, and materials that match the load
your shelves won’t just look good on day one. They’ll still look good after months of real-life use, which is the only timeline that counts.