Table of Contents >> Show >> Hide
- Why Glass Insulators Make Amazing Pendant Lights
- A Quick History of Glass Insulators (So You Sound Extra Smart)
- Planning Your Glass Insulator Pendant Light
- Tools and Materials You’ll Need
- Step-by-Step: How to Turn a Glass Insulator Into a Pendant Light
- Essential Safety Tips for Your DIY Pendant
- Styling Ideas for Glass Insulator Pendant Lights
- Troubleshooting Common Problems
- Real-Life Experiences: What DIYers Learn From Recycling Glass Insulators
- Wrapping It Up
Once upon a time, those chunky little glass insulators perched on telephone poles were busy keeping telegraph and power lines safely in place. Today, they’re more likely sitting in a thrift store bin or tucked in a box in your garage, quietly wondering if their glory days are over. Good news: they’re absolutely not. Turn them into DIY pendant lights and they’ll happily shine over your kitchen island, entryway, or crafting corner like the vintage superstars they are.
This guide walks you step by step through recycling glass insulators into pendant lights in true Remodelaholic spirit: budget-friendly, design-focused, and totally DIY-able. We’ll cover a bit of history, safety basics, what supplies you actually need, how to assemble everything, and some real-life lessons learned so you don’t have to repeat anyone else’s mistakes with glass shards or sad, off-center fixtures.
Why Glass Insulators Make Amazing Pendant Lights
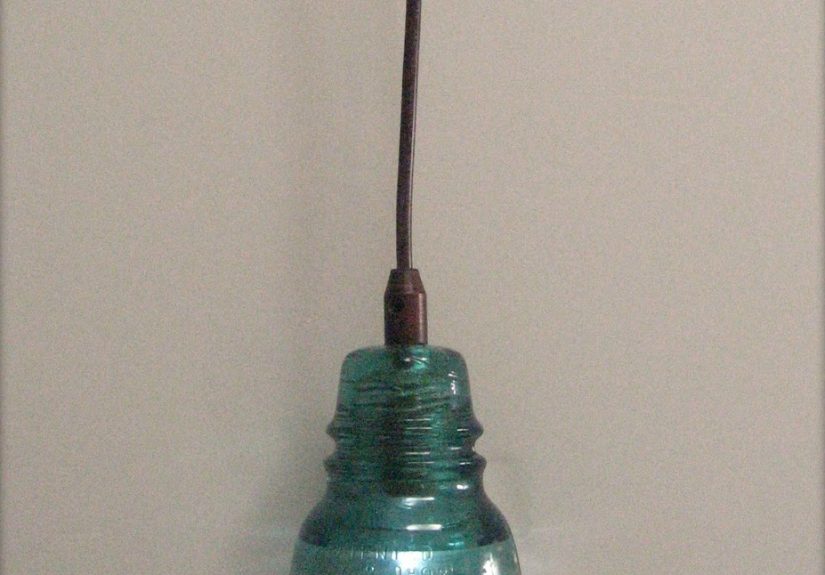
Glass insulators hit the sweet spot between industrial and charming. Their thick glass, embossed lettering, and subtle color variations (from clear to aqua to deep blue and even amber) make them perfect for one-of-a-kind lighting.
- They’re naturally durable. These were designed to live outside on poles through rain, snow, and blazing sun. Indoors, they’re practically indestructible.
- They diffuse light beautifully. The thick glass creates a warm, glowy haloespecially gorgeous over a kitchen island or bar.
- They’re eco-friendly. Every insulator you turn into a pendant is one less object collecting dust or ending up in a landfill.
- They tell a story. Many insulators are stamped with company names, model numbers, and place of origin. They’re conversation starters hanging right over your table.
In short, glass insulators check every Remodelaholic box: vintage, upcycled, budget-conscious, and visually interesting.
A Quick History of Glass Insulators (So You Sound Extra Smart)
Glass insulators first became widely used in the mid-1800s when telegraph and later telephone and power lines spread across the United States. They sat on top of wooden or metal pins and kept the live wires from touching the poles, especially when everything was wet from rain or snow. The thick glass provided a non-conductive buffer, preventing signal loss and dangerous shorts.
As technology shifted to different materials and underground wiring, glass insulators fell out of use, but collectors and DIYers fell in love with them. Today, you’ll find them at flea markets, antique shops, online marketplaces, and occasionally still clinging to old decommissioned poles like tiny glass fossils of the electrical age.
Planning Your Glass Insulator Pendant Light
Before you start drilling into glass or playing with wiring, it helps to plan the look and function of your light. Ask yourself a few questions:
Where Will the Pendant Hang?
- Over a kitchen island: Consider a row of two or three insulator pendants, spaced evenly.
- In an entryway: A single insulator pendant makes a charming focal point.
- Over a sink or desk: One or two pendants add task lighting and character.
The location will influence how long the cord needs to be, how bright your bulb should be, and whether you’ll hardwire the fixture into a ceiling box or use a plug-in swag setup.
What Style Are You Going For?
- Farmhouse or cottage: Clear or light aqua insulators with a simple black cloth-covered cord look timeless.
- Industrial: Pair darker glass with metal hardware in black or oil-rubbed bronze.
- Eclectic or boho: Mix different colors and shapes of insulators at varying heights.
Once you have a vision, it’s much easier to choose the right pendant kit, bulb, and hardware.
Tools and Materials You’ll Need
Here’s a general supplies list inspired by popular Remodelaholic-style tutorials and other DIY insulator projects:
- Glass insulator(s), cleaned and dry
- Pendant light kit (or conversion kit for a recessed “can” light)
- Candelabra (E12) or small-base socket that fits inside the insulator
- Low-wattage LED bulb (often 25W equivalent or less, depending on space and heat)
- Drill with a glass/tile drill bit (usually 1/2″ or sized to the hardware)
- Bucket or container for water (to cool the glass while drilling)
- Masking tape or putty to build a small dam for water around the drill area
- Safety glasses and heavy-duty gloves
- Ceiling canopy, mounting strap, and screws (if hardwiring)
- Voltage tester (non-negotiable for electrical work)
- Wire strippers, screwdriver, and wire nuts (if your kit doesn’t include them)
If you don’t want to piece everything together, there are ready-made glass insulator pendant kits that include the correct socket size, cord grip, and hardware. They cost more than a plain pendant kit but save some guesswork and time.
Step-by-Step: How to Turn a Glass Insulator Into a Pendant Light
This basic method mirrors what many successful DIYers use when following Remodelaholic-style glass insulator tutorials, with a few extra safety notes added.
Step 1: Clean and Inspect Your Insulator
Wash the insulator thoroughly in warm soapy water. Use a bottle brush to reach inside and remove dust or spider webs from its previous life in someone’s barn. Check carefully for chips, cracks, or hairline fractures. A cracked insulator is more likely to break when drilled or heated by a bulb, so set damaged ones aside for non-electrical projects.
Step 2: Mark the Opening for the Fixture
Most glass insulators have a closed, rounded top and an open bottom. You’ll be drilling a hole through the top to pass the threaded rod or socket hardware. Measure and mark the center of the top with a marker. Being slightly off-center won’t ruin your project, but it may make the light hang a bit crooked, which is less charming than you’d hope.
Step 3: Prepare to Drill the Glass
Drilling glass sounds terrifying, but with the right bit and technique, it’s very doable:
- Place the insulator upside down in a container.
- Build a small dam of putty, clay, or rolled-up tape around the drill mark.
- Fill the little “pool” with water to keep the bit and glass cool.
- Wear safety glasses and, ideally, gloves.
Start the drill at a low speed and hold it at a slight angle to get the bit started, then slowly straighten it as the bit bites into the glass. Let the drill do the workpressing too hard is a fast track to cracks.
Step 4: Finish the Hole and Smooth Edges
Once the bit breaks through, ease off the pressure and stop immediately. Remove the insulator from the water, dry it, and check the edges of the hole. If they’re sharp, smooth them gently with a diamond file or fine sandpaper designed for glass. You want the cord or threaded tube to pass through without cutting into insulation.
Step 5: Attach the Socket and Hardware
Follow the instructions for your pendant kit or glass insulator conversion kit. Generally, you will:
- Feed the cord through the threaded tube or cord grip.
- Pull the cord through the hole in the insulator from the inside out, so the socket sits inside the insulator body.
- Secure the insulator in place with nuts or a decorative cap above the top of the glass.
- Wire the socket according to the manufacturer’s instructions.
Most kits have clearly labeled terminals and a diagram. Take your time and double-check your connections before you close everything up.
Step 6: Install the Pendant Light
If you’re hardwiring to an existing ceiling box:
- Turn off power at the breaker panel (not just at the switch).
- Confirm the power is off using a voltage tester.
- Attach the mounting strap and canopy according to the kit directions.
- Connect the house wires to the pendant cord: black to hot, white to neutral, green or bare copper to ground.
- Tuck wires neatly into the box, secure the canopy, and adjust the cord length so the insulator hangs where you want it.
For renters or anyone a bit intimidated by wiring, consider a plug-in pendant kit you can hang from a swag hook and plug into a wall outletno ceiling box required.
Essential Safety Tips for Your DIY Pendant
Electrical work isn’t the place to guess. A few non-negotiable guidelines:
- Always shut off power at the breaker before touching wires, and confirm they’re dead with a voltage tester.
- Use a grounded fixture. Your pendant kit should include a ground wire that connects to the metal box or grounding screw.
- Stay within wattage limits. Glass insulator pendant designs typically call for low-watt LED bulbs that create minimal heat but plenty of light.
- Don’t hide cords where they can overheat or get damaged, like inside walls or under rugs, unless the setup is rated for that use.
- When in doubt, call a licensed electrician to help with final connections, especially in older homes or complicated installations.
The DIY part is fun; the safe part is mandatory.
Styling Ideas for Glass Insulator Pendant Lights
Once you’ve built a single fixture, you’ll immediately start eyeballing more spots in your home where insulator lights could work. A few design ideas:
- Cluster over a dining table: Hang three to five pendants at slightly different heights for a casual, collected feel.
- Hallway lineup: Use multiple matching insulators spaced down a hallway for a vintage “train station” vibe.
- Bedside pendants: Skip table lamps and hang small insulator pendants from the ceiling on each side of the bed.
- Outdoor covered porch: In a protected area and with outdoor-rated components, an insulator pendant can echo its outdoor heritage.
Because each insulator is unique, no two lights will look exactly alike. That’s half the charm.
Troubleshooting Common Problems
The Glass Cracked While Drilling
This usually happens when pressure is too high, the drill speed is too fast, or the glass already had a hidden flaw. Try again with:
- A fresh glass/tile bit
- More water for cooling
- Slower speed and lighter pressure
Save cracked insulators for non-electrical projects, like planters or bookends.
The Bulb Gets Too Hot
Switch to a lower-wattage LED and check the bulb’s packaging for enclosed-fixture suitability. Avoid incandescent bulbs; they produce far more heat for the same light output.
The Fixture Hangs Crooked
Check that the hole is centered and that your mounting strap and canopy are level. Sometimes simply adjusting the cord twist or loosening and re-tightening the canopy screws fixes the lean.
Real-Life Experiences: What DIYers Learn From Recycling Glass Insulators
If you talk to people who’ve actually built glass insulator pendant lights, a few common themes come up again and again. Think of this as the “group wisdom” sectionless technical, more “what I wish someone had told me before I started.”
1. Collecting the Right Insulators Is Half the Fun
Many DIYers start with whatever insulator they can find, then quickly realize there’s a whole universe of styles and colors. Some insulators are squat and chunky; others are taller and more bell-shaped. Clear and light aqua are the most common, but once you spot a deeper blue or rare green piece, it’s easy to become a casual collector.
The experience most people describe is a mix of treasure hunt and design experiment. You’ll pick up an insulator at a flea market, hold it up to the light, and instantly imagine how it would look over your kitchen sink. Choosing the right insulators becomes part of the design process, not just a supply run.
2. The First Hole Is the Scariest
Almost everyone is nervous about drilling into glass for the first time. The insulator feels solid but irreplaceable, especially if it’s a unique color or has cool embossing. Once you take a deep breath, set up your water dam, and slowly let the bit do its thing, the fear starts to fade. By the second or third insulator, you’re still respectful of the glass, but you’re not afraid of it.
Many beginners report that they wish they had practiced on a less-loved insulator or a piece of scrap glass first. That short practice session builds confidence and reduces the chances of cracking your favorite piece.
3. Light Color Changes Everything
One of the fun surprises in these projects is how much the bulb color temperature affects the final look. A warm white LED (around 2700K) makes clear glass feel cozy and nostalgic, while a neutral white (around 3000–3500K) can make aqua glass look brighter and more modern.
DIYers often end up swapping bulbs a few times before landing on the perfect one. It’s a simple tweak that can take your insulator pendant from “interesting” to “absolutely perfect for this space.”
4. Cord Style Is Not an Afterthought
At first, it’s easy to obsess over the glass and ignore the cord. Then, when the light is finally hung, your eye keeps going to the basic plastic cord running down from the ceiling. Upgrading to a cloth-covered cord in black, white, or even a fun contrasting color is one of the most commonly mentioned improvements people wish they’d done from the start.
The cord becomes part of the design, framing the insulator rather than distracting from it. It’s a small upgrade that makes the project look more intentional and less “I grabbed whatever kit was on sale.”
5. Professional Help Is Not a Failure
A lot of successful glass insulator pendant lights are actually built as a team effort: the DIYer handles the creative workcleaning, drilling, assembling the insulator and pendant kitthen calls in an electrician for the final connection to the ceiling box. This hybrid approach keeps electrical work safe and up to code while still allowing you to proudly say, “Yes, I made that.”
People who go this route often mention that the electrician’s visit is faster (and cheaper) when the fixture itself is already assembled and tested. You’re paying for expertise in wiring, not for someone to unpack a box and read the instructions you already followed.
6. The Finished Light Feels Surprisingly Personal
Maybe it’s the history baked into that thick glass, or the fact that you literally shaped the light with your own hands, but many DIYers say their insulator lights feel more personal than store-bought fixtures. Every time you flip the switch, you’re reminded of the hunt for the insulator, the moment you drilled the first hole without cracking it, and the first time you saw it glow over your countertop.
That sense of story and satisfaction is exactly why upcycling projects like this fit so well with the Remodelaholic mindset: they combine design, sustainability, and creativity in a way that mass-produced fixtures simply can’t.
Wrapping It Up
Recycling glass insulators into pendant lights is one of those DIY projects that looks advanced but is absolutely doable with patience, basic tools, and a healthy respect for safety. You’re turning old electrical hardware into fresh, functional arthonoring the past while lighting up your present-day home.
Whether you hang a single insulator over a cozy reading nook or create a row of glowing jewels over your kitchen island, you’ll end up with a custom light fixture that feels uniquely yours. And the next time someone asks, “Where did you find that light?” you get to smile and say, “Oh, that? I made it.”