Table of Contents >> Show >> Hide
- The Viral Hack: Cut an “X” in the Dough Ball Before Rolling
- The Real Secret: A Perfect Rectangle Is a System, Not a Miracle
- The Technique That Actually Works: Roll, Rest, Square, Repeat
- Real-World Examples: Where Rectangle Skills Pay Off
- Troubleshooting: Fix the 5 Things That Ruin Rectangles
- Speed Tips That Make You Look Like You’ve Done This Forever
- Conclusion: Your Dough Isn’t BadIt Just Needs Directions
- Extra: of Real Kitchen “Experience” With This Rectangle Hack
If you’ve ever tried to roll dough into a neat rectangle, you already know how it goes:
you start with good intentions… and end up with something that looks like a windy-country-map version of a rectangle.
Meanwhile, your recipe is casually asking for a “12×18-inch rectangle” like that’s a normal thing humans do on the first try.
The good news: there’s a simple hack (plus a few pro-level “squaring” tricks) that can turn your dough from
“oval-ish situation” into “clean corners and straight edges.” And nothis doesn’t require a woodworking workshop,
a geometry degree, or a prayer circle around your rolling pin.
The Viral Hack: Cut an “X” in the Dough Ball Before Rolling
The core idea is delightfully low-tech: before you roll your dough out, take a sharp knife or bench scraper and cut
a shallow “X” across the top of the dough ball. Then roll it out as usual.
That tiny change encourages the dough to spread outward in more “corner-friendly” directions instead of stubbornly
rounding itself into an oval.
Why the “X-Cut” Helps (Without Wrecking Your Dough)
Dough has a habit of expanding where it’s easiest. A smooth ball often rolls into a rounded shape because the tension is
evenly distributed. When you cut an “X,” you create four natural “flaps” that want to open outward as pressure is applied.
Think of it like giving the dough pre-planned exit rampsso it doesn’t pile up in the middle and curve at the edges.
If you’re worried the cut will “ruin the gluten,” don’t panic. For properly kneaded dough, a shallow score typically won’t
sabotage structureespecially when you’re rolling it out anyway. The key is keeping the cut modest: you’re guiding the dough,
not performing surgery.
How to Do the X-Cut Hack Step-by-Step
- Start with rested dough.
If your dough is cold from the fridge, let it sit until it’s pliable. Cold dough can fight you and spring back. - Shape it into a tight ball.
Tuck the edges underneath so the top is smooth and slightly taut. - Cut a shallow “X.”
Use a sharp knife, lame, or bench scraper. Aim for a cut that’s noticeable but not deeproughly 1/4 to 1/2 inch for many
soft yeast doughs. - Flatten first with your hands.
Press into a thick disc so your rolling pin doesn’t immediately “chase” the dough around the counter. - Roll from the center outward.
Roll up, then down, then left and right. Rotate the dough a quarter turn as needed. - Square it as you go.
(We’ll get into the squaring toolkit in a second.)
When This Hack Works Best
The X-cut method is especially handy for soft, elastic doughs that tend to roll into ovals:
cinnamon roll dough, beignet dough, sweet yeast dough, and some pizza dough variations. It’s a fast “shape-starter”
when you want a rectangle without wrestling the dough into submission.
When to Use a Different Method
For laminated doughs (rough puff, puff pastry, croissant-style rolling), your priority is often maintaining
straight edges and even thickness for consistent layers. You can still roll rectangles, but you’ll usually rely more
on measured rolling, trimming, and careful folds than a quick scoring hack.
The Real Secret: A Perfect Rectangle Is a System, Not a Miracle
The X-cut gets you started. The “perfect rectangle” finish comes from a few simple techniques bakers use all the time:
guide the shape early, keep thickness even, and stop fighting tight gluten.
Tool #1: A Bench Scraper (Your Dough’s Personal Trainer)
A bench scraper is the easiest way to push and straighten edges. After a few rolls, use the scraper like a ruler:
press it against a wobbly side to nudge the dough straighter, then roll again. It also helps lift sticky dough and keep
your counter cleanboth of which reduce tearing and accidental stretching.
Tool #2: A Pastry Mat With Measurements (The “Cheat Codes” Option)
If you want consistent rectangle dimensionslike “12×18 inches” or “10×12 inches”a measured rolling mat makes life easier.
Many mats have printed rectangles, circles, and rulers, so you can roll to the lines instead of guessing.
It’s not fancy; it’s just a calm, supportive grid that doesn’t judge you.
Tool #3: Parchment Paper as a DIY Rectangle Template
No mat? No problem. You can draw a rectangle on parchment paper (in pencil or marker), then flip it over so the ink side
is down. Roll the dough on top and aim for the outline. This works especially well for sticky doughs, cookie slabs,
and doughs you’ll transfer to a pan.
Tool #4: Rolling Pin Guides for Even Thickness
Perfect rectangles aren’t just about edgesthickness matters. Dough that’s thick in the center and thin on the ends
is harder to square and bakes unevenly. Rolling pins with thickness guides (or DIY guides like dowels or stacked rulers)
help you keep the dough level so it behaves more predictably.
The Technique That Actually Works: Roll, Rest, Square, Repeat
1) Start With a Rectangle Before You Roll (Yes, Really)
Here’s a small mindset shift: don’t start from a ball and hope for the best. Even with the X-cut hack,
you’ll get cleaner results if you hand-press the dough into a rough rectangle first.
Think “rounded rectangle,” like a phone iconthen roll it out larger.
2) Roll From the Center and Rotate on Purpose
Roll outward from the center, then rotate the dough a quarter turn. This helps keep the expansion balanced.
If you only roll in one direction, the dough often gets long, narrow, and weirdly moody at the corners.
3) Square the Edges Early (Don’t Wait Until the End)
The biggest mistake is trying to “fix” the rectangle when it’s already thin and sprawling.
Instead, every few passes, use your hands or a bench scraper to straighten one side, then roll again.
Small corrections add up to clean geometry.
4) If the Dough Shrinks Back, Stop and Let It Rest
When dough resists and snaps back, that’s tight gluten talking. The fix is boring but magical:
cover it and rest it. Even 10–15 minutes can relax the dough enough to roll smoothly.
This is especially common with pizza dough and enriched yeast doughs.
Real-World Examples: Where Rectangle Skills Pay Off
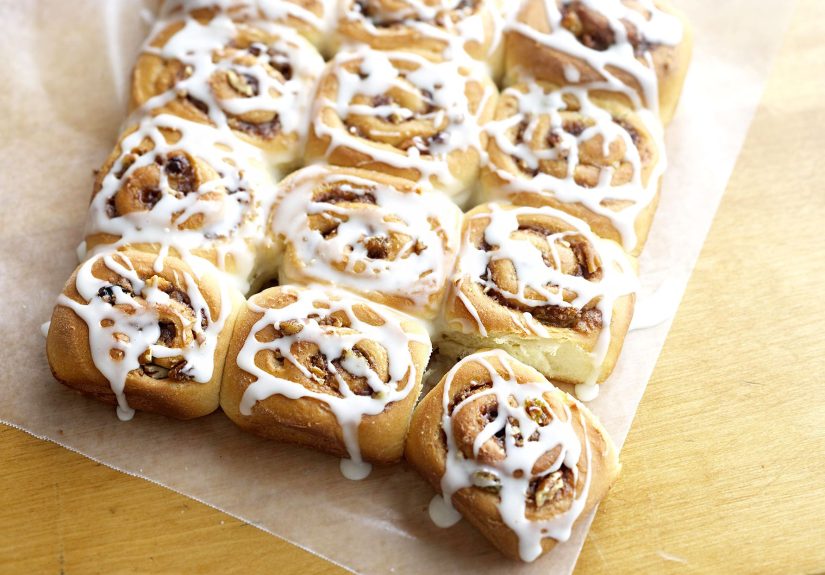
Cinnamon Rolls (The Classic Rectangle Pressure Test)
Cinnamon roll recipes often call for a specific rectangle so you get an even spiral and consistent roll count.
Common sizes include things like 12×18, 14×8, or larger slabs like 16×21 depending on batch size.
A measured pastry mat makes this nearly effortless, but the X-cut + bench scraper combo also works surprisingly well.
Pro tip: keep the long sides straighter than you think you need. When you roll the dough into a log, wavy edges turn into
uneven ends and a lopsided “why are these three rolls tiny?” situation.
Sheet-Pan Pizza (Rectangles That Actually Want to Be Rectangles)
Rectangular pizza is the most rectangle-friendly dough project on earthbecause you can press and stretch it into the pan.
If rolling feels annoying, pat the dough with your hands into the sheet pan shape, let it rest if it tightens up,
then continue pressing toward the corners.
Pie Dough for Lattice or Slab Pies
Rolling pie dough into a rectangle can be surprisingly practical when you’re cutting strips for lattice or doing a slab pie.
A rectangle gives you efficient strips with less waste than fighting for perfect circles.
The “rest and chill” principle matters here, toocut pieces too early and they can shrink as the dough relaxes.
Rough Puff and Laminated Doughs
Laminated dough methods often rely on repeated rolling and folding (“letter folds”) to build layers.
The rectangle isn’t just aestheticit’s structural. Straight sides help layers stack evenly.
If your dough turns into a blob, you can gently square it with a scraper, chill if butter is soft,
and continue with more controlled rolling.
Troubleshooting: Fix the 5 Things That Ruin Rectangles
Problem 1: The Dough Keeps Springing Back
- Cause: tight gluten (often from cold dough or recent kneading).
- Fix: rest it, covered, 10–20 minutes. Let cold dough warm slightly before rolling.
Problem 2: The Dough Tears at the Corners
- Cause: stretching too aggressively, or dough too dry/over-floured.
- Fix: use lighter flouring, lift and rotate more often, and press corners outward gently rather than yanking.
Problem 3: It Sticks to the Counter
- Cause: warm dough, high hydration, or not enough flour/barrier.
- Fix: flour lightly, use parchment or a silicone mat, and lift with a bench scraper as you roll.
Problem 4: Edges Are Thick, Center Is Thin (or Vice Versa)
- Cause: uneven pressure or rolling only from one direction.
- Fix: roll from the center outward, rotate often, and consider thickness guides.
Problem 5: The Rectangle Looks “Fine”… Until You Measure
- Cause: eyeballing is brave, but rulers are accurate.
- Fix: use a measured mat, ruler, or parchment template. Baking is artuntil it’s geometry.
Speed Tips That Make You Look Like You’ve Done This Forever
- Roll in short sessions. Three minutes of rolling, then a quick square-up, beats ten minutes of rolling while muttering at your dough.
- Use the “lift-and-turn” habit. After a few passes, lift the dough with a scraper, dust under it lightly, rotate, continue.
- Keep your rolling pin floured, not buried. Too much flour dries edges and makes them cracky; too little makes sticking worse.
- Chill when butter is involved. For enriched or laminated dough, if it starts feeling greasy or slack, chill briefly before continuing.
Conclusion: Your Dough Isn’t BadIt Just Needs Directions
Rolling dough into a perfect rectangle is one of those kitchen skills that looks effortless… right after you learn the trick.
The X-cut hack can jump-start the shape, while the bench scraper + rest-and-roll method turns “almost” into “actually perfect.”
And once you’ve nailed rectangles, you’ll notice everything gets easier: cinnamon rolls slice cleaner, sheet-pan dough fits better,
and your baking feels just a little more “I know what I’m doing” (even if you’re still wearing flour like glitter).
Extra: of Real Kitchen “Experience” With This Rectangle Hack
The first time someone tries to roll dough into a rectangle, it usually goes through five emotional stages:
confidence, confusion, bargaining (“if you become a rectangle, I’ll stop eating cookie dough straight from the bowl”),
mild irritation, and finally acceptance that the dough has its own personality. That’s why the X-cut hack feels so satisfying
it creates an immediate, visible change. Instead of the dough slowly rounding itself into an oval like it’s trying to join a
pizza commercial, the four scored sections start opening outward with the rolling pin’s pressure. It’s one of those moments
where you think, “Wait… why didn’t anyone tell me this sooner?”
In typical home-baking scenarios, the hack shines most when the dough is soft and elasticespecially enriched doughs that
love to puff and resist precise shaping. When you press the dough down into a disc first, you’ll often notice the cut lines
relax and widen naturally. Then, as you start rolling, the dough doesn’t just get thinnerit gets wider in a more organized way.
That’s the “aha” part: the dough isn’t magically perfect; it’s simply being guided so the expansion has a plan.
Another common experience: the rectangle may look great… right up until you measure. A lot of bakers discover their “12×18”
is more like “11×19 with vibes.” That’s not failure; it’s normal. The fix is almost always the same: stop rolling for a second
and square the edges while the dough is still thick enough to move easily. A bench scraper makes this feel controlled and clean,
like you’re gently nudging the dough into shape instead of stretching it into submission. After you straighten one side, you roll
again, and it tends to stay straighter the next time.
The most relatable moment comes when dough shrinks back. It can feel personallike the dough is refusing to cooperate out of spite.
But in real kitchens, this is usually just gluten being tight, especially if the dough is cold or you’ve been working it a lot.
The experience that surprises people most is how effective a short rest can be. Cover the dough, walk away, set up the filling,
wipe the counter, or just stare at your rolling pin dramatically. Come back in 10 minutes and the dough often stretches like it
changed its mind. This “rest break” is not wasted time; it’s the difference between fighting and shaping.
And finally: perfection is easier when you decide what “perfect” means for your recipe. For cinnamon rolls, straight long sides
matter more than razor-sharp corners, because they roll into a more even log. For sheet-pan pizza, getting dough into the corners
matters more than having a flawless outline on the counter. For laminated dough, neat edges matter because layers matter.
Once you match the rectangle standard to the project, the whole process feels less like a test and more like a tool
and that’s when the rectangle stops being the boss of you.