Table of Contents >> Show >> Hide
- What Are Shop-Made Edge-Gluing Clamps?
- Why Edge Glue-Ups Go Wrong (Even When Your Joinery Is Decent)
- Why the Family-Handyman-Style Clamp Works So Well
- Materials and Tools
- Build a Practical Shop-Made Edge-Gluing Clamp Setup
- How to Use Shop-Made Edge-Gluing Clamps (The No-Panic Workflow)
- Clamp Placement and Pressure: Simple Rules That Actually Work
- Troubleshooting: Fix the Usual Glue-Up Drama
- Shop-Made vs Store-Bought: When DIY Wins
- Quick FAQ
- Experience Notes (Extra ~): What It’s Like Using These in Real Life
If you’ve ever tried edge-gluing boards into a nice, wide panel, you already know the plot: you spread glue, you reach for clamps, and suddenly your boards turn into soap bars on an ice rink. They slide. They tilt. One edge pops up like it’s trying to wave at you. And just when you think you’ve won… you step back and realize your “flat tabletop” now has a gentle, artistic twist that absolutely no one asked for.
That’s why the shop-made edge-gluing clamp idea (popularized by the Family Handyman crowd) is so satisfying. It’s a simple jig-and-wedge system that adds a secret superpower to panel glue-ups: it helps apply pressure in a way that encourages boards to stay tight and level, not tight and chaotic.
This article walks you through what these clamps are, why they work, how to build your own version, and how to use them alongside proven glue-up techniques so your next panel comes out flatter, cleaner, and a lot less dramatic.
What Are Shop-Made Edge-Gluing Clamps?
Shop-made edge-gluing clamps are homemade clamping aids designed specifically for edge gluing boards into panels (think tabletops, cabinet panels, shelves, cutting boards, and more). Instead of relying only on clamp pressure from the sides, these jigs use wedges and wooden rails/cauls to control two problems at once:
- Side-to-side squeeze (closing the glue joint tightly)
- Up-and-down alignment (keeping board faces flush and reducing “steps” at the seams)
In other words: they’re like a bouncer for your glue-up. They don’t let boards wander, and they definitely don’t let one board climb on top of another. (This is woodworking, not a concert.)
Why Edge Glue-Ups Go Wrong (Even When Your Joinery Is Decent)
Wood glue is wonderfuluntil the first few minutes. Before it starts grabbing, wet glue behaves like a thick lubricant. That means when you apply clamp pressure too fast, boards can slide out of alignment. Add in slightly different grain tension, minor thickness variations, or clamps that aren’t perfectly straight, and you’ve got a recipe for cupping, bowing, and misaligned faces.
Also, it’s easy to assume “more clamp pressure = better joint,” but over-tightening can squeeze out too much glue and introduce distortion. Successful panel glue-ups aren’t about brute force; they’re about even pressure, good prep, and controlled alignment.
Why the Family-Handyman-Style Clamp Works So Well
The core idea is beautifully low-tech: wedges give you mechanical advantage and fine control. You can tap them tighter in small increments, which makes it easier to keep boards aligned while the joint closes.
Many shop-made edge-gluing clamp designs also include long wooden rails that act like cauls. Used correctly, cauls help keep boards flush across their thickness, which reduces cleanup time later. When your panel comes out flatter, you spend less time planing/sanding away uneven seamsand more time enjoying the part where your project actually looks like a project.
Materials and Tools
You can build a solid set using common shop supplies. Here’s a practical list that balances durability with “I’m not trying to finance this jig like a car loan.”
Materials
- Rails/cauls: straight hardwood or good construction lumber (1×3, 1×4, or similar)
- Base/support boards (optional): plywood or straight 2x material
- Wedges: scrap hardwood is ideal (maple/oak/poplar), but any straight-grained wood works
- Cleats/stops: short scrap blocks
- Fasteners: wood screws; optional bolts/wing nuts if you want adjustability
- Anti-stick: packing tape, painter’s tape, paste wax, or wax paper
- Optional grip: sandpaper strips for wedge faces
Tools
- Measuring tape, square, pencil
- Saw (miter saw, circular saw, or handsaw)
- Drill/driver (and bits)
- Clamps (yes, you still need a coupleironically)
- Mallet (wood or rubber)
- Sandpaper and/or block plane
Build a Practical Shop-Made Edge-Gluing Clamp Setup
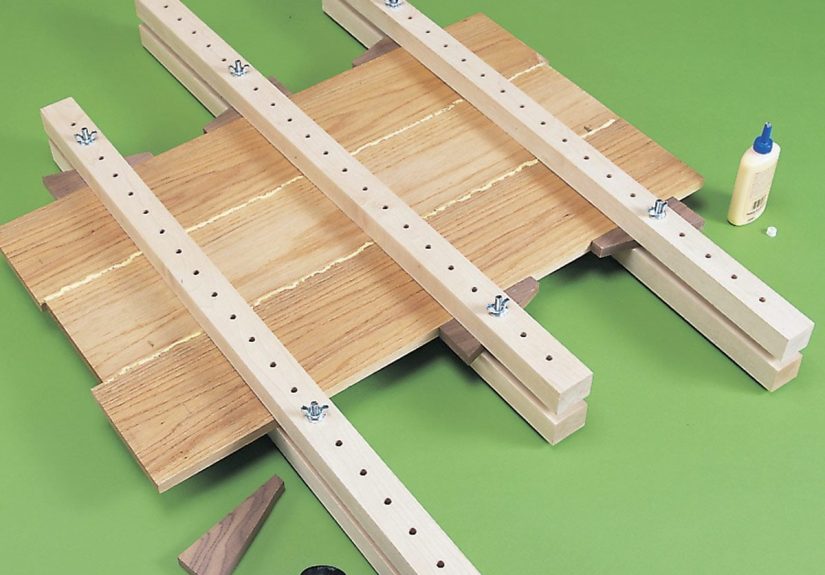
There are several legitimate ways to build shop-made edge-gluing clamps. Below is a reliable “Family Handyman spirit” version: rails + cleats + wedges. It’s adaptable, repeatable, and doesn’t require metal hardware unless you want it.
Step 1: Make (or pick) straight rails
Choose two rails that are straight. If you’re making a set for tabletop glue-ups, rails in the 36″–60″ range are handy. If you mostly make smaller panels (shelves, boxes, cutting boards), shorter rails are fine.
Tip: If your rails are twisted, they’ll “teach” that twist to your panel. If you’re not sure, lay them on a known-flat surface and check for rocking.
Step 2: Add cleats to create a “lane” for the panel
On a base board (plywood or straight 2x material), attach cleats so your panel sits between them with a little extra space for wedges. The goal is to create a controlled channel that keeps the work from wandering sideways during tightening.
- Make the lane slightly wider than your panel (so the wedges have room to work).
- Place cleats near the ends and (for longer panels) add a middle support/cleat position.
Step 3: Cut wedges that tighten smoothly
Cut at least four wedges per glue-up station (two per end is common). The wedge angle should be shallow enough that it doesn’t slip, but steep enough to tighten without you needing a medieval battering ram.
- A wedge with a gentle rise works well (think “gradual ramp,” not “ski jump”).
- Make pairs that slide nicely against each other.
Optional upgrade: Put sandpaper on one wedge face for grip, and seal the mating wedge face (polyurethane or tape) so the pair slides predictably.
Step 4: Add anti-stick protection
Where glue squeeze-out might touch your rails/cleats/wedges, apply packing tape, paste wax, or use wax paper. This keeps your jig from becoming a permanent “art installation” attached to your panel.
Step 5: Make it repeatable (optional)
If you do lots of panels, consider drilling a line of holes in the rails and using pegs/bolts to reposition stops. That way, you can adapt the jig to different widths without rebuilding it every time.
How to Use Shop-Made Edge-Gluing Clamps (The No-Panic Workflow)
1) Prep the boards like you mean it
Great clamping can’t rescue bad edges. Joint or plane your edges so they meet cleanly. Dry-fit the boards and confirm the seams close with hand pressure. If you’re fighting gaps, fix the edges firstdon’t try to “clamp harder” as a strategy.
Pro move: Mark your layout with a big triangle across the faces so you can reassemble quickly. Glue-ups go smoother when you’re not playing “wooden jigsaw puzzle” with wet glue.
2) Do a full dry run
Set the boards in your jig without glue. Position rails/cauls. Insert wedges and confirm everything tightens evenly. This also tells you if you need additional clamps/cauls before you’re on the clock.
3) Apply glue in a controlled way
Apply glue along the full edge, then spread it into a thin, consistent film. Many woodworkers get stronger joints when both mating edges have glue coverage (rather than a lonely bead on one side hoping for the best).
4) Assemble, then tighten in stages
This is where people either look like calm pros or like they’re defusing a bomb.
- Bring the boards together in the jig.
- Insert wedges lightly at first so everything is held in place.
- Tighten gradually, working from the middle outward for long panels.
- Check alignment and flatness as you go.
Bonus tip: If you also use bar/pipe clamps, alternating clamps above and below the panel helps reduce bowing. A straightedge check before the glue sets can save you from a sad surprise later.
5) Use cauls when the panel needs extra “stay flat” energy
If your project demands a very flat surface (tabletop, cabinet door panel), add cauls. A classic approach is to use paired cauls that “sandwich” the panel near the ends and (for longer panels) at the center. Cover caul faces with tape so they don’t stick.
6) Deal with squeeze-out smartly
Squeeze-out is normal. The goal is not “zero glue visible,” but “even seams and no mess baked into the grain.” Many woodworkers scrape glue after it turns rubbery, which can be easier than smearing it around with a wet ragespecially on tight-grained woods.
7) Clamp time and cure time (don’t rush the victory lap)
Most common wood glues allow clamp removal after the joint has set for a while, but the panel shouldn’t be stressed immediately. If you can, let the panel sit longer before heavy machining. If the panel is going to be planed hard or aggressively handled, patience pays off.
Clamp Placement and Pressure: Simple Rules That Actually Work
How many clamps do you need?
It depends on panel size, board stiffness, and how straight your parts are. As a general approach, you want enough pressure to close the seams fully and evenly, not enough to crush the project into submission.
A handy concept: clamping pressure spreads through the workpiece. If clamps are too far apart, the middle between them may not fully close. If clamps are too close, you’re just doing extra work for bragging rights.
Don’t over-tighten
Over-tightening can cause boards to bow, can starve a joint of glue, and can make alignment harder. Tighten to “firm and closed seam,” not “my forearms are now a woodworking accessory.”
Troubleshooting: Fix the Usual Glue-Up Drama
Problem: Boards slide while tightening
- Tighten in stages (light first, then firm).
- Use your shop-made wedges to “set” the panel before cranking clamps.
- Consider a tiny pinch of salt in the glue line for extra bite (use sparingly; it’s a trick, not a seasoning).
Problem: One board sits higher than the other (“step” at the seam)
- Add cauls to force flush alignment.
- Check that your rails/cauls are straight and not twisted.
- Tap the panel back into position gently before glue grabs.
Problem: Panel cups after tightening
- Alternate clamps above and below.
- Check clamp bars/pipes for straightness.
- Use a straightedge and correct early (small adjustments beat big regrets).
Problem: Glue won’t clean up nicely
- Let squeeze-out gel slightly, then scrape.
- Use tape/wax paper where you expect squeeze-out to land.
Shop-Made vs Store-Bought: When DIY Wins
Parallel clamps and panel clamp systems are excellentbut they’re not cheap. A shop-made edge-gluing clamp jig is a great option when:
- You glue up panels often and want consistent results
- You’re short on long clamps
- You want faster setup (tap wedges instead of spinning handles forever)
- You like jigs that can be repaired with scrap wood instead of customer service emails
And honestly? There’s also a satisfaction factor. Using a tool you made to solve a problem you’ve suffered through is one of woodworking’s purest joys. Right up there with hitting a perfect fitand finding a pencil you didn’t immediately lose.
Quick FAQ
Do I need biscuits, dowels, or splines for alignment?
Not always. Well-jointed edges and good clamping technique can produce excellent panels. Alignment aids can help with certain boards or wide panels, but they’re not mandatory for every glue-up.
Can this method work for cutting boards?
Yes. Cutting boards are essentially small panels. Shop-made edge-gluing clamps can keep strips aligned and help reduce post-glue-up flattening work.
What’s the biggest mistake beginners make?
Skipping the dry run and rushing clamp pressure. A calm setup beats frantic tightening every time.
Experience Notes (Extra ~): What It’s Like Using These in Real Life
The first time I used a shop-made edge-gluing clamp setup, I expected a miracle. What I got instead was something better: a glue-up that felt predictable. That might not sound thrilling, but in woodworking, “predictable” is basically a luxury vacation.
My old routine was classic: lay boards across pipe clamps, spread glue, panic as the boards surfed around, then tighten everything and hope for the best. Sometimes it worked. Sometimes I ended up planing off a ridge that could’ve qualified as a speed bump. The shop-made wedge-and-rail approach changed the pace. The dry fit alone was a game changer. Sliding boards into position and tapping wedges lightly showed me where pressure would land and how much “travel” I actually needed. It also exposed a few humbling truthslike the fact that one of my “straight” rails was, in fact, a proud member of the Twisted Lumber Society.
On the first glued panel, I tapped the wedges too aggressively. The panel closed up, surebut I also forced one board to climb slightly. The fix was simple: back off, re-seat, tighten in smaller stages. By the second attempt, the process felt more like tuning than wrestling. Tap, check, tap, check. And because wedges tighten quickly, I spent less time spinning clamp handles and more time watching for alignmentexactly where my attention should’ve been.
Another practical lesson: anti-stick protection is not optional. Glue squeeze-out will find the one unprotected spot like it has a personal mission. I started covering wedge faces and rails with packing tape, and I kept wax paper nearby for anything that looked suspiciously “glue-adjacent.” That small habit prevented the jig from becoming part of the project. (If you’ve ever tried to separate a panel from a glued-on caul, you know it’s a special kind of character-building exercise.)
Where these clamps really shined was medium panelsshelves, cabinet sides, small tabletopswhere I didn’t want to dedicate every long clamp I own. I could use two pipe clamps for the main squeeze and let the wedges/rails handle the “stay flush” job. The cleanup improved too. When seams were aligned better, there was less heavy sanding and less temptation to “fix it with a belt sander,” which is basically woodworking’s version of “I’ll just freestyle this surgery.”
The biggest takeaway is that shop-made edge-gluing clamps don’t replace good prep. If your edges don’t meet cleanly, no jig will magically erase gaps. But when your stock is reasonably true, this setup makes the whole glue-up feel calmer, faster, and more repeatable. And the moment you lift a panel out and it’s flat enough that your straightedge doesn’t laugh at you? That’s a great day in the shop.