Table of Contents >> Show >> Hide
- Before You Start: Safety (Because Your Lungs Deserve Nice Things)
- Tools and Supplies Checklist
- Pick the Right Rock (Hardness Matters More Than Vibes)
- Simple Ways to Polish Rocks with a Dremel: 12 Steps
- Step 1: Wash the rock and inspect it like a detective
- Step 2: Set up a stable work zone (wobble is the enemy)
- Step 3: Choose the right bit for shaping
- Step 4: Shape the rock (optional, but satisfying)
- Step 5: Start sanding with a “first smoothing” grit (usually 220)
- Step 6: Move to 400 grit and erase the 220 scratches
- Step 7: Step through 600 and 800 grit (this is where “smooth” becomes “nice”)
- Step 8: Pre-polish with 1200 to 2000 grit (don’t rush this part)
- Step 9: Clean everything like you’re avoiding glitter contamination
- Step 10: Switch to a felt wheel and polishing compound
- Step 11: Rinse, dry, and inspect under strong light
- Step 12: Final buff and optional sealing
- Troubleshooting: What Went Wrong (and How to Fix It)
- Two Realistic Example Plans (So You Don’t Have to Guess)
- Dust, Water, and Cleanup: The “Unsexy” Step That Makes You a Pro
- Experience Notes: What You’ll Learn After Your First Few Rocks (500+ Words)
- Conclusion
If you’ve ever picked up a rock that looked like it had “potential” (a.k.a. it was weirdly shaped and you felt emotionally attached for no logical reason),
you’re in the right place. Polishing rocks with a Dremel is basically giving your favorite stones a glow-upno rock tumbler required, no waiting weeks,
and no explaining to your family why the garage sounds like a tiny jet engine for a month.
This guide walks you through a simple, beginner-friendly, 12-step method to polish rocks with a Dremel (or any rotary tool with similar
speed control). We’ll cover the tools, grit progression, safety, and the little “lapidary secrets” that separate a glossy finish from a sad, scratched pebble.
Before You Start: Safety (Because Your Lungs Deserve Nice Things)
Rock dust isn’t just messyit can be dangerous. Many stones contain silica (quartz is a big one), and grinding can create fine dust you don’t want to breathe.
Wet methods and good ventilation help reduce dust exposure, and proper respiratory protection matters when dust can’t be controlled.
- Work outside or in a very well-ventilated area.
- Use water whenever possible (wet sanding and frequent rinsing).
- Wear eye protection (flying grit has zero respect for your corneas).
- Wear a proper mask/respirator suited for fine dust when needed, and avoid dry grinding indoors.
- Gloves optional, control not optional: If gloves reduce your grip, skip them and use a clamp instead.
- If you’re under 18, do this with a parent/guardian’s permission and close supervision.
Tools and Supplies Checklist
You don’t need a museum-grade lapidary shop. You need the right abrasives, a sane grit sequence, and the patience to not skip steps (yes, that last one is
the hardest accessory to find).
Rotary tool essentials
- Dremel/rotary tool with variable speed (lower speeds help control heat and reduce chipping on some stones).
- Diamond-coated grinding bits for hard stones (great for shaping and removing stubborn bumps).
- Sanding drums or flap wheels for initial smoothing.
- Felt polishing wheel (felt buffs are commonly used to bring surfaces to a shine).
Abrasives and polishing materials
- Wet/dry sandpaper (silicon carbide preferred) in a grit range such as: 220, 400, 600, 800, 1200, 2000 (and optional 3000+).
- Polishing compound (Dremel-style compound or lapidary compounds like aluminum oxide or cerium oxide, depending on stone type).
- Small bowl of water or spray bottle for wet sanding and frequent rinsing.
- Microfiber cloth for final buffing.
- Optional: a clamp/vice with padding, and a bright desk lamp for scratch-checking.
Pick the Right Rock (Hardness Matters More Than Vibes)
A Dremel can polish a lot of stones, but the best results happen when your abrasives match the rock. A quick rule: harder stones take longer but can shine
like glass; softer stones shape quickly but can undercut or scratch easily.
Quick Mohs hardness cheat sheet
The Mohs scale ranks scratch resistance from 1 (talc) to 10 (diamond). Common reference points:
calcite ~3, feldspar ~6, quartz ~7.
| Stone Type (Common) | Typical Hardness Feel | Dremel Strategy |
|---|---|---|
| Agate / Jasper / Chalcedony | Hard (often around quartz range) | Diamond bits for shaping; full grit progression; polish with oxide compound |
| Quartz crystal | Hard | Wet sand carefully; avoid heat; longer pre-polish helps clarity |
| Feldspar-rich rocks | Medium-hard | Go lighter on pressure; watch for grainy texture; don’t skip grits |
| Calcite / softer stones | Softer | Lower speed, lighter pressure; start at finer grit; gentle polishing |
Simple Ways to Polish Rocks with a Dremel: 12 Steps
The core idea is simple: shape → sand (coarse to fine) → pre-polish → polish. Every grit removes the scratches from the previous grit.
If you skip one, those deeper scratches don’t magically disappear. They just wait until the final step to embarrass you under bright lighting.
-
Step 1: Wash the rock and inspect it like a detective
Scrub off dirt and grit with water and a brush. Then inspect for cracks, crumbly zones, or layers that might flake. If a rock has major fractures,
it may chip during shaping. Decide what you’re aiming for: a smooth palm stone, a polished face, or a “leave it weird” natural shape with shiny highlights. -
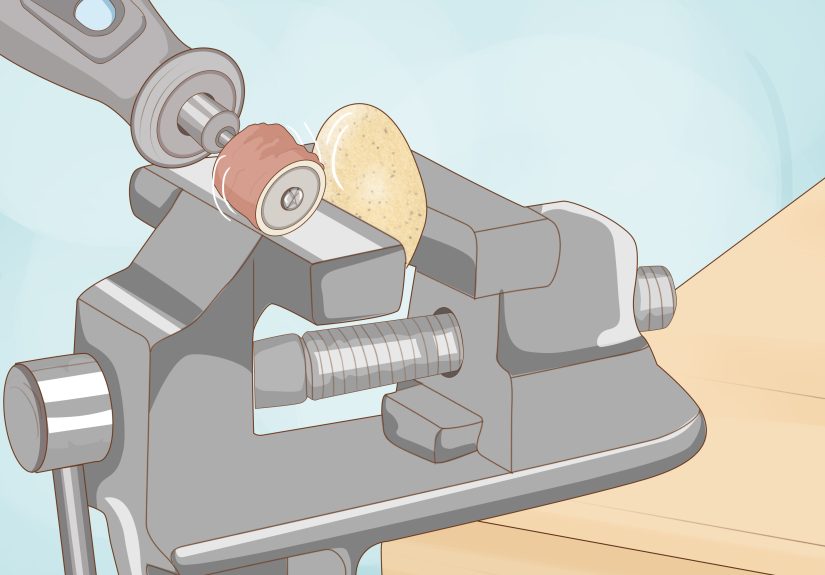
Step 2: Set up a stable work zone (wobble is the enemy)
Use a clamp/vice with padding (leather, rubber, or folded cloth) so you don’t crush the stone or scratch it. If hand-holding, keep your fingers behind
the bit’s travel direction and take frequent breaks. Good lighting mattersscratches hide in dim rooms like they pay rent. -
Step 3: Choose the right bit for shaping
For harder stones, diamond-coated bits are your best friend for controlled material removal. For softer stones, a gentler approach (less aggressive shaping,
more sanding) can reduce chipping. Use a speed that feels controllable, not heroic. -
Step 4: Shape the rock (optional, but satisfying)
If your rock is already the shape you want, you can skip heavy shaping and move to sanding. If not, use a diamond bit to knock down sharp edges and
create the overall form. Keep the stone wetdip it frequently or use a spray bottle. Water helps cool the surface and keeps dust down.Tip: Use light pressure and let the abrasive do the work. Pressing harder mostly creates heat and regret.
-
Step 5: Start sanding with a “first smoothing” grit (usually 220)
Wrap wet/dry sandpaper around a small rubber backing, sanding sponge, or even a folded strip you can control. Sand wet. Your goal at this stage is to
remove tool marks and create a uniformly matte surface. If you still see deep scratches or pits, you’re not done with this grit yet. -
Step 6: Move to 400 grit and erase the 220 scratches
Rinse the rock thoroughly before changing grits. Then sand with 400 until the 220 scratch pattern is gone. A helpful trick is to sand in a slightly different
direction than the previous grit. That way, it’s easier to see when the older scratches disappear. -
Step 7: Step through 600 and 800 grit (this is where “smooth” becomes “nice”)
Keep sanding wet, keep rinsing often, and keep checking under bright light. Around this stage, the rock should feel notably smoother and start reflecting
light softlylike a satin finish. -
Step 8: Pre-polish with 1200 to 2000 grit (don’t rush this part)
Pre-polish is the “secret sauce” for a mirror-like shine. Spend enough time here to remove all visible micro-scratches from the 800 grit stage.
If you want extra shine, add 3000+ grit (micro-mesh style) before using compound. -
Step 9: Clean everything like you’re avoiding glitter contamination
Grit contamination is the #1 reason a nearly-finished rock suddenly looks scratched again. Wash the stone, your hands, and swap to clean sanding surfaces.
If you have multiple rocks going, keep them separated by stage. (Yes, this sounds dramatic. Yes, it saves hours.) -
Step 10: Switch to a felt wheel and polishing compound
Attach a felt polishing wheel and apply a small amount of compound. Use a light touch and keep the wheel moving. Too much pressure can overheat the surface,
smear compound, or create a hazy look. A little compound goes a long waythis is polishing, not frosting a cupcake.Tip: If compound cakes up, lightly clean the felt and reapply a small amount. For many stones, lapidary oxides (like cerium oxide or aluminum
oxide) can be excellent, but what works best depends on the material. -
Step 11: Rinse, dry, and inspect under strong light
Wash off compound residue with soap and water, then dry the stone completely. Inspect from multiple angles. If you see a few stubborn scratches, go back
to the grit stage that can remove them (often 800 or 1200), then work forward again. Polishing compound won’t remove sanding scratchesit only highlights them. -
Step 12: Final buff and optional sealing
Buff with a microfiber cloth for that “wow” finish. Some porous stones can look richer with a tiny amount of mineral oil or wax, but test on a small area first
and avoid sealing stones you want to keep natural for collecting or identification. If the rock will be handled often, a wax finish can help reduce fingerprints.
Troubleshooting: What Went Wrong (and How to Fix It)
Problem: “It’s shiny… but also scratched.”
Cause: You moved on before removing the previous grit’s scratches, or you got grit contamination at a later stage.
Fix: Go back to the last grit that can remove the scratches (often 400–800), sand until uniform, then progress again.
Problem: “It looks cloudy or hazy.”
Cause: Too much compound, overheating, or not enough pre-polish.
Fix: Clean thoroughly, spend more time at 1200–3000 grit, then polish again using a lighter touch.
Problem: “Edges chip or crumble.”
Cause: The stone has fractures, is softer than expected, or you’re using too much pressure.
Fix: Lower speed, lighten pressure, round edges earlier, and consider polishing only a flat face instead of reshaping the whole stone.
Problem: “The rock has tiny pits that won’t disappear.”
Cause: Natural vugs/pores or an uneven, mixed-mineral surface.
Fix: Decide whether to keep the character (many collectors do). If you want them gone, you must grind below the pit depthno sanding stage can erase a crater.
Two Realistic Example Plans (So You Don’t Have to Guess)
Example A: Agate/Jasper “pocket stone” (hard, high shine)
- Shape lightly with diamond bit (wet)
- Sand: 220 → 400 → 600 → 800 → 1200 → 2000 → optional 3000+
- Polish: felt wheel + appropriate polish (often oxide-based for a glassy finish)
- Expect: longer sanding time, best shine payoff
Example B: Softer stone “display face” (gentle approach)
- Minimal shaping (or none); focus on smoothing a single face
- Sand: 400 → 600 → 800 → 1200 → 2000 (go slower, lighter)
- Polish: very light pressure; short sessions to avoid heat
- Expect: faster shaping, easier to accidentally gouge
Dust, Water, and Cleanup: The “Unsexy” Step That Makes You a Pro
Lapidary work is fun until you realize the cleanup is basically geology-themed glitter. Use wet sanding whenever possible, rinse often, and wipe down surfaces
with damp towels instead of dry sweeping (which can re-launch fine dust into the air). If you’re working on silica-containing stones, controlling dust matters.
Water-fed or wet methods are commonly used to reduce airborne dust during grinding and polishing operations.
Experience Notes: What You’ll Learn After Your First Few Rocks (500+ Words)
Here’s the part nobody tells you at the beginning: polishing rocks with a Dremel is less about raw power and more about rhythm. You start out thinking,
“I will simply sand this rock until it becomes shiny.” Then, three hours later, you’re holding a stone that is smoother but somehow looks like it fought a belt sander
and lost. That’s normal. It’s also fixable.
The first big “aha” moment most people have is realizing that pressure is not progress. With a rotary tool, pressing harder usually just makes heat.
Heat can lead to tiny fractures in some materials, soften certain compounds, or create a stubborn haze that refuses to buff out. When you back off and let the abrasive
do the work, you get cleaner scratches (yes, that’s a thing) that are easier to remove at the next grit. It feels slower, but it finishes faster because you spend less
time correcting avoidable problems.
The second lesson is that water is your best assistant. Wet sanding isn’t only about dust controlit also keeps the surface from loading up with slurry
that can create random gouges. A quick dip-and-sand rhythm (dip the rock, sand for 10–20 seconds, dip again) keeps things consistent. You’ll notice the rock “talks” to you:
when it starts to drag or feel sticky, it’s usually time to rinse. Bonus: rinsing constantly makes scratch inspection easier because a wet surface highlights patterns.
Third: your eyes lie, but your lamp doesn’t. Under normal room lighting, you’ll think a grit stage is done. Under a bright, direct light (or sunlight),
suddenly you can see a whole scratch constellation spelling, “You skipped 400 grit, didn’t you?” A dedicated scratch-check routine helps: dry the rock, tilt it slowly,
and look for consistent texture. If you see two different scratch “sizes” at once, the older grit is still hanging around.
Fourth: contamination is sneaky. One stray grain of 220 grit can undo a beautiful 2000 grit finish in seconds. That’s why experienced hobbyists get a little
intense about cleaning between steps. Rinse the rock, rinse your fingers, and don’t set your almost-finished stone down on the same gritty towel you used for shaping.
If you want a simple system, keep separate paper towels or cloths labeled “coarse,” “medium,” and “fine,” and use a fresh one for polishing.
Fifth: not every rock wants to be a mirror. Some stones have mixed minerals, tiny pores, or softer bands that undercut during sanding. The result can be a
polished surface that’s glossy in some spots and satiny in others. That’s not always failureit can be the rock’s personality. Many collectors prefer a “natural plus”
finish: smooth edges, a polished face, and enough original texture to show it came from the earth and not a factory. If a stone fights you, consider polishing a single
face rather than reshaping the entire thing.
Lastly, you’ll learn to love the process. There’s a surprisingly calming loop to it: shape, sand, rinse, inspect, repeat. You start noticing details
the way agate bands sharpen as scratches disappear, or how a dull quartz pebble suddenly throws light like glass once the pre-polish is done right. And yes, you may
end up with a small “to-be-polished” rock pile that multiplies when you’re not looking. Congratulations. You’re one of us now.
Conclusion
Polishing rocks with a Dremel is one of the fastest ways to turn everyday finds into display-worthy piecesif you respect the grit progression, keep things clean,
and use a light touch. Start with a rock you won’t be heartbroken about, follow the 12 steps, and remember: the shine doesn’t come from magic compound.
It comes from the sanding you did before you got excited and tried to skip ahead.