Table of Contents >> Show >> Hide
- Quick Diagnosis: Is the Fill Valve Actually the Problem?
- Parts, Tools, and What to Buy (Without Overthinking It)
- Toilet Tank Anatomy in 90 Seconds (So the Steps Make Sense)
- Step-by-Step: How to Replace a Toilet Fill Valve
- 1) Shut off the water
- 2) Drain the tank
- 3) Disconnect the supply line
- 4) Remove the old fill valve
- 5) Prep the new fill valve: set the height the smart way
- 6) Install the new fill valve
- 7) Reconnect the water supply line
- 8) Attach the refill tube correctly (this is where many DIY jobs go sideways)
- 9) Turn water back on and test
- 10) Adjust the water level
- Common Mistakes and How to Fix Them (No Judgment)
- Fill Valve Types (And Why You Probably Don’t Need to Panic About Them)
- Maintenance Tips That Save You From Future “Why Is It Doing That?”
- When to Call a Pro (Because “DIY” Doesn’t Mean “Do Everything Yourself”)
- DIYer Experiences: The Real Stuff That Happens in Bathrooms (500+ Words)
- Conclusion
A toilet fill valve is basically your toilet’s “bouncer.” Its job is to let water into the tank after a flush, then shut the party down at the right level.
When it’s working, you never notice it. When it’s not, you notice it constantlyusually at 2:00 a.m., when the tank decides to audition for a
soothing waterfall app.
The good news: replacing a fill valve is one of the most DIY-friendly plumbing repairs out there. It’s affordable, it usually takes under an hour,
and the most dangerous part is dropping the tank lid (seriouslythose things chip if you look at them wrong). This guide walks you through diagnosing,
swapping, adjusting, and testing a new valve like you’ve done it a hundred times… even if this is your first rodeo.
Quick Diagnosis: Is the Fill Valve Actually the Problem?
Before you replace anything, make sure you’re fixing the right part. Inside the tank, there are two usual suspects:
the flush valve/flapper (controls water leaving the tank) and the fill valve (controls water entering the tank).
A running toilet can be either.
Common signs you need a toilet fill valve replacement
- Constant running even after the tank fillslike it can’t quite shut off.
- Slow refill (takes forever to recharge after flushing).
- Weak flush because the tank never fills high enough.
- Hissing, squealing, or “ghost noises” as water sneaks in when it shouldn’t.
Do this 30-second check first
- Remove the tank lid (set it somewhere safepreferably not the edge of the tub).
- Flush and watch the tank refill.
- Look at the overflow tube (the vertical tube in the middle). If water is continuously spilling into it,
your water level is too high or the fill valve isn’t shutting off properly. - If the tank is full but you still hear water and the level slowly drops, the flapper could be leaking instead.
A classic DIY trick is adding a few drops of food coloring to the tank and waitingif color shows up in the bowl without flushing,
the leak is through the flush valve/flapper, not the fill valve.
If you’ve confirmed the fill valve is leaking, won’t shut off, refills painfully slowly, or can’t be adjusted into behavingcongrats.
You’re about to win a small but meaningful victory against household chaos.
Parts, Tools, and What to Buy (Without Overthinking It)
What you’ll typically need
- New fill valve (many are “universal” and adjustable)
- Adjustable wrench or channel-lock pliers (optional if everything is hand-tight)
- Small bucket or container
- Sponge or towel (for the last bit of tank water)
Choosing the right replacement fill valve
Most modern replacements are adjustable-height, anti-siphon, and designed to fit common tanks. If you don’t have a specialty toilet,
a universal valve from a reputable brand is usually fine. If you do have a brand-specific system (common with some Kohler,
Mansfield tower-style setups, or certain proprietary flush towers), read your tank’s markings and compare shapes before buying.
Pro tip: take a quick photo of your current setup (especially the refill tube attachment and float style) before you start.
It’s the DIY version of leaving yourself breadcrumbs in the forest.
Toilet Tank Anatomy in 90 Seconds (So the Steps Make Sense)
Understanding what you’re looking at helps you install the new valve correctlyand avoid the classic mistake of “it fits, but now the toilet
runs forever.”
- Fill valve: The tall assembly on one side of the tank that brings in water and shuts off at a set level.
- Float: The moving part that rises with water and tells the fill valve when to stop (cup float, ball float, or internal float).
- Overflow tube: A vertical tube that prevents tank overflow by routing excess water into the bowl.
- Refill tube: A small tube that sends a bit of water into the overflow tube so the bowl refills to its normal level.
The tank water level should end up roughly ½ inch to 1 inch below the top of the overflow tube. Too high and water spills into the
overflow tube (hello, running toilet). Too low and you get a weak flush. Many valves have a waterline mark to help you hit the sweet spot.
Step-by-Step: How to Replace a Toilet Fill Valve
1) Shut off the water
Find the shutoff valve on the wall behind the toilet (usually a small oval or round handle). Turn it to the off position.
If it’s stubborn, don’t Hulk-smash itslow, steady pressure is your friend.
2) Drain the tank
- Flush the toilet.
- Hold the handle down to drain as much water as possible.
- Use a sponge/towel to soak up the remaining water in the bottom of the tank.
3) Disconnect the supply line
Place a small bucket under the connection where the water supply line attaches beneath the tank. Loosen the coupling nut.
Some water will drip out. This is normal and not a sign that you’ve “broken plumbing forever.”
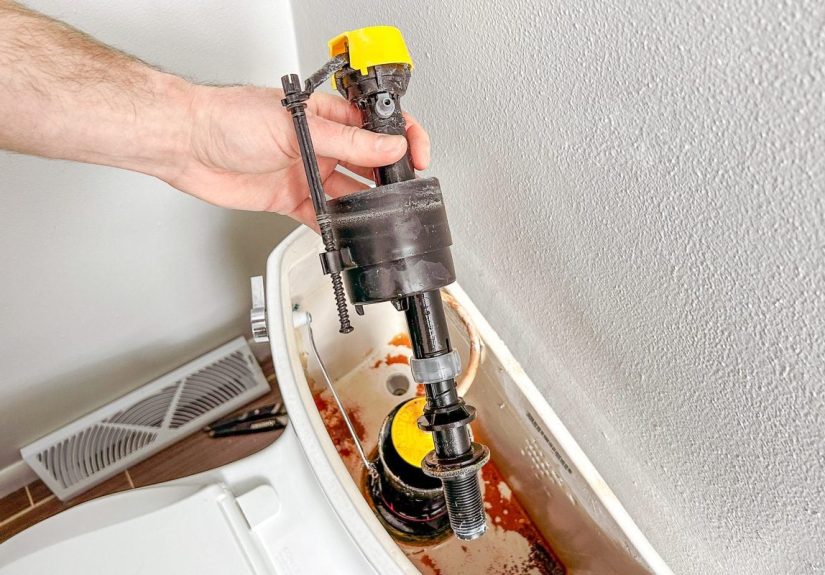
4) Remove the old fill valve
- Under the tank, locate the large plastic nut that holds the fill valve in place.
- Unscrew it (often by hand; use pliers gently if needed).
- Lift the old fill valve straight out of the tank.
- Wipe the area around the tank hole clean so the new seal seats properly.
5) Prep the new fill valve: set the height the smart way
Most replacement valves are adjustable. Before installing, set the height so it will fit your tank and meet two important rules:
- Rule #1: The valve’s top/marking should sit at least 1 inch above the overflow tube (many instructions call this out).
- Rule #2: The final water level should land around ½ inch to 1 inch below the top of the overflow tube.
Different brands label this differently: some have a “critical level” line, some have a stamped waterline mark, and some rely on an adjustable float.
The core idea is the same: prevent back-siphoning and prevent overflow-running.
6) Install the new fill valve
- Place the rubber seal/washer on the valve where the instructions indicate (usually at the base that sits inside the tank).
- Insert the valve shank through the tank hole.
- Under the tank, thread on the locknut and tighten it. In many cases, hand-tight is enough.
Overtightening can crack a porcelain tankan expensive lesson no one wants. - Rotate the valve so the float can move freely and doesn’t rub against the tank wall, handle mechanism, or flush valve.
7) Reconnect the water supply line
Reattach the supply line to the threaded shank under the tank. Tighten snuglybut don’t overdo it.
If your supply line is old or crusty, consider replacing it while you’re here. It’s cheap insurance against future drips.
8) Attach the refill tube correctly (this is where many DIY jobs go sideways)
The refill tube should send water into (or just above) the overflow tube using a clip/adapter. Two key tips:
- Trim it if needed so it doesn’t kink.
- Do not shove the refill tube down into the overflow tube below the waterline.
That can siphon water and trigger on-and-off cycling (and wasted water).
9) Turn water back on and test
- Open the shutoff valve slowly and let the tank fill.
- Watch for leaks at the supply line connection and the tank’s underside nut.
- Flush several times and observe the refill behavior.
10) Adjust the water level
Many modern fill valves use either a screw or a sliding clip to adjust the float height. Your goal:
water stops filling about ½ inch to 1 inch below the overflow tube. If your toilet flush feels weak,
raise slightly. If it runs into the overflow tube, lower it.
Common Mistakes and How to Fix Them (No Judgment)
“My toilet runs… but only sometimes.”
Intermittent running is often a slow leak through the flapper/flush valve seat, not the fill valve. If the tank level drops,
the fill valve dutifully refills itlike a responsible employee covering for a coworker who keeps disappearing.
Do the food coloring test and inspect the flapper.
“It won’t shut off, even after I adjusted the float.”
- Check if the float is catching on the tank wall or handle mechanism.
- Make sure the valve is set at the correct height.
- If you have hard water, debris can interfere with sealssome manufacturers recommend flushing the valve to clear sand/rust.
“The refill tube pops off or sprays wildly.”
- Use the provided clip/adapter and ensure it’s seated securely.
- Shorten the tube slightly if it’s under tension.
- Make sure the tube isn’t kinked or twisted.
“Now I have a leak under the tank.”
- Confirm the rubber washer is positioned exactly as instructed (this matters).
- Make sure the locknut is snug, but don’t crank it like you’re tightening lug nuts.
- If the supply line connection drips, snug it a touch more and recheck.
Fill Valve Types (And Why You Probably Don’t Need to Panic About Them)
If you read a guide and suddenly feel like you need a plumbing PhDrelax. You’ll see a few common fill valve designs:
- Float-cup valves: The modern standardplastic body with a cup float sliding up/down the shaft.
- Ball float (older style): A big ball on a rod (still replaceable, but many people upgrade to a modern valve).
- Diaphragm/plunger styles: Older designs, sometimes brass, quieter but less common in newer installs.
- Floatless valves: Compact designs that use pressure sensing, often found in certain low-profile tanks.
Practically speaking: if your replacement valve is adjustable-height and fits the tank opening, you’re usually good.
Just set the correct height, attach the refill tube correctly, and tune the water level.
Maintenance Tips That Save You From Future “Why Is It Doing That?”
- Keep an eye on mineral buildup if you have hard waterdeposits can mess with seals and flow.
- Avoid harsh in-tank drop-in cleaners that contain bleach/chlorinesome manufacturers warn these can damage tank components.
If you want a cleaner, choose options designed not to sit in the tank water. - Check the shutoff valve occasionally so it doesn’t seize up for the day you actually need it.
- Listen for changes: a new hiss, a longer refill, or random refills often signal a small problem before it becomes a big one.
When to Call a Pro (Because “DIY” Doesn’t Mean “Do Everything Yourself”)
Fill valve replacement is beginner-friendlybut a few situations deserve backup:
- Cracks in the tank or bowl (porcelain + water pressure = not a fun science experiment)
- A shutoff valve that won’t turn or won’t fully stop water
- Corroded hardware or persistent leaks after multiple attempts
- Specialty toilets with proprietary systems you can’t match confidently
DIYer Experiences: The Real Stuff That Happens in Bathrooms (500+ Words)
If you’ve never replaced a fill valve before, it’s easy to imagine the job going like a perfect tutorial video:
you twist one nut, swap one part, and your toilet sings “America the Beautiful.” In real life, DIY toilet repair has a few recurring plot twists.
Here are the experiences many DIYers run intoand how to handle them without turning a simple repair into a full bathroom “project.”
The Stuck Shutoff Valve Surprise
Plenty of people discover the shutoff valve hasn’t been touched since the dawn of indoor plumbing. You turn it, it squeaks, it resists, and suddenly
you’re bargaining with an inanimate object. If the valve won’t budge, don’t force it until it snaps. Try gentle back-and-forth movement, and if you see
moisture forming around the valve stem, stop and consider calling a plumber. A fill valve replacement is supposed to be a $20 fixnot a “replace the shutoff
and repair drywall” adventure.
The “Why Is There Still Water?” Moment
Even after flushing, there’s always leftover water in the tank and supply line. That’s why the bucket-and-sponge combo is non-negotiable.
Many DIYers underestimate how much water can dribble out of the supply line when it’s disconnected. The trick is to position the bucket before you loosen
anything, and keep a towel handy. This isn’t defeat; it’s standard operating procedure.
The Refill Tube Trap
One of the most common “I replaced the valve but the toilet runs” stories comes from the refill tube. A lot of people assume:
“This tube goes into that tube.” Logical, right? But if you push the refill tube too far down into the overflow tubeespecially below the waterlineit can
siphon water and cause the fill valve to cycle on and off. The fix is almost always simple: clip it so it discharges into the overflow tube properly without
being submerged, and trim it so it doesn’t kink. This tiny tube has an outsized ability to make you question your life choices.
The Float Rub (a.k.a. the Silent Saboteur)
Another super common experience: everything is installed correctly… except the float bumps the tank wall or the handle arm. When the float can’t move freely,
the valve won’t shut off at the right time. DIYers often solve this by rotating the fill valve slightly so the float has clear travel. It’s a small adjustment
with big resultsand it’s the kind of thing you only learn after you’ve watched the tank fill three times while muttering, “But why though?”
The Over-Tightening Regret
DIY culture teaches us that tighter is better. Toilets strongly disagree. Many fill valve nuts and supply line connections are designed to seal with washers,
not brute force. A lot of DIYers learn (the hard way) that overtightening can crack a tank or distort a washer so it leaks. The better approach is:
hand-tighten first, then add small incremental turns if needed while checking for drips. If it’s leaking, the solution is usually alignment or washer placement,
not “one more heroic twist.”
The Victory Lap
The best part of this repair is how obvious success feels. The tank fills to the right level, stops cleanly, and the toilet stays quiet. No phantom refills,
no hissing, no running. It’s a small home maintenance winbut it’s the kind that makes you feel wildly competent, like you could now also rebuild a motorcycle
(please do not test this theory on your bathroom).
Conclusion
A toilet fill valve replacement is one of those perfect DIY jobs: it’s practical, it saves money, and it delivers immediate satisfaction (and blessed silence).
Diagnose the problem carefully, choose a quality adjustable valve, set the height correctly, attach the refill tube the right way, and fine-tune the water level.
Do that, and your toilet goes back to doing what it was always meant to dohandle business quietly in the background.