Table of Contents >> Show >> Hide
- Why Convert a Cake Recipe into Cupcakes?
- Step 1: Figure Out the Yield Before You Touch the Batter
- Step 2: Keep the Original Batter Method Mostly Intact
- Step 3: Portion the Batter Correctly
- Step 4: Adjust the Bake Time, Not the Entire Temperature Strategy
- Step 5: Cool, Frost, and Use the First Batch as a Test Run
- Quick Conversion Cheat Sheet
- Common Problems When Converting Cake to Cupcakes
- Conclusion
- Experience: What Bakers Learn After Converting Cake Recipes into Cupcakes Again and Again
- SEO Tags
There comes a moment in every baker’s life when a full cake feels like too much commitment. Maybe you need party-friendly treats, maybe you want built-in portion control, or maybe you just enjoy the tiny thrill of peeling back a cupcake liner like you’re opening a delicious present. Whatever the reason, knowing how to convert a cake recipe into cupcakes is one of the most useful baking skills you can learn.
The good news is that most cake recipes can become great cupcakes. The not-so-good news is that you cannot just pour batter into a muffin tin and hope the oven handles the rest like some kind of sugar-powered life coach. Cupcakes bake faster, portion differently, and can go from fluffy and charming to dry and tragic in a surprisingly short amount of time.
This guide breaks the process down into five simple steps, with real-world tips on batter amount, bake time, pan yield, texture, and frosting. If you have a favorite layer cake, sheet cake, or snack cake recipe, you’re already closer to cupcakes than you think.
Why Convert a Cake Recipe into Cupcakes?
Before we get into the how-to, let’s talk about the why. Cupcakes are easier to serve, easier to transport, and much easier to decorate if your piping skills are somewhere between “home baker” and “this swirl looked better in my head.” They are ideal for birthdays, bake sales, classroom events, showers, office parties, or any gathering where you do not want to stand in the corner cutting slices while balancing a paper plate stack under one arm.
Converting a cake recipe into cupcakes also gives you more flexibility. You can frost them in different flavors, add fillings, test decorations in small batches, and freeze leftovers without sacrificing a whole cake. In other words, cupcakes are the practical, portable, overachieving cousins of layer cake.
Step 1: Figure Out the Yield Before You Touch the Batter
Know how much cake you are actually converting
The first step is not preheating the oven. It is math. Not scary math. Dessert math.
When you convert a cake recipe into cupcakes, you need a rough sense of how many cupcakes the batter will produce. That saves you from filling one pan beautifully and then realizing you still have enough batter left for six mystery cakes in random ramekins.
As a general rule, a standard cupcake uses about 1/4 cup of batter. That means:
- One 8-inch square cake or one 9-inch round layer usually makes about 12 standard cupcakes.
- One 9×13-inch cake or two 9-inch round layers usually makes about 24 standard cupcakes.
- A typical full cake recipe can often make 24 to 30 cupcakes, depending on how full you fill the cups.
If you are making mini cupcakes, you will get a lot more. If you are making jumbo cupcakes, you will get fewer. This is why experienced bakers keep extra pans or liners nearby instead of acting shocked when batter keeps appearing.
At this stage, also decide whether your recipe is a good candidate for cupcakes. Most butter cakes, vanilla cakes, chocolate cakes, funfetti cakes, yellow cakes, and spice cakes convert beautifully. Very delicate cakes may need gentler handling, while very dense cakes can bake up a bit heavier in cupcake form. That does not make them bad. It just means you should expect a different crumb and dome.
Step 2: Keep the Original Batter Method Mostly Intact
Change the pan, not the personality of the recipe
One of the biggest mistakes people make when converting cake to cupcakes is trying to “improve” the recipe at the same time. They swap ingredients, reduce sugar, eyeball the flour, use cold dairy, and then wonder why the cupcakes came out dense enough to qualify as paperweights.
If the cake recipe already works, your job is to preserve what makes it work. Follow the original ingredient ratios and the original mixing method as closely as possible. If the recipe says to cream butter and sugar, do that. If it says to alternate dry and wet ingredients, do that too. Cupcakes may be smaller than cakes, but they are not less fussy.
Room-temperature ingredients also matter more than people think. Softened butter creams more smoothly, eggs blend more evenly, and milk or sour cream that is not fridge-cold helps the batter stay uniform. This usually leads to a better rise and a softer crumb. It is one of those boring-sounding details that quietly separates “pretty good” from “why are these so bakery-like?”
Another key point: do not overmix. Once the flour is added, mix just until combined. Overmixing develops too much gluten, which can make cupcakes tough, dry, or oddly squat. Nobody bakes cupcakes hoping for “chewy but in a confusing way.”
If your original cake recipe includes mix-ins like berries, chopped nuts, or chocolate chips, you can keep them. Just portion carefully so each cupcake gets a fair share. Cupcake injustice is real.
Step 3: Portion the Batter Correctly
This is where good intentions go to overflow
Now we arrive at the step that can make or break the entire batch: filling the liners.
Most standard cupcake recipes work best when the liners are filled about two-thirds to three-quarters full. That usually gives the cupcakes enough room to rise without spilling over the pan like they are making a dramatic escape. If you underfill, you may get sad little cupcakes with flat tops. If you overfill, you get mushroom caps, overflow, or domes so aggressive they make frosting difficult.
For many cake recipes, a 1/4-cup scoop is the easiest way to portion evenly. If the batter is thick, use a cookie scoop or two spoons. If it is thinner, a measuring cup with a spout can save you from decorating your counter with batter drips.
There are a few exceptions. Some thinner batters may tolerate a slightly fuller fill. Some chocolate cupcake batters do better a little lower. Filled cupcakes are another special case: if you are adding cheesecake filling, jam, or another center, you will often need to use less batter underneath so the cupcake has room to rise around the filling.
Paper liners are also worth using in most cases. They make removal easier, help with serving, reduce sticking, and keep cleanup from becoming a second full project. Plus, cupcakes simply look more finished in liners. That is not vanity. That is presentation.
Step 4: Adjust the Bake Time, Not the Entire Temperature Strategy
Same oven, shorter runway
This is the step people tend to overcomplicate. In most cases, you can keep the same oven temperature the original cake recipe uses and simply reduce the baking time. Cupcakes bake faster because each cavity holds a smaller amount of batter, and smaller portions heat through more quickly.
For many standard cupcakes, 350°F for about 15 to 20 minutes is the sweet spot. Mini cupcakes are often done in 10 to 15 minutes, while jumbo cupcakes can take closer to 22 to 25 minutes. If your original cake was baked at 325°F, you can usually keep that temperature, but expect the timing to shift and the fill level to matter even more.
The smartest move is to start checking early. If the cake recipe says 30 minutes, do not wait until minute 29 and stroll over confidently with a toothpick like you have outsmarted physics. Start checking cupcakes several minutes sooner than you think you need to.
Here is what doneness looks like:
- A toothpick inserted in the center comes out clean or with a few dry crumbs.
- The tops spring back lightly when touched.
- The edges look set, but not dry or deeply browned.
If you are baking multiple pans, rotate them halfway through when your recipe or oven tends to brown unevenly. Once baked, let the cupcakes cool in the pan for about five minutes, then move them to a wire rack. Leaving them in the hot pan too long can continue the bake and dry them out.
Step 5: Cool, Frost, and Use the First Batch as a Test Run
Your cupcakes are trying to teach you something
The final step in converting cake to cupcakes is not just frosting them and taking photos from three flattering angles. It is evaluating what happened.
Did the cupcakes dome nicely? Did they overflow? Were they a little dry? Did they sink in the middle? These clues tell you what to tweak next time. Cupcake conversion is usually simple, but tiny adjustments can make a big difference.
If the cupcakes overflowed, reduce the batter in each liner slightly. If they were flat, add a little more next time. If they browned too quickly, check your oven accuracy or lower the rack position. If they seemed dry, shorten the bake time by a minute or two on the next batch. Cupcakes reward note-taking in a way that feels extremely adult and slightly annoying, but it works.
Frosting is also worth considering. A cake recipe may produce enough frosting for thin layers and a light outer coat, but cupcakes often need more frosting if you want generous swirls. Translation: if you are chasing bakery-style tops, make a little extra frosting and thank yourself later.
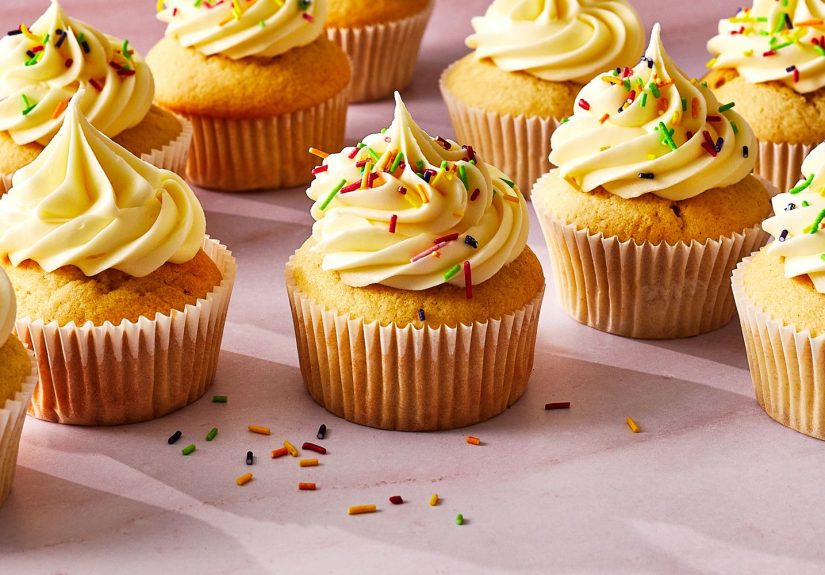
Once the cupcakes are completely cool, you can frost, fill, top, drizzle, sprinkle, or otherwise accessorize them to your heart’s content. This is the point where cupcakes really pull ahead of cake. You can make one batch and decorate half with chocolate buttercream, half with vanilla, and suddenly you look very organized and deeply talented.
Quick Conversion Cheat Sheet
- Batter per standard cupcake: about 1/4 cup
- How full to fill liners: usually 2/3 to 3/4 full
- Standard bake range: about 15 to 20 minutes at 350°F
- Mini cupcakes: often 10 to 15 minutes
- Jumbo cupcakes: often around 22 to 25 minutes
- Common yield: 12 cupcakes from one 8-inch square or 9-inch round layer; 24 from one 9×13-inch cake or two 9-inch layers
- Best texture insurance: room-temperature ingredients and no overmixing
Common Problems When Converting Cake to Cupcakes
Because sometimes the cupcakes have notes
Problem: The batter overflowed.
You likely filled the liners too high. Use a scoop and aim lower next time.
Problem: The cupcakes are dry.
They probably baked too long. Start checking earlier and cool them on a rack after a brief rest in the pan.
Problem: The tops sank.
This can happen from overfilling, underbaking, or overmixing the batter.
Problem: The cupcakes are dense.
Cold ingredients, overmixing, or heavy-handed measuring can all contribute.
Problem: The batch made way more cupcakes than expected.
Welcome to baking. Keep extra liners nearby and pretend this was part of the plan.
Conclusion
Learning how to convert a cake recipe into cupcakes is less about rewriting a recipe and more about respecting how smaller bakes behave. Keep the batter method intact, portion carefully, reduce the bake time, and pay attention to texture and doneness. Once you understand those basics, you can turn almost any favorite cake into a tray of perfectly portable cupcakes.
And that is the real beauty of cupcake conversion: you get all the flavor of your favorite cake in a format that is easier to share, easier to decorate, and much easier to sneak from the kitchen without needing a plate. That last benefit may not be in baking textbooks, but spiritually, it is important.
Experience: What Bakers Learn After Converting Cake Recipes into Cupcakes Again and Again
One of the most interesting things about converting cake recipes into cupcakes is how quickly it teaches you to notice the small stuff. The first time most people try it, they focus on the obvious question: “How long do I bake them?” After a few batches, the better question becomes, “What is this batter trying to do?” A fluffy vanilla cake batter behaves differently from a rich chocolate batter. A sour cream cake may rise with a tighter, prettier dome, while a thinner batter may spread more evenly and need slightly more attention when portioning. Experience teaches you that cupcakes are tiny, but they are not simplistic.
Many home bakers also discover that their favorite full-size cake recipe becomes even more enjoyable as cupcakes. A birthday cake that once felt like a once-a-year project suddenly becomes a practical weekend bake. You can make a dozen for a small gathering or two dozen for a crowd. You can freeze unfrosted cupcakes, decorate them later, and avoid the drama of transporting a layered cake across town with one hand on the steering wheel and the other emotionally supporting the cake box.
Another common lesson is that consistency matters more than perfection. Cupcakes do not need every swirl of batter to be identical down to the gram, but they do reward even scooping. The bakers who get the best results are usually the ones who use the same scoop for every cup, rotate the pan if needed, and start checking early instead of assuming every oven tells the truth. Experienced bakers also stop trusting “just a minute more” unless they truly need it. That extra minute is often where moist cupcakes become dry cupcakes with a nice personality.
There is also a practical decorating lesson that comes with experience: cupcakes invite creativity without demanding a major time investment. A single cake may commit you to one frosting, one filling, and one final look. Cupcakes let you split the batch. Half can get cream cheese frosting, half can get chocolate buttercream. Some can wear sprinkles. Others can stay simple. That flexibility is part of why cupcake conversions are so useful for families, parties, and bakers who like options.
Perhaps the biggest takeaway, though, is confidence. Once you successfully convert one or two cake recipes into cupcakes, the process stops feeling mysterious. You begin to understand the rhythm: estimate the yield, portion the batter, shorten the baking time, cool properly, and adjust as needed. At that point, the cupcake pan stops being a backup plan and becomes a smart first choice. And honestly, that is when baking gets more fun. Less pressure, more frosting, and fewer slicing duties. Hard to argue with that.