Table of Contents >> Show >> Hide
- Why Baking Soda Works So Well in a Garbage Disposal
- My Garbage Disposal Cleaning Supplies
- Step 1: I Turned Off the Disposal and Checked the Opening
- Step 2: I Scrubbed the Splash Guard
- Step 3: I Added Baking Soda
- Step 4: I Poured in Vinegar and Let It Fizz
- Step 5: I Rinsed with Hot Water
- Step 6: I Used Ice and Coarse Salt for Extra Scrubbing
- Step 7: I Added Lemon for Freshness
- What Changed After Cleaning
- Common Mistakes I Avoided
- What Not to Put in a Garbage Disposal
- How Often I Clean My Garbage Disposal Now
- My Simple Maintenance Routine
- When Baking Soda Is Not Enough
- Extra Experience: What I Learned From Cleaning My Disposal the Hard Way
- Conclusion
- SEO Tags
There are household mysteries that can humble even the most confident adult. Where do socks go in the dryer? Why does one drawer become the official graveyard for batteries, twist ties, and mystery keys? And most importantly, why did my garbage disposal suddenly smell like a swamp opened a small business under my sink?
That last question is what led me to my humble orange box of baking soda. I had already tried ignoring the smell, whichshockinglydid not work. I had tried running water and hoping for the best, which is less a cleaning method and more a kitchen-themed wish. Finally, I decided to properly clean my garbage disposal with baking soda, vinegar, hot water, ice, and a little common sense.
The result? A fresher sink, a happier nose, and a garbage disposal that no longer made me question every life choice that brought me to dish duty. Here is exactly how I used baking soda to clean my garbage disposal, what worked, what I would do differently next time, and how you can keep your own disposal from becoming a tiny food-waste haunted house.
Why Baking Soda Works So Well in a Garbage Disposal
Baking soda, also known as sodium bicarbonate, is one of those classic cleaning ingredients that earns its spot under the sink. It is mildly abrasive, which helps loosen stuck-on grime without acting like sandpaper. It also absorbs odors, making it especially useful for a garbage disposal where tiny food particles can cling to the splash guard, grind chamber, and drain walls.
On its own, baking soda helps neutralize funky smells. When paired with vinegar, it creates a fizzy reaction that helps disturb residue hiding in the disposal. That fizz is not magic, but it is useful. It bubbles through the opening, reaches awkward spots, and gives stuck-on gunk a little nudge. Think of it as a foam party for old dinner scraps, except everyone is invited to leave immediately.
My Garbage Disposal Cleaning Supplies
I did not need fancy equipment or a professional cleaning kit. I used simple supplies I already had in the kitchen:
- 1/2 cup baking soda
- 1 cup white vinegar
- Dish soap
- A small scrub brush or old toothbrush
- Ice cubes
- Coarse salt
- A few small lemon wedges without seeds
- Hot water for rinsing after cleaning
- Cold water for running the disposal
- Long tongs for safety, if anything visible needed removal
Before starting, I made one important safety decision: I did not put my hand inside the garbage disposal. Ever. Not for a spoon, not for a lemon seed, not for the suspicious object that looked like it might be a pasta fossil. If something needs to come out, use tongs after the unit is off. A garbage disposal may be small, but it is not a place for heroic fingers.
Step 1: I Turned Off the Disposal and Checked the Opening
The first thing I did was turn off the disposal and make sure it was not running. Then I looked into the drain opening with a flashlight. I was not trying to do an archaeological dig; I only wanted to make sure there was no visible obstruction, such as a bottle cap, twist tie, fruit pit, or utensil.
If you see something stuck, do not reach in with your hand. Turn off power to the unit if needed, then use long-handled tongs or pliers. In my case, there was no dramatic object insidejust a faint odor and the emotional residue of last night’s dinner.
Step 2: I Scrubbed the Splash Guard
The splash guard is the rubber flap at the top of the disposal. It is also where smells love to hold secret meetings. Even if the chamber below is clean, the underside of the splash guard can collect grease, sauce, food flecks, and general kitchen sadness.
I put a little dish soap and baking soda on an old toothbrush and scrubbed the top and underside of the rubber flaps. This was the least glamorous part of the process, but it made a huge difference. The brush came away with grime I will politely describe as “uninvited.”
If your splash guard is removable, cleaning it is easier. If not, lift the flaps gently and scrub around the edges. Rinse the brush often. This step alone can reduce odor before you even get to the fizzy baking soda and vinegar treatment.
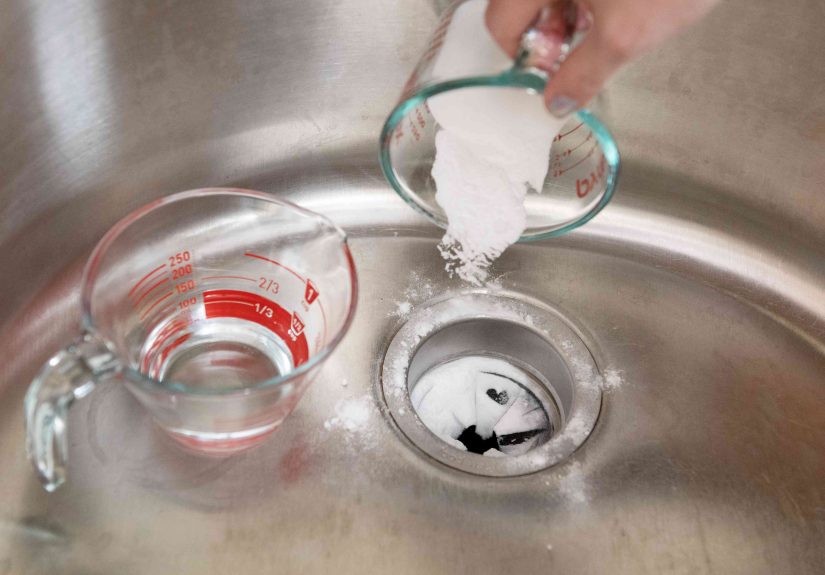
Step 3: I Added Baking Soda
Next, I poured 1/2 cup of baking soda directly into the garbage disposal opening. I tried to sprinkle it around the sides instead of dumping it in one sad mountain. The goal was to coat more of the chamber so the baking soda could absorb odor and cling to damp residue.
I let it sit for about 10 minutes. If your disposal smells especially strong, you can let the baking soda sit longer, around 20 to 30 minutes. This gives it more time to absorb odors before the vinegar arrives with its dramatic entrance.
Step 4: I Poured in Vinegar and Let It Fizz
After the baking soda had time to sit, I slowly poured 1 cup of white vinegar into the disposal. The reaction started right away: fizzing, bubbling, and the satisfying feeling that something productive was happening without me needing to buy a gadget.
I let the mixture foam for about 10 to 15 minutes. During this time, the baking soda and vinegar worked together to loosen grime and freshen the chamber. The smell improved almost immediately, although I resisted the urge to declare victory too early. Cleaning is like baking cookies: you should not celebrate until the final step is done.
Step 5: I Rinsed with Hot Water
Once the fizzing slowed down, I rinsed the disposal with hot tap water. This helped wash away the loosened baking soda, vinegar, and grime. I did not run the disposal during the baking soda-and-vinegar soak. I waited until the reaction had finished, then flushed everything through.
Hot water can help rinse away cleaning residue after the treatment. However, when actually running the disposal with food waste, cold water is usually the better habit because it helps keep fats more solid so they can move through the system instead of melting and coating the pipes.
Step 6: I Used Ice and Coarse Salt for Extra Scrubbing
After the baking soda treatment, I added a handful of ice cubes and about 1/4 cup of coarse salt. Then I ran cold water, turned on the disposal, and let it grind for about 30 seconds.
This step helped knock loose any stubborn bits still clinging inside the grind chamber. The ice and salt act like a rough cleaning crew, scraping the inside surfaces as they move around. Contrary to kitchen legend, garbage disposals do not really have sharp blender-style blades. Most use impellers and a grind ring to break down food. Still, ice can help clear residue from those working parts.
The sound was not elegant. It was loud, crunchy, and slightly alarming, like the disposal was eating a tiny glacier. But it worked. Afterward, the water drained cleanly and the odor had dropped from “mystery swamp” to “normal sink.” Progress.
Step 7: I Added Lemon for Freshness
Finally, I used a couple of small lemon wedges with the seeds removed. I ran cold water, turned on the disposal, and fed the pieces in gradually. Lemon is not a full deep-cleaning solution by itself, but it is great for a fresh scent after the real cleaning is done.
The key is moderation. Do not shove half a lemon, thick rinds, or seeds into the disposal and expect applause. Use small pieces only. Citrus can help freshen the chamber, but too much peel or pulp can create its own clogging problem. Like cologne, lemon works best when it does not announce itself from across the house.
What Changed After Cleaning
The biggest change was the smell. Before cleaning, the sink area had a stale, sour odor that became more noticeable whenever I ran water. After the baking soda, vinegar, scrubbing, ice, salt, and lemon routine, the odor was basically gone.
The second change was the way the disposal sounded. It seemed smoother, probably because the ice and salt helped remove some residue from the chamber. I also noticed the water drained a little faster. This was not a miracle repair, and I would not use baking soda to fix a serious clog, but for routine garbage disposal cleaning, the method worked beautifully.
Common Mistakes I Avoided
Using Harsh Drain Cleaners
I skipped harsh chemical drain cleaners. Garbage disposals are appliances connected to plumbing, and strong chemicals can be risky for parts, pipes, and splash-back. Baking soda and vinegar are gentler options for deodorizing and routine cleaning.
Pouring Grease Down the Drain
Grease is one of the biggest reasons disposals and drains get gross. It may look harmless when warm, but it can cool, thicken, and stick inside pipes. I now wipe greasy pans with a paper towel before washing them. My plumbing deserves better than bacon-fat betrayal.
Overloading the Disposal
I used to think the disposal could handle anything if I turned on enough water and acted confident. Wrong. Now I feed scraps gradually. Small amounts grind more effectively and are less likely to jam the unit.
Forgetting the Splash Guard
The splash guard is easy to ignore because it sits right at the top, pretending to be innocent. It is not innocent. Clean it. Scrub under the flaps. That is where many disposal odors begin.
What Not to Put in a Garbage Disposal
Cleaning helps, but prevention is even better. A garbage disposal is not a trash can with a motor. To keep mine cleaner longer, I avoid putting these items down the drain:
- Grease, fats, and oils
- Coffee grounds in large amounts
- Eggshells, especially the membranes
- Large bones or fruit pits
- Seafood shells
- Pasta, rice, and oatmeal
- Potato peels and banana peels
- Corn husks and fibrous vegetables
- Plastic, paper, twist ties, stickers, or utensils
- Large amounts of citrus peel
Some of these items are bad because they are too hard. Others are bad because they expand, wrap around moving parts, or turn into sticky paste. Pasta in a drain can become plumbing glue. Potato peels can form a starchy clog. Coffee grounds can collect like wet sand. None of these are invited to the disposal party.
How Often I Clean My Garbage Disposal Now
I do a light freshening once a week and a deeper baking soda cleaning about once or twice a month, depending on how much cooking I do. If I cook fish, chop onions, or use the disposal heavily, I clean it sooner. My nose is the supervisor.
For weekly maintenance, I use cold water, a few ice cubes, and sometimes a small lemon piece. For deeper cleaning, I repeat the baking soda and vinegar method, scrub the splash guard, and rinse thoroughly. This routine takes about 15 to 20 minutes, most of which is waiting time.
My Simple Maintenance Routine
Here is the routine I follow now to keep odors from coming back:
- Run cold water before turning on the disposal.
- Feed food scraps slowly, not all at once.
- Keep cold water running while the disposal works.
- Let the disposal run until grinding sounds stop.
- Keep water running for several seconds afterward.
- Clean the splash guard weekly.
- Use baking soda and vinegar monthly for odor control.
These habits are simple, but they make a noticeable difference. The disposal stays fresher, the sink smells better, and I no longer need to perform a dramatic sniff test before guests come over.
When Baking Soda Is Not Enough
Baking soda is excellent for odor and light buildup, but it is not a cure-all. If your garbage disposal hums but does not grind, leaks under the sink, drains very slowly, trips the reset button repeatedly, or smells terrible even after deep cleaning, the issue may be a jam, clog, drain-line problem, or aging unit.
In those cases, stop using the disposal until you identify the problem. Check the reset button only after the unit is off. Use tongs for visible debris. If the disposal still does not work or the sink backs up, it may be time to call a plumber. There is a fine line between being handy and turning a small problem into a wet cabinet disaster.
Extra Experience: What I Learned From Cleaning My Disposal the Hard Way
The first lesson I learned is that smell has a source. I used to assume garbage disposal odor was just “kitchen life,” like crumbs under the toaster or that one container in the fridge everyone is afraid to open. But the odor was not random. It came from food residue stuck in places I was not cleaning: under the splash guard, along the drain opening, and inside the disposal chamber.
The second lesson is that baking soda needs time. The first time I tried it, I poured baking soda in, immediately chased it with vinegar, watched the fizz, and rinsed it away like I was in a race. It helped a little, but not enough. Letting the baking soda sit first made the process more effective because it had time to absorb odor before the vinegar reaction started.
The third lesson is that the splash guard matters more than I expected. Honestly, cleaning under those rubber flaps was disgusting. It was the kind of task that makes you stare into the middle distance and reconsider takeout. But once I scrubbed it, the sink smelled fresher before I even used vinegar. That told me the splash guard had been holding a lot of the odor.
I also learned that lemon is a finishing touch, not the whole cleaning plan. Lemon smells wonderful, but it does not replace scrubbing or deodorizing. If the disposal is dirty, lemon can briefly make the grime smell like citrus-flavored grime. That is not the dream. Now I clean first, then use a small amount of lemon for freshness afterward.
Another practical discovery: cold water is my everyday friend. I used to run hot water because hot water feels cleaner. But when grinding food waste, cold water is better for helping fats stay more solid as they move through the disposal and pipes. I still use hot water after a baking soda-and-vinegar cleaning rinse, but during normal disposal use, I stick with cold water.
The baking soda method also made me more careful about what I put down the drain. Before this little cleaning adventure, I was too casual with rice, coffee grounds, onion skins, and greasy pan residue. Now I scrape plates better, toss questionable scraps in the trash or compost, and treat the disposal like an appliance instead of a kitchen monster that eats everything.
My favorite part is that the whole process feels manageable. It does not require special tools, expensive tablets, or a Saturday afternoon sacrifice. A box of baking soda, a bottle of vinegar, an old toothbrush, and a few minutes can make a dramatic difference. The disposal smells cleaner, the sink area feels fresher, and I get the smug satisfaction of solving a household problem with something that costs less than a fancy coffee.
If I had to give one piece of advice, it would be this: do not wait until the odor becomes personal. Clean your garbage disposal before it starts sending distress signals. A quick baking soda treatment every month is easier than dealing with a sink that smells like it has opinions.
Conclusion
Using baking soda to clean my garbage disposal turned out to be one of the easiest kitchen maintenance wins I have tried. Baking soda absorbed odors, vinegar helped loosen residue, scrubbing the splash guard removed hidden grime, and ice with coarse salt gave the chamber a final refresh. The process was simple, inexpensive, and surprisingly satisfying.
The biggest takeaway is that a clean garbage disposal is not about one dramatic cleaning session. It is about small habits: run cold water, avoid grease, feed scraps slowly, clean the splash guard, and use baking soda regularly before odors get out of hand. Do that, and your disposal can stay fresher, cleaner, and much less likely to smell like it is plotting against you.