Table of Contents >> Show >> Hide
- What Does It Mean to Fish Wire Through a Wall?
- Safety First: Know What Kind of Wire You Are Running
- Tools and Materials You May Need
- Step 1: Plan the Wire Route
- Step 2: Turn Off Power Near the Work Area
- Step 3: Cut the Wall Openings
- Step 4: Check for Fire Blocks and Insulation
- Step 5: Feed the Fish Tape or Fish Rod
- Step 6: Attach the Cable Correctly
- Step 7: Pull Slowly and Feed at the Same Time
- Step 8: Install Wall Plates and Finish the Opening
- Common Problems When Fishing Wire Through a Wall
- Best Practices for a Clean, Code-Aware Installation
- Specific Example: Hiding TV Cables Behind a Wall
- Specific Example: Running Ethernet to a Home Office
- Experience-Based Tips for Fishing Wire Through a Wall
- Conclusion
Fishing wire through a wall sounds like something a very patient person does on a quiet Saturday while wearing knee pads and questioning every life choice. In reality, it is one of the most useful DIY skills for hiding TV cables, running Ethernet, installing speaker wire, adding smart-home wiring, or preparing a cleaner home office setup. Done correctly, it can make a room look polished. Done badly, it can turn drywall into Swiss cheese and your mood into burnt toast.
This guide explains how to fish wire through a wall safely, cleanly, and with fewer “why is this not moving?” moments. The focus is mainly on low-voltage cable projects, such as HDMI, Ethernet, coaxial cable, speaker wire, thermostat wire, camera cable, or audio-video wiring. If you are working with standard 120-volt household electrical wiring, local codes, permits, junction boxes, circuit capacity, and safety rules matter much more. When in doubt, hire a licensed electrician. Electricity is not the place to freestyle like you are inventing jazz.
What Does It Mean to Fish Wire Through a Wall?
To “fish wire” means to guide cable through a hidden space inside a wall, ceiling, basement, attic, or stud bay without removing large sections of drywall. Instead of opening the entire wall, you create small access points, use a fish tape or fish rods, attach the cable, and pull it through the cavity.
Common projects include mounting a TV and hiding cables, running Ethernet from a router to another room, installing surround-sound speaker wire, adding a security camera cable, or bringing low-voltage wiring to a smart thermostat. The goal is simple: make the cable go from Point A to Point B while the wall remains mostly intact and your sanity stays mostly available.
Safety First: Know What Kind of Wire You Are Running
Before you grab a drill, identify the cable type. Low-voltage wiring is generally used for data, audio, video, controls, and communication. Standard electrical wiring carries household current and must follow stricter rules. Never run a regular extension cord inside a wall. Extension cords are not designed for concealed permanent installation, and trapping them in a wall can create overheating and fire risks.
For in-wall low-voltage cable, choose cable with the correct in-wall rating. For example, HDMI cables used inside a wall should be CL2 or CL3 rated. Ethernet cables may be labeled CM, CMR, or CMP depending on where they are allowed to be installed. Plenum-rated cable, often marked CMP, is used where air-handling spaces require stricter flame and smoke performance. If cable labels look like alphabet soup, read the packaging carefully and check local requirements before installation.
When to Call a Professional
Call an electrician if you are adding a new outlet, extending a 120-volt circuit, working near a breaker panel, crossing complicated framing, dealing with knob-and-tube wiring, or unsure whether a wall contains plumbing, gas lines, or live electrical cables. A professional visit costs less than repairing an accidental plumbing fountain inside the wall. Spoiler: drywall does not enjoy indoor rain.
Tools and Materials You May Need
A successful wire-fishing project starts with the right tools. You do not need a truck full of contractor equipment, but a few smart tools make the job cleaner and faster.
Basic Tools
- Stud finder with electrical detection
- Non-contact voltage tester
- Fish tape or fiberglass fish rods
- Drywall saw or oscillating multi-tool
- Drill and long flexible drill bit
- Painter’s tape or electrical tape
- Low-voltage mounting brackets or old-work boxes
- Wall plates, brush plates, or cable pass-through plates
- Measuring tape and pencil
- Flashlight or headlamp
- String or pull line
- Protective eyewear and gloves
Fish tape works well for longer straight pulls, especially through open stud bays, attics, basements, and conduit. Fish rods are often easier for short wall drops because they are rigid enough to push through insulation and flexible enough to navigate obstacles. A magnetic pull system can also help in insulated walls, although it may take patience and a little bargaining with gravity.
Step 1: Plan the Wire Route
Planning is the step that prevents most disasters. Decide where the cable will start and where it will exit. For example, if you are hiding TV wires, the cable may run from a low wall plate near an outlet to another wall plate behind the TV. If you are running Ethernet, the cable may travel from a router location through a basement or attic, then down into a wall cavity.
Use a stud finder to locate studs, fire blocks, pipes, and existing wiring. Mark the stud edges lightly with pencil or painter’s tape. Avoid drilling directly above or below outlets and switches unless you know exactly what is in the wall. Existing electrical cables often run vertically from boxes, although older homes can have creative surprises. Older wiring sometimes follows the “somebody in 1963 had a plan, probably” school of design.
Choose the Easiest Path
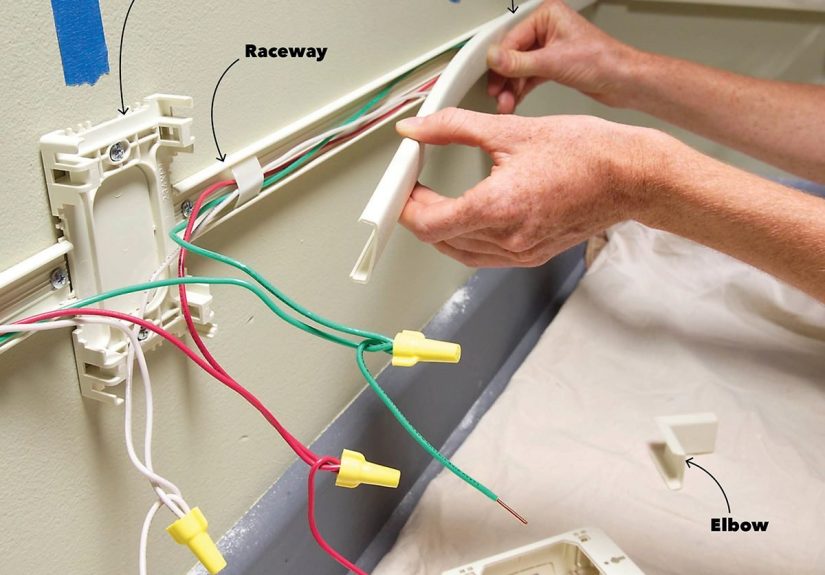
The easiest route is usually a straight vertical drop in the same stud bay. Horizontal runs are harder because studs block the path. For horizontal cable runs, you may need to go up into an attic, down into a basement or crawl space, or use crown molding, baseboards, or surface raceways as an alternative. The best wire-fishing route is not always the shortest route; it is the route with the fewest hidden monsters.
Step 2: Turn Off Power Near the Work Area
Even if you are only running low-voltage cable, turn off power to nearby outlets or switches before cutting or drilling. Use a non-contact voltage tester to check the area. This is especially important when working near existing electrical boxes. A stud finder with live-wire detection helps, but it is not magic. Use it as one layer of protection, not as a permission slip to drill like a woodpecker on espresso.
Step 3: Cut the Wall Openings
Use a low-voltage mounting bracket or old-work box as a template. Hold it level, trace the outline, and cut carefully with a drywall saw. Start small. You can always enlarge the hole, but you cannot un-cut drywall without entering the thrilling world of patching compound.
For low-voltage cable, many projects use open-back low-voltage brackets with brush plates or pass-through wall plates. For standard electrical wiring, approved electrical boxes are required, and wire connections must be enclosed and accessible. Do not bury splices inside a wall.
Tip for TV Cable Management
If you are hiding TV cables, place the upper opening behind the TV and the lower opening near the media console. Keep the plates in the same stud bay if possible. This usually allows a simple vertical pull and avoids drilling through studs.
Step 4: Check for Fire Blocks and Insulation
Many walls contain horizontal fire blocking between studs. Fire blocks are pieces of framing that slow the spread of fire inside wall cavities. They can also stop fish tape dead in its tracks, which is how the wall says, “Nice try.”
If your fish tape stops at the same height repeatedly, you may have hit a fire block. You can sometimes drill through it using a long flexible bit from the wall opening. In other cases, you may need to cut a small access hole, drill through the block, pull the cable, and patch the wall afterward. If you drill through fire blocking, use proper fire-rated sealant where required by code and local rules.
Insulated walls add friction. Fiberglass fish rods are usually better than flimsy tape in insulated cavities because rods can push through the insulation instead of curling into a sad metal noodle. Work slowly to avoid snagging vapor barriers or damaging insulation.
Step 5: Feed the Fish Tape or Fish Rod
Insert the fish tape or fish rod into one opening and guide it toward the other. If you are working vertically, gravity can help. Feeding from the top opening down often works better than pushing upward. If the cable route begins in an attic, drop a weighted string into the wall cavity, then retrieve it from the lower opening.
If you are pulling from a basement or crawl space upward, drill through the bottom plate into the correct stud bay. Accurate measuring matters here. Measure from a nearby wall corner, plumbing stack, or known framing point. Being off by one stud bay can turn a simple job into a drywall treasure hunt.
Use a Helper When Possible
One person can feed the cable while the other pulls. This reduces tension, prevents kinks, and makes the whole process feel less like wrestling a metallic snake. The helper can also listen for tapping inside the wall to confirm the correct bay.
Step 6: Attach the Cable Correctly
Once the fish tape or rod reaches the second opening, attach the cable securely. Strip back only what is necessary if using pull string, and avoid damaging the cable jacket. For finished cables such as HDMI, protect the connector. Stagger bulky connectors if pulling multiple cables so they do not form one giant lump that refuses to fit through the opening.
Wrap the connection with electrical tape in a smooth, tapered shape. The tape should cover sharp edges and create a slim nose that slides through the wall. Do not make a tape football. A bulky taped connection will catch on everything, including things you are pretty sure do not exist.
Step 7: Pull Slowly and Feed at the Same Time
Pull the fish tape gently while your helper feeds cable into the opening. Use steady pressure, not heroic yanking. If the cable gets stuck, stop. Pulling harder may damage the cable, scrape the jacket, or disconnect the tape. Push back slightly, wiggle the fish tape, rotate the rod, and try again.
For data cables such as Ethernet, avoid sharp bends and crushing. Kinks can reduce performance. For HDMI or fiber optic cables, be extra gentle with connectors and bend radius. The cable should move like it has somewhere important to be, not like it is being dragged into court.
Step 8: Install Wall Plates and Finish the Opening
After the cable appears at the exit point, leave a little extra length. Install the low-voltage bracket or old-work box according to the product instructions. Attach the wall plate, brush plate, keystone jack, or pass-through plate. Check that the cable is not pinched behind the plate.
Test the cable before pushing everything neatly into place. For Ethernet, use a cable tester if available. For HDMI, connect the TV and source device. For speaker wire, verify polarity and sound. Testing now is much better than discovering later that the cable failed after the wall plate is already installed and your furniture has returned to its natural habitat.
Common Problems When Fishing Wire Through a Wall
The Fish Tape Will Not Go Down the Wall
You may be hitting a fire block, insulation, a cross brace, plumbing, or another obstruction. Try feeding from the opposite direction. If that fails, inspect from the attic or basement if possible. You may need a small access hole.
The Cable Gets Stuck Halfway
The taped connection may be too bulky, the cable may be snagging on insulation, or the route may include a sharp turn. Pull back gently, slim down the taped connection, and try again. Lubricants are not usually necessary for short residential low-voltage pulls and can create messes if used incorrectly.
The Stud Bay Is Not Where You Thought
This happens. Studs are not always exactly where your confidence says they are. Recheck measurements, use a stud finder, and inspect from above or below. If you cut an opening in the wrong bay, patching drywall is annoying but survivable.
You Found Existing Electrical Wiring
Do not pull low-voltage cable through the same hole as power wiring unless the installation method is specifically allowed and properly separated. Keep low-voltage and line-voltage wiring apart to reduce safety risks and signal interference. If power wiring must be crossed, crossing at a 90-degree angle is generally preferred over running parallel for long distances.
Best Practices for a Clean, Code-Aware Installation
Use cable rated for in-wall use. Keep cables away from heat sources, sharp metal edges, and moving parts. Use nail plates where cables pass close to the face of studs and could be hit by screws or nails. Avoid overstuffing wall cavities with large cable bundles. Label both ends of the cable, especially if you are running more than one line.
Do not hide power cords inside walls. For wall-mounted TVs, use an approved in-wall power relocation kit or have an electrician add a proper receptacle behind the TV. HDMI and low-voltage signal cables can often be fished through the wall when properly rated, but the TV’s factory power cord should not be treated the same way.
Also check local building codes. The National Electrical Code is widely used as the safety benchmark in the United States, but local jurisdictions may adopt versions with amendments. Your city or county building department has the final say.
Specific Example: Hiding TV Cables Behind a Wall
Suppose you have a wall-mounted TV and a media console below. First, confirm that the wall area behind the TV and console is in the same stud bay. Turn off nearby power, scan for studs and wires, and cut two openings using low-voltage brackets. Feed fish rods from the upper opening down to the lower opening. Attach the in-wall-rated HDMI cable and pull it upward while a helper feeds from below. Install brush plates at both openings and connect your devices.
For power, do not drop the TV power cord through the wall. Either plug the TV into an existing outlet behind the TV, install an approved in-wall power kit, or hire an electrician to add a new receptacle. Your wall should hide cables, not become a secret toaster.
Specific Example: Running Ethernet to a Home Office
For a stronger home office connection, you may want Ethernet instead of Wi-Fi. Plan a route from the router to the office using a basement, crawl space, or attic. Use in-wall-rated Cat6 or Cat6A cable. Drill through the top or bottom plate into the correct stud bay, drop a pull string or fish tape, and retrieve it at the wall opening. Pull the cable gently, terminate it with keystone jacks, and test the connection.
Ethernet cable should not be sharply bent, stapled tightly, or run parallel against power wiring for long distances. A clean Ethernet run can make video calls more stable, downloads faster, and your router feel less like it is trying to communicate through soup.
Experience-Based Tips for Fishing Wire Through a Wall
After you have fished wire through a few walls, you learn that every wall has a personality. Some are polite and hollow. Some are packed with insulation, blocking, old cable, mystery nails, and the emotional residue of previous renovations. The biggest lesson is to slow down before making holes. A careful five-minute inspection can save two hours of patching.
One practical habit is to use painter’s tape to map everything before cutting. Mark the studs, the planned box locations, the cable path, and the height of nearby outlets. Step back and look at the layout. Is the wall plate hidden behind the TV? Will the lower plate be blocked by furniture? Is the cable long enough after routing? These small checks prevent the classic mistake of installing a perfect wall plate in a place no human hand can reach.
Another lesson: always buy more cable than the straight-line distance. A ten-foot wall path may need fifteen or twenty feet once you account for vertical drops, attic routing, service loops, and mistakes. Cable is cheaper before the project starts. It becomes emotionally expensive when you are already in the attic, holding a flashlight with your chin, realizing the cable is three feet short.
For insulated walls, fiberglass rods usually feel more controlled than fish tape. Fish tape can curl, dive into insulation, or pop out at odd angles. Rods let you push with direction. If you are dropping cable from above, a small chain or weighted string can also work well because gravity is the one helper who always shows up.
Do not underestimate lighting. A headlamp makes a huge difference in attics, crawl spaces, and dark wall openings. So does a helper with patience. The person feeding cable should not simply stand there scrolling on a phone. Their job is to feed gently, call out resistance, and prevent the cable from twisting into a decorative knot.
When taping cable to fish tape, make the connection slim and tapered. This is one of those tiny skills that separates a smooth pull from a drywall argument. Fold the cable along the fish tape, tape from the fish tape toward the cable, and create a smooth leading edge. If the connector is delicate, protect it without making the joint bulky. The wall cavity is not a spacious highway; it is more like a crowded hallway where every bump matters.
Finally, accept that sometimes the cleanest professional-looking job includes one small access hole. Many DIYers try too hard to avoid patching drywall and end up wasting hours. A neat rectangular access hole can be patched, sanded, and painted. Random damage from forcing tools through a wall is harder to hide. The goal is not zero holes at all costs; the goal is controlled openings, safe routing, and a finished result that looks intentional.
The best experience-based advice is simple: plan the path, respect the wall, use rated cable, pull gently, and test before finishing. When the TV hangs cleanly, the Ethernet works, or the speaker wire disappears like a magic trick, the effort feels worth it. And yes, you may stare at the finished wall for a few minutes like you just completed a museum restoration. That is allowed.
Conclusion
Learning how to fish wire through a wall is one of the most satisfying home improvement skills because the result is both practical and invisible. You get cleaner rooms, fewer dangling cables, better network connections, and a setup that looks planned instead of improvised during a caffeine emergency.
The key is preparation. Use the correct in-wall-rated cable, scan before drilling, choose the simplest route, protect the cable, and pull slowly. For low-voltage projects, a careful DIYer can often handle the job with basic tools. For household electrical wiring, permits, code compliance, and professional help may be necessary. A beautiful wall is nice; a safe wall is non-negotiable.
Note: This article is for general educational purposes. Always follow local electrical codes, product instructions, and safety requirements. Hire a licensed electrician for line-voltage wiring or any project that feels uncertain.