Table of Contents >> Show >> Hide
- Why Save Apple Notes as a PDF?
- Before You Start: A Few Quick Checks
- Quick Way #1: Save an Apple Note as a PDF Using Markup
- Quick Way #2: Save an Apple Note as a PDF Using Print Preview
- Markup vs. Print Preview: Which Method Should You Use?
- How to Find the PDF After Saving It
- How to Share the PDF from Your iPhone
- Common Problems and Easy Fixes
- Extra Tips for Better Apple Notes PDFs
- Can You Export Multiple Apple Notes to PDF at Once?
- Can You Save a Locked Note as a PDF?
- Real-World Experience: What I Learned Saving Apple Notes as PDFs on iPhone
- Final Thoughts
- SEO Tags
Need to turn an Apple Note into a PDF on your iPhone? Good news: you do not need a printer, a laptop, a mysterious “PDF wizard” app, or a degree in tiny-button archaeology. Apple Notes already gives you more than one built-in way to export a note as a PDF. The trick is knowing where iOS hides the buttons.
In this guide, you will learn two quick ways to save Apple Notes to PDF on an iPhone: using Markup and using the Print preview method. You will also get practical tips for saving PDFs to Files, sharing them by email, preserving formatting, handling scanned documents, and avoiding the small surprises that make people mutter, “Why is this not just one button?”
Why Save Apple Notes as a PDF?
Apple Notes is perfect for grocery lists, class notes, meeting summaries, travel plans, recipes, scanned receipts, random midnight ideas, and the occasional “future millionaire business plan” written at 1:17 a.m. But when it is time to share or archive a note, PDF is usually the safer format.
A PDF keeps your note easy to open across iPhone, iPad, Mac, Windows, Android, and most web browsers. It is also cleaner for printing, emailing, uploading to school portals, storing in cloud folders, or sending to someone who does not live inside the Apple ecosystem. Instead of sending editable text that may shift around, a PDF gives your note a more stable, document-like format.
Saving an Apple Note as a PDF is especially useful when you want to:
- Send meeting notes to a coworker or client.
- Submit school notes, study guides, or assignment drafts.
- Archive receipts, checklists, or travel documents.
- Keep a permanent copy before editing or deleting a note.
- Share a note without giving collaboration access.
- Save a scanned document from Notes as a portable file.
The two methods below work directly from your iPhone. The first is the most straightforward. The second is handy when you want a print-style PDF or when the Markup route does not behave the way you expect.
Before You Start: A Few Quick Checks
Before exporting a note, open it and give it the five-second “will this embarrass me later?” review. Make sure the title is clear, the content is complete, and any images or scans are displayed the way you want. Apple Notes exports the note based on its current content and view, so the cleaner your note looks inside the app, the better your PDF will look.
Also, check where you want the PDF to go. The easiest destination is usually the Files app. You can save it to iCloud Drive if you want access from other Apple devices, or On My iPhone if you want it stored locally. If you use Google Drive, Dropbox, OneDrive, or another cloud service connected to Files, those locations may appear as options too.
One important note about attachments: if your Apple Note contains an embedded multipage PDF or scanned document, exporting the note may not always include every page of that embedded item in the way you expect. For important scans, open the scan or PDF attachment itself and verify the exported file before sending it. Trust, but preview.
Quick Way #1: Save an Apple Note as a PDF Using Markup
The Markup method is the cleanest built-in way to convert an Apple Note to PDF on iPhone. It lets you preview the exported note, add quick annotations if needed, and then save the PDF to Files.
Step-by-Step Instructions
- Open the Notes app on your iPhone.
- Tap the note you want to save as a PDF.
- Tap the Share button. It usually looks like a square with an arrow pointing up.
- In the Share Sheet, tap Markup. You may need to scroll through the options.
- Your note opens as a PDF preview. Add highlights, drawings, text, or a signature if you want.
- Tap Done.
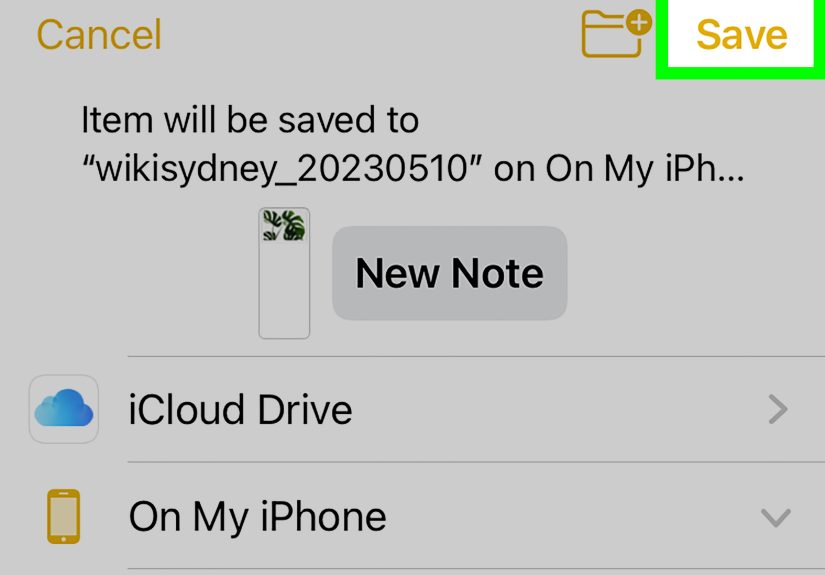
- Choose Save File To… or Save to Files, depending on your iOS version.
- Select a folder, such as iCloud Drive, On My iPhone, or another connected cloud folder.
- Tap Save.
When This Method Works Best
Use Markup when you want the fastest path from Apple Notes to PDF. It is ideal for text notes, checklists, simple images, short meeting notes, class notes, and anything you might want to annotate before saving. If your boss asks for a PDF version of the meeting notes “when you get a chance,” this is the method that lets you appear impressively organized while still drinking your coffee.
Markup is also useful if you need to sign, circle, underline, or add a quick comment before sending the file. For example, if your note contains a scanned form or a checklist, you can use Markup tools to write directly on the PDF preview before saving it.
Useful Markup Tips
Markup is simple, but it has a few quiet superpowers. You can use the pen tools to underline a key point, add text boxes, draw arrows, or add a saved signature. If you are sending a note to a client, teacher, or coworker, small annotations can make the PDF easier to understand.
However, do not overdo it. A PDF covered in arrows, circles, and neon scribbles can start looking like a detective’s conspiracy board. Keep annotations clear and purposeful. If the note already explains itself, save it cleanly and move on with your life like the efficient digital citizen you are.
Quick Way #2: Save an Apple Note as a PDF Using Print Preview
The second way uses the iPhone’s Print feature. This may sound odd because you are not actually trying to print anything. But on iPhone, the Print screen can create a PDF-style preview that you can share or save to Files.
This method is especially helpful when you want to see how the note will look as printed pages. It can also be a useful backup if the Markup option is hard to find or if you prefer the print layout.
Step-by-Step Instructions
- Open the Notes app on your iPhone.
- Open the note you want to convert to PDF.
- Tap the Share button.
- Scroll down and tap Print.
- Wait for the print preview to appear. You do not need to select a printer if your goal is saving a PDF.
- Look for the Share button on the Print Options screen. On some versions, you may need to pinch open the preview thumbnail first.
- Tap Save to Files.
- Choose your folder, rename the file if needed, and tap Save.
When This Method Works Best
The Print preview method is excellent when layout matters. If your Apple Note has headings, lists, images, or a longer structure, the print preview gives you a page-by-page look before you save. That makes it easier to catch awkward page breaks, giant image spacing, or that one checklist item floating alone on page two like it missed the bus.
It is also a strong option when you plan to print the note later. Saving the note through Print preview gives you a PDF that already behaves like a print-ready document. You can then send it by email, upload it to a portal, or store it with other paperwork.
What If You Do Not See the Share Button?
iOS menus can vary slightly by version. If you are on the Print Options screen and do not see a Share button, try pinching outward on the preview thumbnail with two fingers. This often opens the preview in a larger PDF-style view. From there, look again for the Share button and choose Save to Files.
If that still does not work, use the Markup method instead. In most cases, Markup is easier and more direct for Notes.
Markup vs. Print Preview: Which Method Should You Use?
Both methods can save Apple Notes to PDF on an iPhone, but they are not identical. Think of Markup as the fast “export and annotate” route. Think of Print preview as the “show me the pages first” route.
Choose Markup If…
- You want the quickest built-in PDF export.
- You need to add a signature, drawing, highlight, or quick note.
- Your note is mostly text, lists, or simple images.
- You want to save directly to Files without thinking too much.
Choose Print Preview If…
- You want to check the page layout before saving.
- You plan to print the PDF later.
- Your note is long and you care about page breaks.
- The Markup option is missing or not working as expected.
For everyday use, start with Markup. For longer notes or documents that need to look polished on paper, try Print preview. If one method gives you a weird result, use the other. This is not cheating. This is called being smarter than the Share Sheet.
How to Find the PDF After Saving It
After you save the PDF, open the Files app. Tap Browse at the bottom, then check the location you selected: iCloud Drive, On My iPhone, or a third-party cloud folder. If you do not remember where you saved it, use the search bar in Files and type part of the note title or “PDF.”
To make PDFs easier to find later, create a folder for them. For example, you might use folders such as:
- School Notes
- Work PDFs
- Receipts
- Travel Documents
- Scanned Forms
You can also rename the PDF before saving it. A file called Client_Meeting_Notes_April.pdf is much easier to find than Untitled 47.pdf, which sounds like a suspicious folder from a spy movie.
How to Share the PDF from Your iPhone
Once your note is saved as a PDF, sharing it is easy. Open the Files app, find the PDF, touch and hold the file, then tap Share. From there, you can send it through Mail, Messages, AirDrop, Slack, WhatsApp, Google Drive, Dropbox, or any other compatible app installed on your iPhone.
If the PDF is large, consider compressing it or saving it to a cloud folder and sending a link instead of attaching the whole file. This is especially helpful for notes with lots of images or scans. Nobody loves receiving a 48 MB “quick note,” especially not someone on airport Wi-Fi.
Common Problems and Easy Fixes
Problem: I Cannot Find Markup
Tap the Share button and scroll carefully through the Share Sheet. Some options may be hidden farther down. If you still do not see Markup, make sure your iPhone is updated and that you are opening the note directly in Apple Notes, not viewing it through another app or shared preview.
Problem: The PDF Looks Different from My Note
PDF export depends on how the note content is interpreted for sharing, markup, or printing. Images, scans, tables, and attachments can affect spacing. Try the other method: if Markup looks strange, use Print preview; if Print preview breaks the layout oddly, use Markup.
Problem: A Scanned Document Did Not Export Correctly
If a note contains a scan, tap the scan itself and check whether it has multiple pages. For important documents, you may get better results by sharing or saving the scanned document directly rather than exporting the entire note around it.
Problem: The PDF Is Too Large
Large PDFs usually come from photos, scans, or image-heavy notes. Try removing unnecessary images before exporting, saving a cleaner version of the note, or using a PDF compression tool after export. If the file is for email, you can also upload it to iCloud Drive or another cloud service and share a link.
Problem: I Saved It, but Now It Has Vanished
It probably has not vanished. It is just hiding in the Files app with the confidence of a raccoon in a garage. Open Files, tap Browse, check Recent, then search for the note title or “PDF.” Also check both iCloud Drive and On My iPhone.
Extra Tips for Better Apple Notes PDFs
If you want your exported PDF to look professional, clean up the note before saving. Add a short title at the top, use headings for sections, remove duplicate images, and make lists consistent. Apple Notes is casual by nature, but your PDF does not have to look like it was assembled during a caffeine emergency.
For longer notes, break the content into sections with clear headings. This makes the PDF easier to read and helps the page layout feel intentional. If you are sending the PDF to someone else, add context at the top, such as the meeting date, project name, or class topic.
If you are saving a note for records, include the date in the file name. For example: Tax_Receipt_Notes_2026-04-30.pdf. Dates sort beautifully in file lists, and your future self will silently thank you.
For sensitive notes, think before sharing. A PDF is easy to forward. If the note contains private information, passwords, personal details, financial records, or medical information, consider whether PDF is the right format and whether the recipient truly needs the whole note.
Can You Export Multiple Apple Notes to PDF at Once?
On iPhone, Apple Notes is mainly designed for exporting one note at a time. If you need to turn many notes into PDFs, you may need to repeat the process for each note or use a Mac, where document handling can be easier for batch-style organization. Another workaround is to combine related notes into one master note before exporting, but that only works if the notes belong together.
For example, if you have five separate notes for a road tripflights, hotels, packing list, restaurant ideas, and emergency contactsyou could copy them into one “Trip Packet” note and then export that as a single PDF. That is cleaner than sending five separate files named like a digital scavenger hunt.
Can You Save a Locked Note as a PDF?
If a note is locked, unlock it first with Face ID, Touch ID, or your password. Once it is open, you can try exporting it like any other note. But be careful: saving a locked note as a PDF creates a separate file that may not have the same protection as the original locked note. If the content is sensitive, store the PDF in a secure location and avoid casually sharing it.
In plain English: the lock protects the note in Apple Notes. It does not magically wrap every exported copy in a tiny security blanket.
Real-World Experience: What I Learned Saving Apple Notes as PDFs on iPhone
The first time many iPhone users try to save an Apple Note as a PDF, they expect a giant button labeled “Export as PDF.” A fair expectation! Instead, iOS sends you on a miniature treasure hunt through Share, Markup, Print, preview thumbnails, and Save to Files. Once you know the route, it is quick. Before that, it can feel like trying to find the secret menu at a restaurant where the waiter refuses to make eye contact.
In everyday use, the Markup method is the one I would teach first. It is fast, direct, and works well for normal notes: meeting summaries, study notes, lists, drafts, recipes, and short reports. The best part is that it gives you a chance to annotate the note before saving. If you need to circle a total, underline a deadline, or sign a scan, Markup keeps everything inside the iPhone workflow. No printing. No scanning again. No emailing yourself like it is 2012.
The Print preview method feels slightly more hidden, but it earns its place. It is useful when the final page layout matters. If a note is long, includes images, or may be printed later, previewing the pages first can save embarrassment. Nobody wants to send a PDF where the heading sits alone at the bottom of page one while the actual content starts on page two, looking abandoned.
One practical habit is to create a dedicated folder in Files before exporting. For example, make a folder called “Notes PDFs” inside iCloud Drive. That way, every exported note has a home. Without this, PDFs tend to scatter across folders like loose socks in a dryer. You save one to Downloads, another to On My iPhone, another to some cloud folder you forgot existed, and suddenly finding the file becomes harder than creating it.
Another lesson: rename the PDF immediately. Apple may suggest a name based on the note, but it is worth making it specific. A file called “Meeting Notes” is fine today and useless in three months. A file called “Marketing_Meeting_Notes_2026-04-30.pdf” is searchable, sortable, and emotionally mature.
For scanned documents, always preview the exported PDF before sending it. Notes is great for scanning receipts and forms, but attachments can behave differently from plain text. If the scan is the main thing you need, open the scan and share it directly when possible. That gives you better control over what the recipient receives.
Finally, remember that PDF is a copy, not a live note. If you update the original Apple Note later, the saved PDF will not update automatically. This is actually a feature when you need a permanent record. But if you are working on a draft that changes often, wait until the note is final before exportingor label the file as a draft so nobody treats it like the holy tablet of final decisions.
The bottom line from real use is simple: use Markup for speed, use Print preview for layout, save to a clear folder, rename the file, and preview before sending. Once those habits click, saving Apple Notes to PDF on an iPhone becomes one of those tiny productivity wins that makes your phone feel less like a distraction rectangle and more like a pocket office.
Final Thoughts
Saving Apple Notes to PDF on an iPhone is quick once you know where the options live. For most people, the best method is Share > Markup > Done > Save to Files. It is simple, built in, and works well for everyday notes. The second method, Share > Print > Preview > Share > Save to Files, is a smart backup when you want a print-style layout or need to check page breaks before saving.
Whether you are archiving meeting notes, submitting schoolwork, saving receipts, or sending a polished copy of a note to someone outside Apple Notes, PDF is a reliable format. Just remember to preview the file, name it clearly, and save it somewhere you can actually find later. Your future self has enough problems. Do not make “Where did I put that PDF?” one of them.
Note: iPhone menu names and button placement can vary slightly by iOS version, region, and note content. If one method does not appear on your device, try the other method or update iOS before troubleshooting further.