Table of Contents >> Show >> Hide
- Why a Basket Pendant Light Works So Well
- Basket Pendant Light Basics: Shade First, Fixture Second
- How To Choose the Right Basket
- Tools and Materials You May Need
- Step-by-Step: How To Turn a Basket Into a Pendant Light
- Safety Rules You Should Not “Creative DIY” Around
- Best Places To Use a Basket Pendant Light
- Common Mistakes To Avoid
- Renter-Friendly Ways To Get the Look
- How To Make It Look Custom, Not Crafty
- What the Experience Is Really Like: 500 Extra Words From the Real-World Side of This DIY
- Conclusion
- SEO Tags
There are two kinds of people in this world: people who walk past an old basket and see a basket, and people who squint at it and whisper, “You could be a light fixture.” This article is for the second group. Or for the first group who are ready to become a little more interesting.
Turning a basket into a pendant light is one of those DIY projects that looks expensive, feels custom, and makes visitors ask, “Wait, where did you get that?” The best part is that the answer can be delightfully smug: “Oh, that? I made it from a basket.” Whether you want a breezy coastal look, a warm modern farmhouse vibe, or a slightly boho “I definitely know what rattan means” aesthetic, a basket pendant light can deliver texture, character, and a softer glow than many off-the-shelf fixtures.
But this is not a “grab any basket, shove in a bulb, and hope for the best” situation. A good basket pendant light balances style, airflow, weight, hardware, and safety. Done right, it looks designer. Done wrong, it looks like your ceiling is wearing a picnic hamper.
Why a Basket Pendant Light Works So Well
A woven basket brings something many factory-made fixtures struggle to fake: texture. Natural materials like rattan, seagrass, bamboo, and other woven fibers add warmth without making a room feel heavy. They soften hard kitchen finishes, warm up white walls, and give a plain room a focal point that feels collected rather than copied from page seven of a catalog.
There is also a practical reason basket lights keep showing up in kitchens, breakfast nooks, entryways, bedrooms, and covered patios. Pendant lights do double duty. They provide light, of course, but they also visually anchor a table, island, or corner. A basket shade diffuses that role with a friendlier face. Instead of shouting, “Behold, a metal cylinder,” it says, “Relax, I have snacks and good taste.”
Another bonus: basket pendants can work with a wide range of interiors. A tighter weave reads more polished and tailored. A loose, airy weave feels casual and beachy. A darker stain can lean rustic or vintage. A pale woven shade can feel Scandinavian, coastal, or minimalist depending on the room around it.
Basket Pendant Light Basics: Shade First, Fixture Second
Before you start drilling anything, decide what you are actually making. In most cases, you are not turning a basket into the electrical fixture itself. You are turning it into the shade that works with a proper pendant light kit, socket, canopy, and mounting hardware. That distinction matters.
The safest and simplest approach is to use a real pendant cord set or an existing hardwired pendant fixture, then modify the basket so it hangs around the bulb as a decorative shade. The basket becomes the stylish shell. The lighting hardware still does the actual lighting work.
If you already have a ceiling box and an old pendant you dislike, you may only need to swap the shade. If you have recessed lighting in the right spot, a recessed-to-pendant conversion kit can sometimes save you from a full rewiring job. If you are a renter and cannot hardwire anything, you can still fake the look with a battery-powered light or plug-in pendant setup. In other words, there is a version of this project for homeowners, renters, thrifters, and people who own exactly one screwdriver and too much optimism.
How To Choose the Right Basket
1. Prioritize shape
The easiest baskets to convert are round, tapered, bell-shaped, dome-shaped, or drum-shaped. Open-bottom baskets are especially useful because they already hint at a lampshade profile. Deep storage baskets with straight sides can work too, but they may look chunkier and block more light.
2. Check the weave
Look for a basket with enough open weave to let light escape and heat dissipate. A very dense weave can look gorgeous during the day and then behave like a gloomy hat for your bulb at night. Some shadow play is lovely. Total cave lighting is less charming over dinner.
3. Watch the weight
A lightweight or medium-weight basket is ideal. If the basket is heavy, awkward, or made with a thick internal frame, stop and think before hanging it overhead. The heavier the shade, the more important proper fixture support becomes. If your chosen basket feels like it could survive a bar fight, it may be better as storage than as a pendant.
4. Inspect the material
Natural woven shades are popular for a reason, but not all baskets are equal. Some are made from rattan. Some are wicker, which refers to the weave style rather than a single material. Others may be bamboo, reed, seagrass, or synthetic fibers. Aim for a basket in good condition with no crumbling fibers, brittle coatings, or questionable glue repairs.
5. Consider the opening size
You will usually cut or enlarge a hole in the center of the basket bottom so the socket hardware can pass through. A basket with a reasonably flat base is often easiest to modify cleanly.
Tools and Materials You May Need
- Basket of your choice
- Pendant light kit, pendant cord set, or existing pendant fixture
- LED bulb
- Washer, shade ring, or socket collar depending on your kit
- Marker or pencil
- Measuring tape
- Utility knife, heavy scissors, or small rotary cutting tool
- Sandpaper for rough edges
- Wire cutters if needed for basket framing only
- Optional paint, stain, or clear matte sealer
- Optional chain, ceiling hook, or conversion kit for non-hardwired options
Step-by-Step: How To Turn a Basket Into a Pendant Light
Step 1: Plan the location
Decide where the pendant will hang before you modify the basket. Over a kitchen island, a pendant usually looks best when centered and hung low enough to feel intentional but high enough that nobody stands up into it and learns a lesson. Over a dining table, pendant lighting should feel intimate, not interrogational. In an entryway or hallway, maintain enough clearance so the fixture does not become forehead decor.
If you are installing several pendants, spacing matters. Multiple small basket pendants can look airy and elegant, while one oversized basket pendant can make a dramatic statement. The goal is balance, not a ceiling traffic jam.
Step 2: Clean and prep the basket
Give the basket a thorough cleaning. Dust, loose fibers, and thrift-store mystery glitter do not improve a light fixture. If you want to paint or tone the basket, do it now. Soft whitewash, warm natural stain, matte black, and muted clay tones all work beautifully depending on the room.
If the basket has handles, decide whether to keep them. In some designs they look charming and handmade. In others they scream “I once held laundry.” Remove them if they interfere with the shape or look.
Step 3: Mark the opening
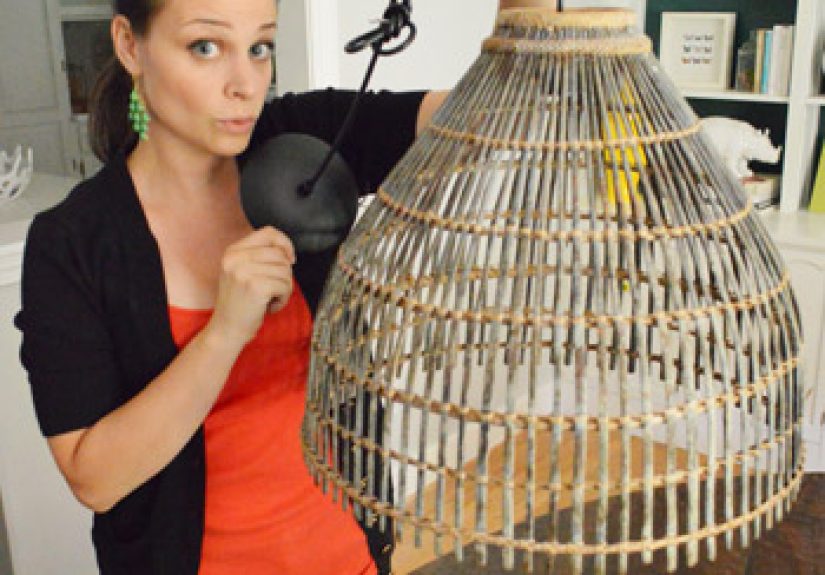
Turn the basket upside down. Most DIY basket pendants are built by using the basket upside down so the original bottom becomes the top where the socket passes through. Measure the socket opening or shade ring on your pendant kit and mark a centered hole.
Go slowly here. A too-small hole is annoying but fixable. A too-large hole is how many innocent DIYs become “rustic” against their will.
Step 4: Cut the hole
Carefully cut the opening. With woven baskets, this often means snipping strands one at a time instead of hacking through the whole thing like you are escaping a shipwreck. Test-fit the opening as you go. You want the basket to sit securely on the fixture hardware without wobbling.
Trim loose ends and sand or smooth any rough spots. If the basket frays easily, a light coat of clear sealer can help stabilize the cut area.
Step 5: Attach the basket to the pendant hardware
Slide the basket onto the pendant light kit so it functions like a shade. Depending on your fixture, the basket may be secured by a threaded socket ring, a washer-and-nut setup, or a shade fitter. The basket should sit level and stable, with the bulb centered inside the opening.
This is the moment where you step back, squint, and decide whether you are a genius. If the basket hangs crooked, adjust before installing it overhead. Gravity is honest, sometimes rudely so.
Step 6: Use the right bulb
This part is important. Use the bulb type recommended by the fixture manufacturer, and stick to the fixture’s maximum wattage. For a woven basket shade, an LED bulb is usually the smartest choice because it runs cooler and is more energy efficient than incandescent options. A warm white LED often creates the best glow for natural woven shades.
Also think about bulb shape. A giant globe bulb can look fantastic in a loose, open basket. A standard A-shape LED is more understated. If the basket weave exposes the bulb heavily, pick one that adds to the look instead of sabotaging it.
Step 7: Install or hang the pendant
If you are replacing an existing ceiling fixture, turn off power at the breaker first. Then follow the pendant kit instructions exactly. In general, pendant installation involves securing the mounting bracket, matching hot, neutral, and ground wires correctly, tucking the wires safely into the electrical box, attaching the canopy, and testing the light after power is restored.
If the electrical box is loose, outdated, or not rated for the weight of the fixture, this is not the moment to improvise. That is your sign to call an electrician. A basket pendant should be charming, not memorable to your insurance company.
Safety Rules You Should Not “Creative DIY” Around
There are plenty of fun places to freestyle in this project. Safety is not one of them. Keep these rules in mind:
- Always turn off the circuit breaker before touching existing wiring.
- Use a proper ceiling electrical box and secure canopy hardware.
- Follow the fixture manufacturer’s bulb and wattage recommendations.
- Choose LED bulbs when possible for lower heat output.
- Keep the bulb from touching the basket or sitting too close to dense fibers.
- Do not use a damaged, brittle, moldy, or heavily coated basket.
- If the fixture feels too heavy or complicated, hire a licensed electrician.
A woven shade should never be crammed tight around a hot bulb. Think “breathing room,” not “sweater on a toaster.” If your design traps heat, blocks airflow, or places natural fibers right against the bulb or socket, redesign it before you flip the switch.
Best Places To Use a Basket Pendant Light
Kitchen island
This is the classic. One large pendant or a pair of medium basket pendants can warm up stone, quartz, butcher block, or painted cabinetry. Basket lighting works especially well in white kitchens that need texture.
Dining nook
A basket pendant over a small round table creates instant café energy. Add linen curtains and suddenly your breakfast feels more organized than it really is.
Bedroom corner
Swapping a basic ceiling fixture for a woven pendant can soften a bedroom fast. It is especially effective in rooms that feel boxy or overly plain.
Entryway
A basket light in an entry creates a welcoming first impression. It says, “Someone here has opinions about texture,” which is usually a compliment.
Covered patio
If you use a fixture rated for the location, a woven pendant can make a covered outdoor space feel like an actual room instead of just a place where pollen happens.
Common Mistakes To Avoid
Choosing a basket that is too small
If the bulb nearly touches the weave, the scale is off and the heat clearance may be poor. Go up a size.
Choosing a basket that is too dense
A closed weave can swallow light. If you want glow and pattern, pick a more open design.
Ignoring proportion
A tiny basket over a large island looks accidental. A giant basket over a narrow side table looks like a dare.
Skipping the centered opening
If the bulb is off-center, the whole fixture looks a little seasick. Measure twice and cut once.
Using the wrong bulb color
Cool-toned bulbs can make natural baskets feel harsh. Warm white generally flatters woven materials better and creates a softer, more inviting mood.
Renter-Friendly Ways To Get the Look
If you cannot hardwire a new fixture, you still have options. A plug-in pendant cord swagged from a ceiling hook can mimic the look with less commitment. Another workaround is using a battery-powered puck or rechargeable light inside a lightweight basket shade for decorative effect in areas where task lighting is not critical.
Is it identical to a true hardwired pendant? No. Is it a clever way to get the woven pendant look without annoying your landlord? Absolutely. Sometimes design is about elegance. Sometimes it is about plausible deniability.
How To Make It Look Custom, Not Crafty
The difference between “beautiful designer-inspired DIY” and “weekend project with strong feelings” usually comes down to finishing details.
- Use a canopy and cord color that suits the room, such as black, brass, white, or aged bronze.
- Choose a bulb that looks intentional if it will be visible.
- Repeat the basket’s tone elsewhere in the room with stools, trays, or woven storage.
- Keep the shape simple if the weave is already visually busy.
- Hang it at the correct height so it feels planned rather than randomly suspended.
And resist the urge to overdecorate the basket with tassels, beads, ribbons, or six conflicting finishes. Let the texture do the talking. It already has a lot to say.
What the Experience Is Really Like: 500 Extra Words From the Real-World Side of This DIY
The funniest thing about making a basket pendant light is how the project changes while you are doing it. At the beginning, it feels gloriously simple. You find a basket, hold it upside down, and think, “This is basically already a lamp.” Then the practical questions show up. Is the opening centered? Is the weave too tight? Will the bulb look weird? Why does this one basket somehow weigh as much as a medium-sized ottoman?
That is the real experience of this project: it lives at the intersection of decorating instinct and tiny engineering decisions. You are not just choosing something pretty. You are editing shape, light, texture, scale, and safety all at once. The basket that looks perfect sitting on a thrift-store shelf may suddenly look too shallow when a bulb is inside it. Another basket that seemed awkward and dull can become stunning the second it is flipped upside down and hung at eye level.
Many people also discover that woven light fixtures change a room more dramatically than expected. A new paint color is obvious. New curtains are obvious. But a basket pendant affects mood in a sneakier way. During the day, it adds natural texture and sculptural interest. At night, it casts softer light and sometimes beautiful shadows. A room that felt flat can suddenly feel layered and lived-in. It is a small project with suspiciously large main-character energy.
There is also a learning curve with placement. Too high, and the fixture disappears. Too low, and everyone notices it for the wrong reasons. The sweet spot can take a few adjustments, especially over islands, bedside tables, and breakfast nooks. That trial-and-error phase is normal. In fact, it is part of what makes the finished result feel more personal. You are not just installing a product. You are tuning the room.
Another common experience is that one basket pendant light tends to lead to more basket-related confidence than any responsible person should probably have. First it is one pendant over the table. Next thing you know, you are side-eyeing every woven object in the house and asking whether it has “lighting potential.” This is how projects multiply. Today it is a pendant. Tomorrow you are spray-painting a lamp base at 9 p.m. while insisting everything is under control.
Still, that is part of the fun. This DIY invites experimentation without requiring luxury-level spending. It rewards patience, but it is also forgiving. A basket can be trimmed, stained, swapped, or replaced without wrecking your whole budget. And because woven shades are naturally imperfect, the final result often looks charming rather than rigid. Small variations in color, weave, and shape make the light feel more collected and less mass-produced.
In the end, the experience of turning a basket into a pendant light is less about saving money and more about creating something with personality. You start with an ordinary object and end up with a fixture that feels thoughtful, warm, and unmistakably yours. That is a good trade. Especially when the basket used to cost less than lunch.
Conclusion
If you want a lighting upgrade that adds texture, personality, and a little bragging rights, turning a basket into a pendant light is a smart DIY move. The key is to treat the basket like a shade, not a shortcut around proper lighting hardware. Choose the right shape, use a real pendant kit, keep heat and weight in mind, and finish the project with a bulb and hanging height that flatter the room.
Done well, a basket pendant light can make a kitchen feel warmer, a breakfast nook feel cozier, or an entryway feel far more custom than its square footage suggests. It is one of those rare DIY projects that is affordable, stylish, and actually useful. Which, frankly, is more than can be said for a lot of things in the home-decor universe.