Table of Contents >> Show >> Hide
- Why a Campaign Chest Looks So Good in Klein Blue
- Before You Paint: Smart Checks That Save Regret
- Tools and Materials for a Klein Blue Dresser Makeover
- Step-by-Step: How to Make Over a Campaign Chest in Klein Blue
- Step 1: Remove hardware and document everything
- Step 2: Clean like paint depends on it (because it does)
- Step 3: Sand for adhesion, not punishment
- Step 4: Repair dents, dings, and drawer-face drama
- Step 5: Prime with intention
- Step 6: Choose your Klein Blue-inspired paint color wisely
- Step 7: Paint in thin coats and resist the urge to “fix” wet paint
- Step 8: Topcoat for durability (especially on dresser tops)
- Step 9: Clean and refresh the brass hardware
- Step 10: Reassemble and style like you meant to do this all along
- Common Mistakes to Avoid in a Blue Dresser Makeover
- Design Ideas: Where a Klein Blue Campaign Dresser Works Best
- 500-Word Experience Add-On: What People Usually Learn During a Klein Blue Campaign Chest Makeover
- Conclusion
Some furniture makeovers whisper. This one absolutely sings.
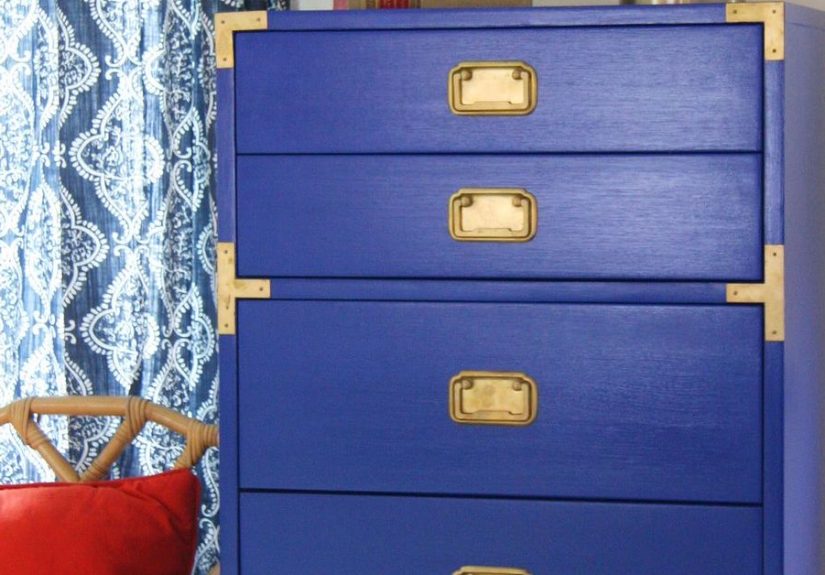
A campaign chest (or campaign-style dresser) already has strong bones: clean lines, brass corner guards, and those classic recessed pulls that look like they belong in an old-world travel trunk. Pair that shape with a saturated Klein Blue-inspired finish, and suddenly your thrift-store find stops being “just storage” and starts acting like a piece of art with drawers.
This guide walks you through a full Klein Blue campaign chest makeover from start to finish: how to prep correctly, how to avoid the rookie mistakes that cause chipping, how to handle brass hardware without turning it into a science experiment, and how to style the finished piece so it looks intentionalnot like a paint can exploded in your guest room.
If you want a dresser makeover that feels bold, tailored, and high-end (without spending high-end money), this is the one.
Why a Campaign Chest Looks So Good in Klein Blue
The campaign chest silhouette is already doing half the work
Campaign furniture was designed to be practical, durable, and portable, which is why it usually features flush surfaces and protective brass details. In modern homes, those same details read as crisp and architectural. A campaign dresser has the rare ability to look traditional, coastal, modern, and collected at the same time.
That makes it the perfect candidate for a color-forward update. You can paint a curvy, ornate dresser bright blue, surebut a campaign chest wears bold color better because the shape is disciplined. The geometry keeps the color from feeling chaotic.
What “Klein Blue” brings to a furniture makeover
International Klein Blue (IKB) is associated with artist Yves Klein and is famous for its rich, ultramarine intensity. In furniture terms, think of it as a blue that refuses to be background. It’s deeper than a cheerful cobalt, brighter than navy, and more electric than denim tones.
A true museum-grade IKB formula belongs to art history, but for DIY interiors, a Klein Blue-inspired paint color is the move: a highly saturated ultramarine/cobalt blue with strong depth. On a campaign chest, the brass hardware and corners pop against that blue like jewelry against a tailored jacket.
In short: the blue brings drama, and the brass keeps it classy.
Before You Paint: Smart Checks That Save Regret
1) Make sure the piece is a good candidate for paint
Not every dresser should be painted. If your piece is a true antique (especially 100+ years old), a collector piece, or a high-value midcentury item with beautiful original veneer, painting can reduce both the visual character and the resale value.
A good rule: if you’re unsure, spend 10 minutes checking maker’s marks, drawer joinery, and comparable listings before you open the primer. If it’s a mass-market or heavily worn piece? Paint away. If it’s a valuable original? Consider restoration instead.
2) Watch for lead paint on older furniture
If the dresser is older (especially pre-1978), don’t assume you can just sand first and ask questions later. Lead-safe practices matter. If you can’t confirm the age or finish history, treat it cautiously, test if needed, and set up your workspace to contain dust and debris.
The goal is simple: beautiful makeover, no hazardous dust in your home.
3) Decide your finish level before you start
Klein Blue looks gorgeous in multiple sheens, but your choice changes the vibe:
- Matte/ultra-matte: artistic, velvety, moody
- Eggshell/satin: polished and practical for everyday use
- Semi-gloss: more dramatic, but highlights imperfections
For most dressers, satin is the sweet spot. It gives enough glow to highlight the color while still being forgiving.
Tools and Materials for a Klein Blue Dresser Makeover
Here’s a practical setup that works well for most wood or veneer campaign chests:
- Screwdriver (for hardware removal)
- Painter’s tape and labels (bag screws by drawer)
- Drop cloths
- Gentle degreaser or non-residue cleaner
- Sandpaper (100–150 grit for prep, 220+ for smoothing)
- Tack cloth or damp lint-free cloth
- Wood filler (if needed)
- Stain-blocking primer
- Klein Blue-inspired furniture paint (quality acrylic/alkyd or furniture enamel)
- High-quality synthetic brush and/or foam roller
- Clear topcoat (water-based poly or furniture topcoat, optional but recommended)
- Soft cloths and a soft-bristle toothbrush (for brass)
- Brass cleaner or a gentle DIY brass-cleaning solution
Pro tip: buy better brushes than your instincts want to. Cheap brushes shed bristles like a golden retriever in July.
Step-by-Step: How to Make Over a Campaign Chest in Klein Blue
Step 1: Remove hardware and document everything
Remove all pulls, corner brackets (if removable), and screws. Take a quick photo of each drawer front before disassembly. Campaign hardware can look identical until you’re reattaching it at 10:47 p.m. and suddenly every screw hole feels personal.
Store each drawer’s hardware in a labeled bag. This one step prevents 80% of “why is this not lining up?” moments.
Step 2: Clean like paint depends on it (because it does)
Before sanding, clean the entire dresser thoroughly. Old furniture often has invisible grime: polish residue, skin oils, dust, and mystery stickiness from previous lives. Paint hates mystery stickiness.
Wipe it down with a gentle grease remover or non-residue cleaner, then follow with a clean water wipe. Let the piece dry completely before moving on.
Step 3: Sand for adhesion, not punishment
You do not need to sand the dresser back to raw wood in most makeovers. Your job is to create tooth so primer can grip.
A reliable approach:
- 100–150 grit: scuff glossy surfaces and smooth rough spots
- 220 grit: refine and soften scratch marks before priming
If the existing finish is chipping or uneven, sand more aggressively in those areas first. If the surface is already fairly smooth, a light scuff sand is enough. After sanding, remove all dust with a tack cloth or a slightly damp lint-free cloth.
Step 4: Repair dents, dings, and drawer-face drama
Campaign dressers often have a few battle scarsand honestly, some are charming. But deep gouges, chipped veneer edges, and dents near the hardware should be repaired before paint if you want a polished look.
Fill where needed, let it dry fully, then sand the repair smooth. Run your hand across the drawer fronts. Your fingers will find flaws your eyes miss.
Step 5: Prime with intention
Primer is not the boring part. Primer is the reason your makeover still looks good next year.
Use a stain-blocking primer, especially if the piece is old, dark, or has unknown stains/tannins. Apply thin, even coats. If the primer dries with a little texture, lightly sand it smooth and wipe off dust before paint.
If you’re using a very bold Klein Blue-inspired color, primer helps with both adhesion and color consistency. It also reduces the odds of wood tones or old finishes ghosting through and muddying that gorgeous blue.
Step 6: Choose your Klein Blue-inspired paint color wisely
“Klein Blue” is a design direction, not just a label on a can. What you want is a saturated, high-chroma ultramarine/cobalt blue that still has depth in shadow.
When color matching at a paint counter, describe it like this:
- Deep ultramarine blue
- High saturation
- Little to no gray
- Not navy, not turquoise
Test a sample on the back or inside of a drawer first. Blue shifts a lot depending on lighting. In cool light, it can read electric. In warm light, it can lean more jewel-toned and dramatic.
Step 7: Paint in thin coats and resist the urge to “fix” wet paint
Apply the first coat with a high-quality synthetic brush, foam roller, or a combination of both (roller for flat drawer fronts, brush for details). Keep coats thin and even. Most furniture paint jobs look better with two to three thin coats than one thick one.
The most common mistake is overworking the paint. You brush a section, it starts to set, you go back over it “just once,” and now you’ve created drag marks and texture. Paint the section, feather lightly, and move on.
Let each coat dry thoroughly according to the label. If needed, lightly sand between coats with very fine sandpaper to keep the finish smooth and professional.
Step 8: Topcoat for durability (especially on dresser tops)
A campaign chest gets touched, bumped, and used. Drawer fronts, top surfaces, and corners all benefit from extra protection.
A clear topcoat helps harden and protect the paint film. Match your topcoat type to your paint system (water-based with water-based, oil-compatible with oil-based systems). For most DIY furniture projects, a water-based clear coat is easier to use indoors and less likely to yellow.
Apply 1–2 thin coats, and sand lightly between coats if the product instructions recommend it. The goal is protection, not a thick plastic shell.
Step 9: Clean and refresh the brass hardware
This is where the makeover goes from “nice” to “wow.”
Campaign hardware often has tarnish, dirt, or old wax buildup. Start gently: warm water, mild soap, and a soft cloth. If the brass still looks dull, use a brass-safe cleaner or a mild DIY method. Soft cloths and a soft-bristle toothbrush help clean around edges and recessed details.
For heavier tarnish, brass-safe paste methods (including common vinegar/salt-based approaches) can work wellbut always test first, especially if the hardware is plated rather than solid brass. Rinse and dry thoroughly before reinstalling.
Want to keep the patina instead of polishing to bright gold? Totally valid. A soft clean without aggressive polishing looks especially good on a deep blue dresser.
Step 10: Reassemble and style like you meant to do this all along
Once the paint is dry enough to handle and the hardware is clean, reassemble carefully. Avoid dragging hardware across fresh paint. Tighten screws snugly, not aggressivelyespecially on older drawer fronts.
Then style the top with restraint. Klein Blue is already the statement.
- A ceramic lamp with a neutral shade
- A brass-framed mirror
- A stack of books and one sculptural object
- A trailing plant or simple branches
The dresser is the star. The accessories are backup singers.
Common Mistakes to Avoid in a Blue Dresser Makeover
Skipping prep because “the paint says no sanding needed”
Some paints do have great adhesion, but glossy furniture still benefits from cleaning and a quick scuff sand. Prep is what keeps your makeover from chipping around drawer pulls in six months.
Using thick coats to save time
Thick coats cause drips, brush marks, and longer dry times. Thin coats are faster in the long run because they level better and need fewer fixes.
Rushing cure time
Dry to the touch is not the same as cured. Furniture paint may feel dry quickly, but full cure often takes days to weeks depending on the paint type. Baby the piece during that period: no heavy decor, no sticky trays, no dragging baskets across the top.
Painting valuable originals without checking first
If the piece might be antique or a collectible midcentury item, do your homework before painting. Some dressers are worth moreand look betterrestored than painted.
Design Ideas: Where a Klein Blue Campaign Dresser Works Best
Entryway statement piece
Use a low campaign chest as an entry console. Add a mirror, a catchall tray, and a lamp. The blue adds instant personality, and drawers hide all the boring stuffmail, chargers, mystery keys, that one screwdriver everyone needs.
Dining room storage with attitude
A campaign dresser in Klein Blue makes a killer dining room sideboard. Store linens and serving pieces inside, and style the top with a bar tray or candles. The brass details tie in beautifully with warm metals and glass.
Bedroom focal point
If your bedroom is mostly neutrals, this piece can anchor the room without repainting every wall. Pair it with white bedding, natural wood, and small brass accents for a look that feels edited and intentional.
Home office storage that doesn’t look office-y
A painted campaign dresser can hold files, tech, and supplies while still looking stylish on camera. It’s practical storage disguised as excellent taste.
500-Word Experience Add-On: What People Usually Learn During a Klein Blue Campaign Chest Makeover
One of the most common experiences with a campaign chest dresser makeover is that the project feels simple in theory and surprisingly emotional in practice. You start with “I’m just painting a dresser,” and by coat two you’re standing back every ten minutes, squinting, and suddenly caring deeply about undertones. Blue has that effect on people. It makes you notice lighting, shadow, and sheen in a way beige furniture never could.
Another very real experience: the brass hardware can completely change your opinion of the piece. Before cleaning, it often looks tired or overly dark, and you may be tempted to replace it. Then you clean one pull as a test, hold it against the fresh Klein Blue paint, and realize the original hardware is the entire point. That contrastrich blue and warm brassdoes the heavy lifting. It’s the visual equivalent of wearing a great blazer with simple jeans.
Many DIYers also discover that drawer fronts are the part of the project that separates “fine” from “fantastic.” Large flat surfaces are easy. But on campaign chests, the areas around recessed pulls, trim edges, and corner brackets demand patience. This is usually where people learn to use less paint on the brush, slow down, and trust thin coats. It’s also where most brush marks happen if you try to “touch up” a section that has already started drying.
There’s also the surprise factor of color shift. A Klein Blue-inspired paint sample can look almost royal blue in the store, then look moody and inky at night, and nearly electric near a sunny window. This is not a problemit’s part of why the color feels luxurious. But it does teach you to sample first and to check the piece in the actual room before declaring victory or panic.
Another common experience is underestimating cure time. The dresser may look finished in a weekend, but it is not ready for real life on day one. People often learn this the hard way by setting a basket, tray, or lamp base on the top too soon and getting faint marks. The best outcomes come from treating the piece gently for a couple of weeks while the finish hardens. Annoying? A little. Worth it? Absolutely.
And finally, there’s the “I should have done this sooner” moment. It usually happens after reassembly, when the hardware goes back on and the piece suddenly looks custom. The room feels better, not because everything changed, but because one piece became intentional. That’s the magic of a strong furniture makeover. A campaign chest in Klein Blue doesn’t just add storageit adds identity to the room. It tells people someone with taste lives here. Even if that someone still has painter’s tape stuck to their sock.
Conclusion
A Klein Blue campaign chest makeover is one of those rare DIY projects that checks every box: high visual impact, practical function, and a genuinely achievable process. The keys are simple but non-negotiableclean thoroughly, sand for adhesion, prime properly, paint in thin coats, and give the finish time to cure.
The result is a dresser that feels custom, collected, and expensive-looking without the expensive part. And thanks to the brass details and clean campaign shape, the bold blue reads timeless rather than trendy.
If your room needs one statement piece that actually earns its keep, this is it.