Table of Contents >> Show >> Hide
- Before You Start: Simple Prep for Better Heart Nail Art
- Way 1: The Dotting Tool Heart
- Way 2: The Toothpick V-Heart Design
- Way 3: The Tape or Stencil Heart
- Way 4: The Heart French Tip
- How to Make Your Heart Nail Designs Last Longer
- Common Mistakes When Painting Hearts on Nails
- Best Color Combinations for Heart Nail Art
- of Real-Life Experience: What DIY Heart Nails Teach You
- Conclusion
- SEO Tags
Painting a heart on your nail sounds like the kind of thing that requires a salon appointment, a magnifying glass, and hands as steady as a brain surgeon. Good news: it does not. With the right trick, a few simple tools, and a little patience, heart nail art can be one of the easiest DIY nail designs to master at home.
Whether you want a cute Valentine’s Day manicure, a soft romantic accent nail, a playful birthday look, or just a tiny reminder that your hands deserve attention too, heart nails are wonderfully flexible. They can be bold and red, tiny and minimalist, glittery and dramatic, or so subtle your manicure whispers “adorable” instead of shouting it from across the room.
This guide breaks down 4 ways to paint a heart on your nail with easy DIY designs, using tools you may already have: a toothpick, bobby pin, dotting tool, nail art brush, tape, stickers, or even the rounded edge of a polish brush. You do not need to be a professional nail artist. You just need a clean nail surface, a little drying time, and the confidence to say, “That heart is charmingly handmade,” if one side comes out a little plumper than the other.
Before You Start: Simple Prep for Better Heart Nail Art
The secret to cute heart nails is not only the heart. It is the prep. Nail polish behaves better when your nails are clean, dry, and lightly shaped. If your nail has oil, lotion, dust, or old polish on it, your design may peel faster than your motivation on laundry day.
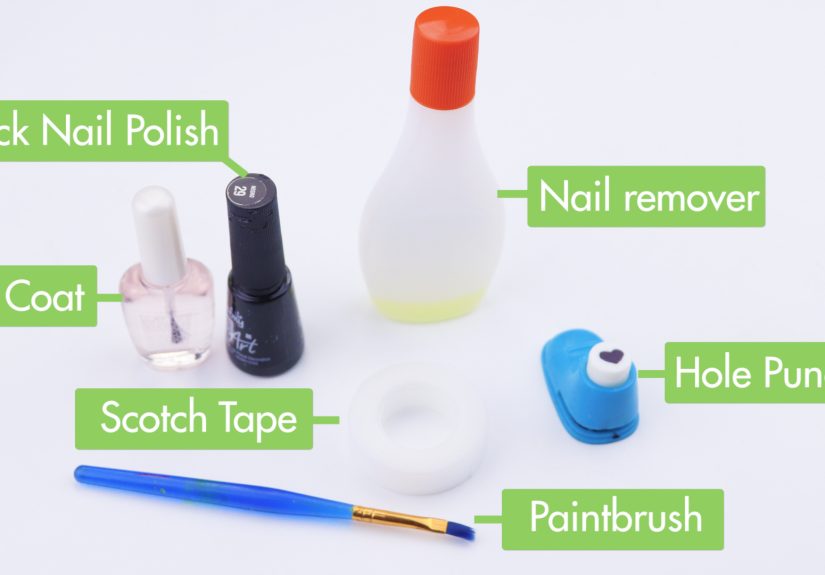
DIY nail art tools you may need
- Base coat
- Top coat
- Two or three nail polish colors
- Dotting tool, toothpick, or bobby pin
- Thin nail art brush or eyeliner brush you no longer use
- Painter’s tape, nail tape, or heart stencil stickers
- Small piece of foil, plastic, or paper for polish drops
- Cotton swabs and nail polish remover for cleanup
Quick nail prep steps
- Remove old polish. Start with a completely clean nail plate.
- Shape your nails. Short, rounded, oval, squoval, and almond nails all work well for heart nail designs.
- Wash and dry your hands. Your nails should be dry before polish touches them.
- Apply base coat. This helps polish go on smoothly and can reduce staining from darker reds or pinks.
- Paint your base color. Use one or two thin coats, then let it dry fully before adding hearts.
Here is the rule that saves many DIY manicures: thin coats beat thick coats every time. Thick polish looks tempting because it seems faster, but it dries slower, dents easier, and can make your tiny heart look like a melted jellybean. Cute? Maybe. Intentional? Not always.
Way 1: The Dotting Tool Heart
This is the classic beginner method and probably the easiest way to paint a heart on your nail. It works because a heart is basically two dots and a point. Once you see it that way, the design feels much less intimidating.
Best for
Beginners, short nails, accent nails, tiny hearts, Valentine’s Day nail art, and anyone who owns a toothpick but not a nail art kit.
What you need
- Base polish color
- Heart polish color
- Dotting tool, toothpick, or rounded bobby pin end
- Top coat
Step-by-step instructions
- Paint your nails with your base color and let them dry completely.
- Place a small drop of heart-color polish on foil or paper.
- Dip your dotting tool into the polish.
- Make two small dots side by side on the nail.
- Use the tip of the tool or a toothpick to drag each dot downward into a soft V shape.
- Gently connect the bottom point so the two dots become one heart.
- Let the design dry, then seal with top coat.
For a tiny heart, keep the dots close together. For a bigger heart, use a bobby pin or the larger end of a dotting tool. If your heart looks slightly uneven, wait for it to dry and refine the edges with a thin brush dipped in the base color. Think of it as nail art concealer.
Color ideas for dotting tool hearts
- Nude base with red hearts for a clean romantic look
- Pink base with white hearts for a soft candy style
- Black base with silver hearts for a glam night-out manicure
- Clear base with tiny red hearts for minimalist nail art
- French manicure base with one heart accent nail
The dotting method is also great for scattered heart nails. Paint one small heart near the cuticle, another toward the tip, and a third at an angle. The design looks intentional even when every heart is slightly different, which is excellent news for real human hands.
Way 2: The Toothpick V-Heart Design
The toothpick V-heart is perfect when you want a delicate design without buying tools. Instead of forming two dots first, you draw a small V shape and soften the top into a heart. This method is especially useful for tiny hearts on short nails or for adding little details around French tips.
Best for
Micro hearts, minimalist manicures, short nails, natural nails, and people who like designs that look dainty rather than dramatic.
What you need
- Base coat and base color
- Contrasting polish for the heart
- Toothpick or very thin nail art brush
- Top coat
Step-by-step instructions
- Apply base coat and your chosen background color.
- Let the base dry thoroughly so the toothpick does not scrape it.
- Add a small polish drop to a disposable surface.
- Dip the toothpick lightly into the polish.
- Draw a tiny V on the nail.
- Round the two upper sides of the V with small curved strokes.
- Let the heart dry before applying top coat.
This design rewards light pressure. A toothpick can create surprisingly crisp lines, but if you press too hard, it may dig into the base polish. Use the polish at the very tip, almost like you are sketching with a feather. A dramatic feather, of course, because this feather is painting love symbols on your fingernails.
Design variations
Try one tiny heart on each ring finger for a simple accent manicure. For a more playful style, place several micro hearts across each nail like confetti. You can also paint hearts in different shades of the same color family, such as baby pink, rose, berry, and cherry red. This gives your manicure dimension without making it look busy.
If you want a modern look, use a sheer nude or milky pink base and paint one tiny red heart near the center of each nail. The result is simple, sweet, and very wearable. It says “romantic,” but in a calm, organized way. Like a love letter that also has bullet points.
Way 3: The Tape or Stencil Heart
If freehand painting makes you nervous, tape and stencils are your best friends. This method gives you a cleaner outline and works well for larger heart shapes. You can use nail vinyls, heart stickers, painter’s tape, or even a homemade stencil cut from tape.
Best for
Bold heart accents, negative space hearts, crisp shapes, large hearts, and beginners who want cleaner edges.
What you need
- Base polish color
- Heart polish color
- Heart stencil, nail vinyl, or tape
- Tweezers
- Top coat
Step-by-step instructions
- Paint your nails with base coat and base color.
- Let the polish dry completely. This is important. Not “kind of dry.” Completely dry.
- Place a heart stencil or tape shape on the nail.
- Press the edges down gently so polish will not bleed underneath.
- Paint over the stencil with your heart color.
- Remove the stencil while the polish is still slightly wet.
- Allow the design to dry, then apply top coat.
For a negative space heart, reverse the idea. Place a heart sticker on your bare or base-coated nail, paint over it, and peel the sticker away. The heart shape remains unpainted, creating a chic cutout effect. Negative space heart nails look especially stylish with nude, blush, burgundy, black, or deep plum polish.
Homemade tape stencil trick
Fold a small piece of painter’s tape in half, cut half a heart along the fold, then open it. You now have a mini heart stencil. The same trick you used in elementary school for paper valentines can now upgrade your manicure. Childhood crafts: still useful, still adorable.
One warning: do not apply tape over polish that is still tacky. The tape will lift the base color, and then you will experience the tiny heartbreak of ruining a nail while trying to paint a heart. Give your base plenty of time to dry, or use quick-dry drops if you have them.
Way 4: The Heart French Tip
The heart French tip is cute, trendy, and surprisingly easy. Instead of painting a traditional curved French tip, you use two rounded strokes at the tip of the nail to form the top of a heart. The point of the heart naturally falls toward the center of the nail tip.
Best for
Medium to long nails, almond nails, oval nails, romantic French manicures, date-night nails, and anyone who wants heart nail art that still looks polished.
What you need
- Sheer nude, pink, or clear base polish
- Red, pink, white, or glitter polish for the heart tip
- Thin brush or the regular polish brush
- Top coat
Step-by-step instructions
- Apply a base coat and a sheer nude or pink polish.
- Let the base dry.
- Using your heart color, paint one rounded stroke from the left side of the nail tip toward the center.
- Paint another rounded stroke from the right side toward the center, meeting in a soft point.
- Refine the bottom point with a thin brush if needed.
- Repeat on each nail or use it only as an accent design.
- Finish with a glossy top coat.
This design is forgiving because the heart shape sits at the tip, where a French manicure already expects a curve. If your nails are short, make the heart smaller and keep it near the free edge. If your nails are longer, exaggerate the curves for a more dramatic sweetheart-tip look.
Heart French tip ideas
- Classic nude base with red heart tips
- Milky pink base with white heart tips
- Clear base with glitter heart tips
- Black heart tips for an edgy romantic look
- Alternating pink and red heart tips for Valentine’s Day
If you want to make the design look more professional, clean the smile line with a thin brush dipped in polish remover. Use a gentle hand and very little remover. You want to sharpen the line, not flood the nail like a tiny beauty-themed swimming pool.
How to Make Your Heart Nail Designs Last Longer
Once your heart nail art looks cute, the next goal is keeping it cute. DIY manicures can last longer when you use thin coats, allow proper drying time, and seal the free edge of the nail with top coat. The free edge is the very tip of your nail, and capping it helps reduce early chipping.
Use top coat the right way
Wait until the heart design is dry enough that it will not smear. Then float the top coat over the nail instead of pressing hard with the brush. A heavy brush stroke can drag red polish through a pale base, creating what can only be described as “romantic chaos.”
Protect your manicure
- Wear gloves when washing dishes or cleaning.
- Avoid using your nails as tools.
- Apply cuticle oil or hand cream to keep the area around your nails hydrated.
- Add another thin layer of top coat after two or three days for extra shine.
Healthy-looking nails also make nail art look better. Keep nails clean and dry, avoid aggressive cuticle cutting, and moisturize regularly. A cute heart design is fun, but comfortable, cared-for nails are always the real main character.
Common Mistakes When Painting Hearts on Nails
Using too much polish
A giant blob of polish is the fastest route to a lumpy heart. Use a small amount and build the shape slowly. You can always add more polish, but removing one overloaded blob usually means starting over.
Not waiting for the base color to dry
If your base is wet, your tool will drag through it and create streaks. Let your base dry before adding hearts. Patience is not glamorous, but neither is a smudged manicure five minutes before leaving the house.
Skipping cleanup
A small cleanup brush can make DIY nail art look much more polished. Dip a tiny brush or cotton swab in remover and clean around the nail edges. This step makes a big difference, especially with red polish.
Applying top coat too aggressively
Do not press the brush down hard. Use a generous bead of top coat and glide it lightly over the design. This helps prevent smearing and keeps your heart shape crisp.
Best Color Combinations for Heart Nail Art
The classic heart manicure uses red and pink, but you have plenty of room to play. For a sweet everyday look, try a sheer nude base with tiny white hearts. For a bold manicure, use a glossy black base with metallic red hearts. For spring, pastel lavender with baby pink hearts looks soft and fresh. For winter, burgundy hearts over a creamy beige base feel cozy and elegant.
If you love minimalist nail art, stick to one accent nail on each hand. If you prefer a playful look, scatter hearts across every nail in different sizes. If you want something trendy but wearable, paint a heart French tip on the ring finger and keep the other nails simple.
of Real-Life Experience: What DIY Heart Nails Teach You
The first thing you learn when painting hearts on your nails is that your non-dominant hand has a personality of its own. It may be enthusiastic, but precision is not always its favorite hobby. The left hand may produce five neat little hearts, while the right hand gives you three hearts, one strawberry, and something that looks like a red potato with feelings. This is normal. This is part of the DIY nail art journey.
In practice, the easiest method for most beginners is the dotting tool heart. Two dots and a V shape are simple enough to repeat, and the design works even when the hearts are not perfectly symmetrical. In fact, slightly uneven hearts often look more charming. They feel handmade in the best way, like a tiny love note instead of a printed label.
Another lesson: drying time matters more than talent. Many DIY nail designs fail not because the design is hard, but because we rush. We paint the base, add a heart, admire it for four seconds, then immediately apply top coat and watch the whole thing smear. The emotional damage is real. Giving each layer time to dry makes the final manicure smoother, shinier, and much less dramatic.
Color choice also changes everything. Red hearts on a nude base are classic and easy to see. White hearts on pale pink look soft but may need two careful layers. Glitter hearts are fun, but glitter polish can be harder to control because the particles do not always land where you want them. If you are new to heart nail art, start with a cream polish before moving to glitter, chrome, or jelly finishes.
One useful experience-based trick is to practice on a plastic bag, a piece of tape, or even a sheet of paper before painting your nails. Make ten tiny hearts in a row. By the sixth or seventh heart, your hand starts to understand the motion. It is like warming up before a workout, except the workout is adorable and you are allowed to sit down.
Cleanup is another skill that instantly improves the final look. A small angled brush dipped in nail polish remover can sharpen edges, erase little polish slips, and make a home manicure look more finished. If you do not have a cleanup brush, a pointed cotton swab can help. Just avoid flooding the nail with remover, because too much liquid can ruin the design.
The best part of DIY heart nails is how customizable they are. You can paint one tiny heart for a barely-there detail or cover every nail with mini hearts like confetti. You can make the design romantic, funny, elegant, bold, or sweet. And if one nail goes wrong? Add another heart, turn it into an accent nail, or cover it with glitter and pretend that was the plan all along. Honestly, glitter has saved more manicures than we will ever know.
With a little practice, painting a heart on your nail becomes less intimidating and more relaxing. It is a small creative ritual: pick colors, slow down, focus on tiny shapes, and enjoy the result every time you reach for your phone, coffee, keys, or snack. A heart manicure may be small, but it brings a cheerful little detail into your day. And sometimes, that is exactly what a good DIY beauty project should do.
Conclusion
Learning how to paint a heart on your nail is easier than it looks. Start with clean, dry nails, apply a base coat, choose a simple method, and give each layer enough time to dry. The dotting tool heart is perfect for beginners, the toothpick V-heart is great for tiny minimalist designs, tape or stencils help create crisp shapes, and the heart French tip gives your manicure a polished, romantic finish.
The beauty of heart nail art is that it does not have to be perfect to be pretty. A slightly uneven heart still looks cute. A tiny smudge can often be fixed. A bold color can turn a simple design into a statement. With these easy DIY heart nail designs, you can create a manicure that feels personal, playful, and totally web-worthywithout booking a salon appointment.