Table of Contents >> Show >> Hide
- Before You Start: What Makes a Good Crochet Baby Sandal?
- 1. Crochet Classic Strap Baby Sandals
- 2. Crochet Barefoot Baby Sandals for Photos
- 3. Crochet Gladiator Baby Sandals
- 4. Crochet Flip-Flop Style Baby Sandals
- 5. Crochet Mary Jane Baby Sandals
- How to Size Crochet Baby Sandals
- Finishing Tips for Professional-Looking Baby Sandals
- Common Mistakes to Avoid
- Personal Experience: Lessons From Crocheting Baby Sandals
- Conclusion
- SEO Tags
Crochet baby sandals are tiny, adorable, and suspiciously powerful. One minute you are making “just one pair,” and the next minute you have a rainbow lineup of little handmade shoes that look ready for a baby fashion runway. The good news? These sweet projects are small, affordable, beginner-friendly, and perfect for baby showers, newborn photo shoots, summer outfits, and keepsake gifts.
In this guide, you will learn five creative ways to crochet baby sandals, from classic strap sandals to barefoot photo-prop sandals. We will also cover yarn choices, sizing tips, sole construction, safety notes, and finishing details that make your crochet baby shoes look polished instead of “my yarn had a disagreement with my hook.”
Before You Start: What Makes a Good Crochet Baby Sandal?
A good pair of crochet baby sandals should be soft, lightweight, flexible, washable, and secure enough to stay on during supervised wear. They should not be stiff walking shoes, especially for babies who are still developing balance and foot movement. Think of them as decorative, cozy accessories rather than outdoor footwear.
Best Yarn for Crochet Baby Sandals
For most baby sandal crochet patterns, cotton or cotton-blend yarn is a favorite because it holds shape well, feels breathable, and gives the straps clean stitch definition. Soft acrylic baby yarn can also work, especially if you want a plush feel and easy care. Avoid scratchy fibers, heavy wool, or yarns that shed fuzz everywhere. Babies already come with enough mystery crumbs; they do not need yarn confetti too.
Useful Supplies
You will usually need lightweight or medium-weight yarn, a crochet hook that matches your yarn label or pattern gauge, stitch markers, a yarn needle, scissors, and a measuring tape. Optional supplies include soft elastic thread, ribbon, or snap closures, but any added fastener must be attached securely and checked often.
Baby Sandal Safety Tips
When crocheting for babies, cute should never outrank safe. Avoid loose buttons, beads, long ties, hard decorations, and anything a baby could pull off and put in their mouth. If you add flowers, bows, or appliqués, sew them down firmly and inspect them before every use. Baby sandals should be worn with supervision and should be removed before sleep.
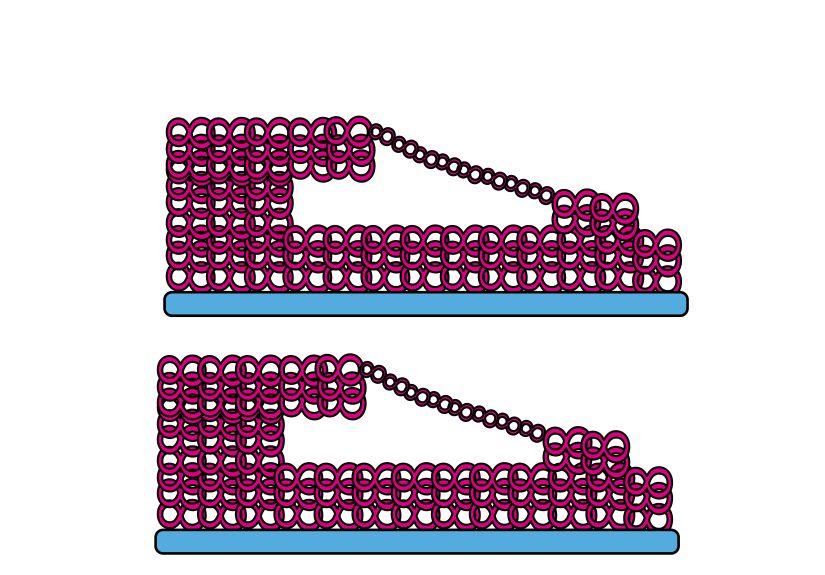
1. Crochet Classic Strap Baby Sandals
The classic strap sandal is the style most people picture when they think of crochet baby sandals. It has a small oval sole, one strap across the toes, side straps, and an ankle strap. It is simple, cute, and easy to customize for boys, girls, or gender-neutral baby gifts.
How the Construction Works
Start with an oval sole worked in rounds. Most soles begin with a foundation chain, then increase around both ends to create a soft foot shape. For extra structure, make two identical soles for each sandal and stitch them together. This double-sole method helps the sandal hold its shape and hides strap ends neatly inside the layers.
After the sole is finished, crochet a toe strap and two side straps. The ankle strap can be made as a simple chain, a row of single crochet, or a slightly wider band of half double crochet. Attach the strap on one side, bring it around the ankle, and secure it with a soft tie, snap, or crocheted loop.
Why This Style Works
Classic strap sandals are great for beginners because they use basic stitches such as chain, slip stitch, single crochet, half double crochet, and double crochet. They also teach important baby-shoe skills: shaping a sole, placing straps evenly, and creating a secure but gentle fit.
Design Ideas
Use tan yarn for the sole and white yarn for the straps for a beachy summer look. Try soft gray with mustard yellow for a modern nursery-style gift. Add a small crochet flower only if it is sewn down firmly. For a sporty look, make the straps in two colors and add surface crochet lines along the sole.
2. Crochet Barefoot Baby Sandals for Photos
Barefoot baby sandals are not shoes in the traditional sense. They are decorative foot accessories that loop around the toe and ankle, leaving the sole uncovered. They are especially popular for newborn photography, summer portraits, baptism outfits, and “look at those tiny toes” moments.
How Barefoot Sandals Are Made
Most barefoot crochet baby sandals begin with a small motif, such as a flower, heart, star, shell circle, or tiny bow. From that center motif, you crochet a loop for the toe and two ties or bands for the ankle. The result is delicate, lightweight, and fast to make.
A beginner version can be made with one small crochet flower, a chain loop for the toe, and a simple ankle chain. A more advanced version might include lace stitches, picot edging, or layered petals. Because the project is tiny, it is a great way to practice decorative crochet without committing to a full blanket that may take until the baby starts college.
When to Use This Style
Barefoot sandals are best for supervised photo sessions, special outfits, and warm-weather styling. They are not meant for crawling, walking, sleeping, or everyday wear. Keep the toe loop soft and loose enough not to pinch, and always remove the sandals after the photos are done.
Design Ideas
For a sweet newborn look, use ivory cotton yarn and a tiny rose motif. For a cheerful summer style, crochet the flower in coral, lavender, or mint. For a simple modern pair, skip the flower and make a small circle motif with a scalloped edge. The goal is delicate, not dramatic. Baby feet are already the main event.
3. Crochet Gladiator Baby Sandals
Gladiator baby sandals are the tiny version of strappy summer sandals. They usually feature multiple horizontal straps across the foot and sometimes a vertical center strap running from the toe area to the ankle. They look fancy, but the construction is surprisingly manageable once you understand strap placement.
How to Build the Gladiator Shape
Begin with a firm oval sole. A double sole is especially useful for this style because there are more strap ends to hide. Next, decide how many straps you want across the top of the foot. Two or three narrow straps usually look balanced on baby sizes. Too many straps can crowd the small space and make the sandal bulky.
Crochet each strap separately, then pin it in place before sewing. This step matters. Baby sandals are tiny, and one crooked strap can make the whole shoe look like it is trying to escape sideways. Once the top straps are attached, add a center strap if desired. Finish with an ankle band that closes gently around the foot.
Best Stitches for Gladiator Sandals
Single crochet is ideal for narrow straps because it creates a dense, stable fabric. Half double crochet works well for wider ankle bands. Slip stitch edging can clean up the sides and make each strap look more finished. If your yarn is very soft or stretchy, use a slightly smaller hook so the straps do not grow too loose after wear.
Design Ideas
For a boho baby look, use warm tan, cream, or soft brown. For a playful style, make the sole neutral and each strap a different pastel. For a dressy pair, use white cotton and add a tiny scalloped ankle edge. Keep embellishments minimal because the straps already provide plenty of detail.
4. Crochet Flip-Flop Style Baby Sandals
Crochet flip-flop style baby sandals are fun, summery, and quick. Unlike real flip-flops, baby versions should be soft and decorative, with a gentle toe detail rather than a hard post between the toes. The shape usually includes an oval sole and a Y-shaped strap design.
How the Y-Strap Works
Start with a sole, then mark three points: one near the toe area and one on each side of the foot. Crochet or sew a soft strap from the toe point to the side points, forming a Y shape. The toe area should sit on top of the foot rather than wedged tightly between the toes.
For more security, add an ankle strap at the back. This helps keep the sandal on wiggly feet and makes the design more practical for supervised wear. The ankle strap can be a crocheted band, a soft tie, or a button loop if the button is large, secure, and used with caution.
Why This Style Is Popular
Flip-flop style baby sandals are quick to make and easy to personalize. They are perfect for summer baby outfits, beach-themed baby showers, and handmade gift sets. Pair them with a crochet sun hat or lightweight baby blanket, and suddenly you have a gift that says, “Yes, I am the crafty relative, and I accept applause.”
Design Ideas
Use bright colors like aqua, peach, lemon, or watermelon pink for a summer feel. Add a small crochet bow at the center of the Y-strap for a dressy version. For a minimalist pair, make the sole and straps in the same color and finish with a clean slip-stitch border.
5. Crochet Mary Jane Baby Sandals
Mary Jane baby sandals are a sweet hybrid between booties and sandals. They usually have a closed or partially closed toe, an open top, and a strap across the instep. This style is excellent for babies who need a little more coverage while still keeping the look light and sandal-like.
How to Crochet the Mary Jane Style
Begin with a baby sole, then build a short upper around the toe area. This can be done by working stitches into the front half of the sole and decreasing slightly to cup the toes. Keep the upper low so it still feels like a sandal rather than a full bootie.
Next, create the signature strap. Crochet a narrow band from one side of the shoe to the other, placing it across the instep. You can make a buttonhole with a chain space, use a snap, or sew the strap permanently in place if the sandal slips on easily. Permanent straps are often safer for very small babies because they reduce loose parts.
Best Uses for Mary Jane Sandals
This style works beautifully for special occasions, family photos, handmade coming-home outfits, and baby shower gifts. It also looks adorable in soft neutrals, vintage colors, and classic white. Mary Jane sandals are a smart choice when you want something more secure than barefoot sandals but lighter than booties.
Design Ideas
Try cream yarn with a blush strap, navy with white edging, or soft sage with a tiny embroidered detail. Add a scalloped border around the opening for a vintage touch. If you want a more modern look, keep the edges plain and let the clean shape do the talking.
How to Size Crochet Baby Sandals
Baby feet grow quickly, so sizing is always a little bit of a moving target. A common approach is to measure the baby’s foot from heel to longest toe, then add a small amount of ease so the sandal is comfortable. If you are making a gift and cannot measure the baby, use a baby foot size chart as a general guide and choose a slightly flexible design.
General Baby Sandal Size Guide
Newborn sandals are often around 3.25 to 3.75 inches long. Sandals for 3 to 6 months may be around 3.75 to 4.25 inches. Sandals for 6 to 12 months may be around 4.25 to 4.75 inches. These numbers are general estimates, not universal rules. Gauge, yarn weight, hook size, and stitch tension can change the final measurement.
Always Check Gauge
Gauge is not just a boring pattern sentence trying to ruin your excitement. It is the difference between a sandal that fits a baby and a sandal that fits a decorative spoon. Crochet the sole first and measure it before continuing. If it is too small, go up a hook size. If it is too large, go down a hook size or adjust the starting chain.
Finishing Tips for Professional-Looking Baby Sandals
The difference between homemade and handmade often comes down to finishing. Weave in ends carefully, block the sandals lightly if needed, and make sure both shoes match in size and strap placement. Count stitches on each sole so the pair looks intentional.
Use Stitch Markers
Mark the center toe, heel, and side points before attaching straps. This keeps everything symmetrical. On tiny sandals, even one stitch off can be noticeable.
Reinforce Strap Joins
Straps take the most stress, especially when a baby kicks. Sew them down with several passes of yarn and tug gently to test them. If anything feels loose, fix it before gifting.
Choose Washable Materials
Baby accessories should be easy to clean. Machine-washable yarn is practical for parents, especially when the sandals are part of a larger handmade set. Include a small care note with your gift so the recipient knows how to wash and dry them.
Common Mistakes to Avoid
One common mistake is using yarn that is too thick. Bulky yarn can make baby sandals stiff and oversized. Another mistake is making straps too tight. Babies need comfort and movement, not tiny yarn tourniquets. A third mistake is adding too many decorations. A small bow is charming; a sandal covered in beads, buttons, and dangling flowers is a safety concern and a laundry nightmare.
Also, do not skip the second sandal immediately after finishing the first. Crochet the pair in one sitting if possible, or take careful notes. Otherwise, your second sandal may mysteriously develop a new personality, a new size, and a new attitude.
Personal Experience: Lessons From Crocheting Baby Sandals
One of the first things many crocheters learn from making baby sandals is that small does not always mean effortless. A baby sandal is tiny, yes, but it asks for precision. The sole must be even, the straps must line up, and the finishing needs to be secure. In a blanket, one slightly loose stitch can disappear into the cozy landscape. On a two-inch strap, that same loose stitch stands on stage with a spotlight.
The most helpful habit is to make both soles before moving on to the straps. This keeps the pair consistent. Crochet one sole, then immediately crochet the second while your hands still remember the rhythm. After that, compare them side by side. If one sole looks bigger, do not panic. Sometimes blocking can help, but if the difference is obvious, it is better to remake one piece than to continue building a mismatched pair.
Another experience-based tip is to keep your first pair simple. Many beginners want to start with gladiator straps, flowers, bows, scallops, color changes, and maybe a tiny crown for good measure. That enthusiasm is wonderful, but a clean classic strap sandal teaches more useful skills. Once you understand the basic sole and strap structure, decorative versions become much easier.
Yarn choice also matters more than expected. Cotton creates crisp straps and a neat sole, but it can feel firm if worked too tightly. Soft acrylic is gentle and forgiving, but it may stretch. A cotton blend often gives a nice balance. Before making a gift, crochet a small test strap and rub it against your wrist or cheek. If it feels rough to you, it may feel rough to a baby.
When gifting crochet baby sandals, presentation makes a big difference. Tie the pair with a soft ribbon, place them in a small box, and include a care card. Mention that the sandals are handmade, should be worn with supervision, and should be removed before sleep. Parents appreciate cute gifts, but they appreciate thoughtful, practical details even more.
Finally, remember that handmade baby sandals are not about perfection. They are about care. Every stitch says, “Someone made this tiny thing for a tiny person who is already very loved.” If one strap is a little wobbly, you are not a failure. You are a crocheter, which means you are part artist, part engineer, and part yarn detective. The more pairs you make, the better your shaping, tension, and finishing will become. And yes, you may eventually become the person who brings crochet baby sandals to every baby shower. Honestly, there are worse reputations to have.
Conclusion
Crochet baby sandals are quick, charming, and endlessly customizable. Whether you choose classic strap sandals, barefoot photo sandals, gladiator sandals, flip-flop styles, or Mary Jane sandals, the best results come from soft yarn, careful sizing, secure finishing, and baby-safe design choices. Start simple, measure often, and let your creativity show through color, texture, and thoughtful details.
These five ways to crochet baby sandals give you a strong foundation for making handmade baby footwear that looks adorable and feels personal. Make one pair for practice, one pair for gifting, and one pair just because tiny sandals have a way of making everyone smile.