Table of Contents >> Show >> Hide
- What Is Chicken Parmigiana?
- Why This Chicken Parmigiana Recipe Works
- Ingredients for the Best Chicken Parmigiana Recipe
- How to Make Chicken Parmigiana
- Chicken Parmigiana Tips That Make a Big Difference
- What to Serve with Chicken Parmigiana
- Easy Variations on This Chicken Parmigiana Recipe
- Common Mistakes to Avoid
- How to Store and Reheat Chicken Parmigiana
- Conclusion
- Experiences Related to Making Chicken Parmigiana
Chicken Parmigiana is one of those dinners that somehow manages to be both a comfort-food legend and a tiny kitchen drama. You’ve got crispy chicken, bubbling cheese, rich tomato sauce, and the constant fear that one wrong move will turn your masterpiece into a soggy breaded tragedy. The good news? It does not have to be that way.
This Chicken Parmigiana recipe is built to give you the best of both worlds: crunchy coating, juicy chicken, balanced sauce, and enough melty mozzarella to make dinner feel like it deserves applause. It is the kind of recipe that works for a cozy family meal, an “I need to impress people without pretending I’m on a cooking show” dinner, or a weekend craving that simply refuses to be ignored.
If you have ever wondered why some chicken parm tastes crisp and glorious while other versions resemble a tomato-soaked winter coat, the answer is technique. This guide walks you through the full process, with practical tips, ingredient choices, and real-world troubleshooting so you can make a chicken parmigiana recipe that tastes restaurant-worthy without turning your kitchen into an oil-splattered crime scene.
What Is Chicken Parmigiana?
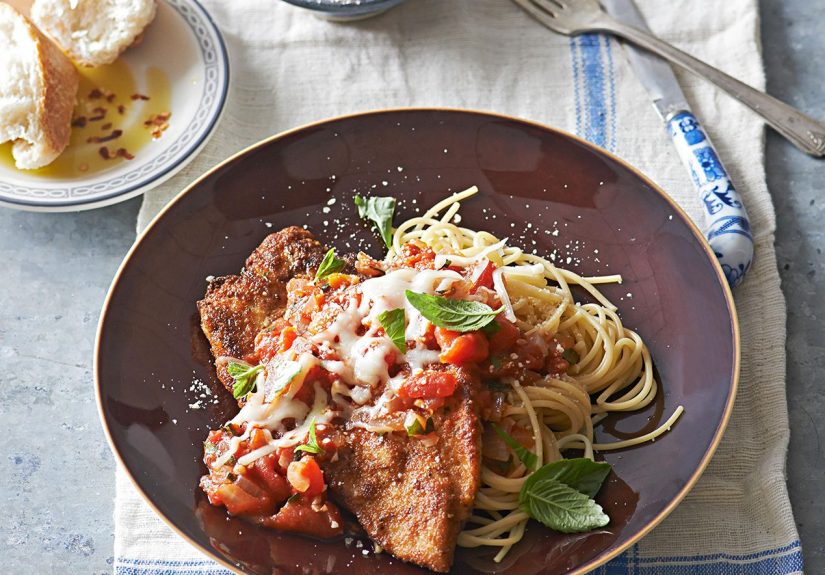
Chicken Parmigiana, also called chicken parmesan or chicken parm, is a classic Italian-American dish made with breaded chicken cutlets that are fried or baked, then topped with tomato sauce, mozzarella, Parmesan, and often a little basil before being finished in the oven. It is usually served with pasta, salad, garlic bread, or all three if you are embracing joy with both hands.
The magic of this dish is contrast. You want the chicken crisp, the inside tender, the sauce bright and savory, and the cheese rich without smothering everything underneath. Great chicken parm is not about piling on ingredients until the plate can barely breathe. It is about balance. Think of it as edible architecture with better cheese.
Why This Chicken Parmigiana Recipe Works
This version leans on the smartest techniques home cooks use again and again because they actually solve the common problems.
1. Thin cutlets cook evenly
Chicken breasts are delicious but dramatic. They are thick in one spot, thin in another, and very willing to dry out if ignored for thirty seconds too long. Splitting and pounding the chicken into even cutlets keeps the meat juicy and helps the breading cook at the same rate.
2. A three-step dredge creates a real crust
Flour helps the egg stick. Egg helps the crumbs stick. Crumbs give you the golden shell that makes chicken parm worth making in the first place. Mixing Parmesan into the breadcrumbs adds flavor and extra color, while panko keeps the coating light and crisp.
3. Less sauce means better texture
This is the hill I will happily die on: too much sauce ruins the crunch. Spoon just enough over the top of each cutlet to flavor it, then serve extra sauce on the side or with pasta. Your crispy coating will thank you. Probably not verbally, but spiritually.
4. High heat finishes the dish fast
Once the chicken is golden, it only needs a short oven finish to melt the cheese and bring everything together. A brief blast of heat keeps the coating from steaming into softness while the chicken reaches a safe and juicy finish.
Ingredients for the Best Chicken Parmigiana Recipe
For the chicken
- 2 large boneless, skinless chicken breasts, halved horizontally to make 4 cutlets
- Salt and freshly ground black pepper, to taste
- 1/2 cup all-purpose flour
- 2 large eggs
- 2 tablespoons milk or water
- 1 1/2 cups panko breadcrumbs
- 1/2 cup finely grated Parmesan cheese
- 1 teaspoon garlic powder
- 1 teaspoon dried oregano
- 1/4 teaspoon crushed red pepper flakes, optional
- 3/4 cup neutral oil or light olive oil, for shallow frying
For the topping
- 1 1/2 cups marinara sauce, plus more for serving
- 8 ounces low-moisture mozzarella, shredded or cut into small cubes
- 2 tablespoons grated Parmesan cheese
- Fresh basil or parsley, for garnish
Optional for serving
- Spaghetti, linguine, or penne
- Garlic bread
- Simple green salad
How to Make Chicken Parmigiana
Step 1: Prep the chicken
Place each chicken breast on a cutting board and slice it horizontally into thinner cutlets. Cover with plastic wrap or parchment and gently pound to an even thickness, about 1/2 inch. Season both sides well with salt and pepper. This is not the time for timid seasoning. Chicken is polite but bland if left unsupervised.
Step 2: Set up your breading station
Place the flour in one shallow bowl. In a second bowl, whisk together the eggs and milk. In a third bowl, combine the panko, Parmesan, garlic powder, oregano, and red pepper flakes if using.
Dredge each cutlet in flour, shaking off the excess. Dip it into the egg mixture, then press it into the breadcrumb mixture until well coated. Set the breaded cutlets on a rack or tray and let them rest for 10 to 15 minutes. This short rest helps the coating stick better during frying.
Step 3: Preheat the oven
Heat your oven to 450 degrees F. If you want extra browning at the end, you can switch to the broiler for the final minute or two, but only if you are willing to stand there and watch it like it owes you money.
Step 4: Fry until golden
Heat the oil in a large skillet over medium-high heat. You want the oil hot enough that the crumbs sizzle immediately, but not so hot that the crust burns before the chicken has a chance to cook. Fry the cutlets in batches for about 2 to 3 minutes per side, until deep golden brown. Do not crowd the pan.
Transfer the fried chicken to a wire rack or paper towel-lined tray. A wire rack is ideal because it lets steam escape and helps preserve the crust. Paper towels work too, though they are slightly more eager to trap a little steam underneath.
Step 5: Add sauce and cheese strategically
Place the cutlets on a baking sheet or in a baking dish. Spoon a modest amount of marinara over the center of each cutlet rather than flooding the whole thing. Top with mozzarella and a little extra Parmesan.
This is the part where restraint wins. You are not burying the chicken. You are accessorizing it.
Step 6: Bake until melted and done
Bake for 5 to 8 minutes, or until the cheese is melted and bubbly and the chicken reaches 165 degrees F in the thickest part. Garnish with basil or parsley and serve immediately with pasta, salad, or bread.
Chicken Parmigiana Tips That Make a Big Difference
Use low-moisture mozzarella
Fresh mozzarella can taste wonderful, but it often releases extra liquid. If your goal is a crisp chicken parm with gooey cheese instead of puddles, low-moisture mozzarella is the safer choice. You can still get rich flavor without turning the top into a dairy rainstorm.
Choose a good marinara sauce
A homemade tomato sauce is lovely, but a high-quality jarred marinara is absolutely fair game here. Chicken parm already involves breading, frying, baking, and resisting the urge to eat cheese directly from the bag. Let the sauce save you time if needed.
Do not skip the pounding
If your chicken is uneven, the thin parts overcook while the thick parts lag behind. Even thickness helps the cutlets fry properly, stay tender, and finish in the oven without drying out.
Let the breaded chicken rest before frying
This little pause helps the coating adhere better, which means fewer sad breadcrumb bald spots in the skillet. It also gives you a convenient moment to clean up your counter before it starts looking like a breadcrumb snowstorm.
Serve extra sauce on the side
This is the secret move for people who love sauce and texture equally. The chicken stays crisp, the pasta gets all the marinara it wants, and nobody has to compromise.
What to Serve with Chicken Parmigiana
Chicken parmigiana is flexible enough to work with classic sides or lighter options, depending on your mood and how aggressively you want to lean into comfort food.
- Spaghetti or linguine: the traditional crowd-pleaser
- Penne or ziti: easier to serve and equally delicious
- Garlic bread: because sauce exists, and bread should be involved
- Caesar salad or arugula salad: a fresh contrast to all that crisp-cheesy richness
- Roasted vegetables: a smart choice if you want balance without sacrificing flavor
Easy Variations on This Chicken Parmigiana Recipe
Baked chicken parmigiana
If you want a lighter version, bake the breaded cutlets on a lightly oiled sheet pan at 425 degrees F until crisp, flipping once, then top with sauce and cheese and return to the oven until melted. It is less dramatic than frying, but still highly satisfying.
Air fryer chicken parm
Air fry the breaded cutlets in a single layer, then add the sauce and cheese near the end. It is quick, crisp, and especially useful when you want chicken parm without heating up the entire kitchen.
Chicken parm sandwiches
Tuck the finished cutlets into toasted rolls with extra sauce and cheese. This is excellent for game day, casual guests, or any evening when dinner should feel slightly reckless in the best way.
Spicy chicken parm
Add red pepper flakes to the breadcrumbs or sauce, or use a spicy marinara. Heat works especially well with the rich cheese and crispy crust.
Common Mistakes to Avoid
- Over-saucing the chicken: this is the fastest route to soggy breading
- Using thick, uneven breasts: they cook inconsistently and dry out easily
- Frying at the wrong temperature: too low gets greasy, too high gets burnt
- Crowding the pan: it lowers the oil temperature and ruins the crust
- Walking away from the broiler: cheese goes from perfect to volcanic in a flash
How to Store and Reheat Chicken Parmigiana
If you have leftovers, let the chicken cool, then refrigerate it in an airtight container for up to 3 days. Reheat in a 375-degree F oven or toaster oven until hot and the coating perks back up. The microwave works in an emergency, but it does soften the crust, and chicken parm deserves better when possible.
If you plan ahead, store the fried cutlets, sauce, and cheese separately. Then assemble just before reheating. That gives you a much better chance of preserving the crisp exterior instead of reheating a fully assembled dish into sleepy softness.
Conclusion
A great Chicken Parmigiana recipe is not hard because the ingredients are fancy. It is hard because the dish depends on timing, texture, and a little self-control around the sauce. Once you understand that the goal is crispy chicken first and cheesy tomato goodness second, everything clicks into place.
Make the cutlets thin, season them well, bread them carefully, fry them until deeply golden, and top them with just enough sauce and cheese to make each bite feel generous without losing the crunch. That is the sweet spot. That is the move. And once you nail it, you may find yourself making chicken parm whenever life needs a little edible optimism.
Experiences Related to Making Chicken Parmigiana
One of the most interesting things about a Chicken Parmigiana recipe is that almost everyone has a story attached to it. It is one of those dishes that shows up when people want dinner to feel warm, familiar, and slightly celebratory. I have seen it served on quiet Sunday evenings, during chaotic family birthdays, and on those random midweek nights when everyone has had a long day and suddenly only crispy cheese-topped chicken can restore morale.
For many home cooks, the first experience with chicken parm is not perfect. The breading slips. The pan feels too hot. The sauce goes on a little too enthusiastically. Someone says, “It still tastes amazing,” which is kind and true, but you know deep down that the crust was supposed to crunch and not sigh. That first attempt is actually useful, because chicken parm teaches quickly. After one soggy batch, you understand the value of less sauce. After one dry batch, you never again skip pounding the chicken thin.
There is also a funny kind of confidence that develops when you make this dish more than once. At first, the dredging station feels like a messy puzzle. By the third or fourth round, you start moving like you know what you are doing. Flour hand. Egg hand. Breadcrumb hand. Rack ready. Oil hot. You begin to feel like the sort of person who casually makes excellent chicken parm on a Tuesday, which is honestly a very attractive personal brand.
Chicken Parmigiana also creates strong opinions at the table. Some people want it over spaghetti. Some want it with salad. Some want it in a toasted sandwich roll the next day with extra sauce and enough napkins to suggest regret is possible. There is usually a discussion about cheese too. One person likes extra mozzarella. Another wants more Parmesan bite. Someone always asks for more sauce, while the texture purist in the room quietly protects the crispy cutlets like a museum curator guarding a priceless artifact.
What makes the experience memorable is that chicken parm feels generous. It looks like a dish that took effort, and in fairness, it did. Even when you use a shortcut marinara, there is still something satisfying about breading, frying, and finishing the cutlets until the cheese bubbles on top. The aroma alone makes the kitchen feel like dinner matters. It turns an ordinary evening into an occasion, even if the only guests are your family, your roommate, or your very judgmental dog.
There is also a comfort in how forgiving the dish can be. Maybe your cutlets are not perfectly shaped. Maybe the cheese browns a little more than planned. Maybe you forgot the basil and had to improvise with parsley. Chicken parm still shows up with enough flavor, crunch, and melted-cheese charisma to win people over. It is not a fussy recipe pretending to be above everyday life. It is a deeply practical pleasure, which may explain why so many cooks keep coming back to it.
In the end, the experience of making chicken parmigiana is about more than following steps. It is about learning the rhythm of a beloved dish and making it your own. Every batch teaches you something, every kitchen adds a little personality, and every plate delivers that irresistible combination of crispy, saucy, cheesy comfort. That is why this recipe lasts. It is not just dinner. It is a repeat-worthy experience with very good cheese.