Table of Contents >> Show >> Hide
- What “Color Block” Means for a Kitchen Table
- Why a Color Block Kitchen Table Works (Even If Your Kitchen Is Small)
- Design Directions That Look Great on a Kitchen Table
- Plan Your Palette Like a Pro (Without Turning It Into Homework)
- Choose Your Strategy Based on the Table Material
- DIY: How to Paint a Color Block Kitchen Table
- Step 1: Clean like paint depends on it (because it does)
- Step 2: Scuff sand for “tooth”
- Step 3: Prime with the right primer
- Step 4: Paint the base color in thin, even coats
- Step 5: Map your color block design
- Step 6: Tape for crisp lines
- Step 7: Paint the color blocks
- Step 8: Let it dry, then protect it
- Make It Last: Topcoats, Cure Time, and the “Food-Safe” Question
- Styling Tips So Your Table Looks “Designed,” Not “DIY in Progress”
- Maintenance and Touch-Ups: How to Keep It Looking Fresh
- Buying Instead of DIY: What to Look For in a Color Block Kitchen Table
- Real-World Experiences With a Color Block Kitchen Table (Extra )
- Conclusion
- SEO Tags
Your kitchen table has a job description that reads like a superhero résumé: dinner host, homework desk, coffee bar,
craft station, Zoom background, and the place where a single sticky fingerprint can somehow multiply overnight.
So if that hardworking surface is looking… emotionally tired, a color block kitchen table is one of the
fastest ways to make it feel fresh, intentional, and honestly kind of fun.
Color blocking is the design equivalent of saying, “I have my life together,” without having to actually reorganize
the junk drawer. It’s bold but structured, playful but tidyperfect for a space that’s always in use.
What “Color Block” Means for a Kitchen Table
In fashion, color blocking means pairing solid blocks of color (instead of busy prints) to create strong contrast.
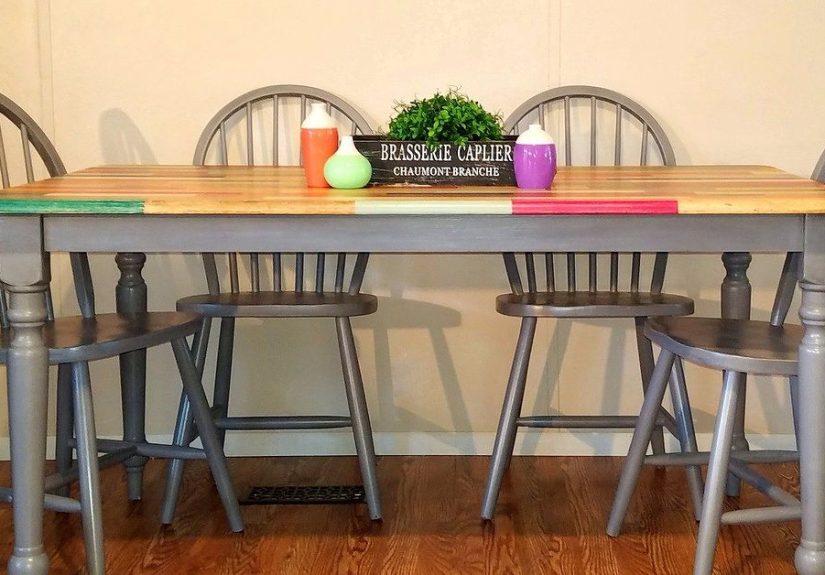
For furniture, it’s the same idea: distinct areas of color with crisp boundarieslike a tabletop with a geometric
pattern, legs painted a contrasting shade, or a two-tone split that looks modern and deliberate.
The magic is in the clarity. Your eye understands the design quickly, so even bright colors can feel clean instead of chaotic.
That’s why a color block dining table can work in minimalist kitchens, cozy apartments, and full-on family homes.
Why a Color Block Kitchen Table Works (Even If Your Kitchen Is Small)
1) It creates a focal point without remodeling
A table is naturally central. Add color blocking and it becomes a visual anchorlike a design “pin” that holds the room together.
This is especially helpful in open layouts where the kitchen blends into dining and living zones.
2) It disguises real-life wear better than you’d think
Solid, single-color tabletops show every scratch like it’s trying to win an award. A geometric or two-tone pattern
can camouflage minor wear and keep the table looking “styled” even after heavy use.
3) It’s a high-impact DIY with a relatively low supply list
If you can clean a surface, apply tape, and paint in thin coats, you can pull this off. No woodworking degree required.
(Though you can absolutely wear one of those fancy aprons if it improves morale.)
Design Directions That Look Great on a Kitchen Table
Color blocking can be bold or subtle. The trick is choosing a design language that matches your kitchen’s vibe.
Here are popular directions that work especially well on tables:
Modern Geometric
Think triangles, diagonal halves, offset rectangles, or a stripe band across the center. Pair a neutral base (warm white,
charcoal, greige) with one statement color (deep teal, terracotta, mustard) for a modern, gallery-ready look.
Soft Two-Tone
Paint the tabletop one color and the legs another. This is the easiest entry point and looks polished even with muted colors
like sage top + warm white base, or navy top + light oak legs (painted to mimic wood tones if needed).
Retro Color Pop
Try a midcentury-inspired palette: avocado green + cream + burnt orange, or dusty blue + mustard + walnut brown.
Keep shapes simple (bands, blocks, a border frame) so the colors do the talking.
Farmhouse Meets Graphic
If your kitchen leans cozy, you can still color blockjust choose earthy, softened tones. Picture a bone-white base,
a clay-colored border, and a muted green center block. It feels warm, not loud.
Checkerboard (Yes, It’s Back)
A checkerboard top can look playful and surprisingly sophisticated when you pick toned-down colors (like warm white + taupe,
or pale blue + cream). Bonus: it hides crumbs better than a plain surface. That’s not a design opinionit’s a life fact.
Plan Your Palette Like a Pro (Without Turning It Into Homework)
The easiest way to make color blocking look intentional is to choose colors that have something in common:
similar undertones, similar “strength,” or a shared relationship on the color wheel.
Use this simple palette formula
- Option A (Clean + Modern): 1 neutral + 1 bold + 1 supporting accent
- Option B (Soft + Cozy): 2 muted colors + 1 warm neutral
- Option C (High Contrast): light neutral + dark neutral + one bright pop
Match your kitchen’s “fixed items”
Cabinets, countertops, floors, and backsplash aren’t changing every weekend (hopefully). Pull one color cue from them:
the undertone of your wood floors, the veining in your countertop, or the color temperature of your hardware.
That’s how the table looks like it belongs, not like it wandered in from a different apartment.
Test before you commit
Paint swatches look dramatically different under kitchen lighting. Sample boards (or even thick poster board) let you view
colors morning, afternoon, and at night. If a color looks great at 2 p.m. but weird at 8 p.m., it’s not “moody.”
It’s a problem.
Choose Your Strategy Based on the Table Material
Before you paint, identify what you’re working with. The best paint job in the world won’t stick to the wrong surface
without proper prep.
Solid Wood
Usually the easiest to refinish. Scuff sanding helps paint and primer grip. If the wood is tannin-rich (like oak),
a stain-blocking primer can prevent discoloration from bleeding through lighter paint colors.
Veneer
Veneer is real wood, but thin. Sand gentlyyour mission is to degloss, not to bulldoze.
A bonding primer and light sanding are your best friends here.
Laminate
Laminate is slick and can be stubborn. The key is cleaning thoroughly, scuffing to a dull finish, and using a strong bonding primer.
Skip this and your paint may peel faster than a sunburn.
MDF/Particle Board
These need edge sealing and careful priming for a smooth finish. The edges soak up paint unless you seal and sand them properly,
which is why MDF projects sometimes look perfect on the flat surfaces but fuzzy at the corners.
DIY: How to Paint a Color Block Kitchen Table
Here’s a practical process that balances durability with sanity. (Because you still need to use your kitchen.)
Step 1: Clean like paint depends on it (because it does)
Remove grease, oils, and residue. Kitchens are sneaky: even “clean-looking” surfaces can have an invisible film that fights adhesion.
Let everything dry fully.
Step 2: Scuff sand for “tooth”
You’re not sanding to remove the entire finishjust dulling gloss and creating grip.
Wipe away dust carefully after sanding.
Step 3: Prime with the right primer
Use a bonding primer for slick surfaces and a stain-blocking primer if you suspect bleed-through.
This one step is the difference between “this looks amazing” and “why is it peeling when I look at it.”
Step 4: Paint the base color in thin, even coats
Apply your base coat (often the lightest color) with a fine-finish roller for the tabletop and a brush for details.
Thin coats help avoid drips and leave a smoother finish.
Step 5: Map your color block design
Use a pencil and a ruler, or lightly mark with painter’s tape first. If you’re doing triangles or diagonals,
measure from edges so shapes look balanced (not like they’re sliding off the table).
Step 6: Tape for crisp lines
Press tape edges firmly, especially along the tabletop grain or texture. For extra crispness, some DIYers “seal”
the tape edge with the base color before painting the second colorso any seepage matches the base coat, not the contrast color.
Step 7: Paint the color blocks
Apply the second (and third) colors in thin coats. Remove tape when the paint is set but not fully rock hardthis helps prevent peeling.
Touch up edges with a small angled brush if needed.
Step 8: Let it dry, then protect it
A kitchen table needs a protective finish. Even if your paint claims it’s “durable,” the daily reality of plates,
cups, and cleaning demands a topcoat that can handle moisture and abrasion.
Make It Last: Topcoats, Cure Time, and the “Food-Safe” Question
Painted tables live a rough life: heat, moisture, friction, and the occasional “oops” moment. A clear protective finish
helps your design survive actual living.
Water-based vs. oil-based polyurethane
Water-based polyurethanes tend to dry faster, stay clearer, and have lower odor. Oil-based versions often add warmth
(a slight amber tone) and can be extremely tough, but they usually take longer to dry and have stronger fumes.
Both can workyou’re choosing between look, working time, and convenience.
How many coats?
Tabletops typically benefit from multiple thin coats. Light sanding between coats improves adhesion and smoothness.
For busy kitchens, a third coat can be a real insurance policy.
“Food-safe” in real life
Many common clear finishes are considered safe for incidental food contact once fully cured. The key phrase is
fully cured, not just “dry to the touch.” A common rule of thumb for full curing of certain varnishes
can be around a month at room temperature. During that cure window, treat the surface gently: coasters, placemats,
no hot pans directly on the paint, and avoid harsh cleaners.
Styling Tips So Your Table Looks “Designed,” Not “DIY in Progress”
Use one repeat color in the room
If your table includes a deep green block, echo it somewhere: a tea towel, a small vase, a framed print, or even barstools.
Repetition is what makes bold color feel intentional.
Keep the centerpiece simple
Color blocking is already visual energy. A low-profile bowl, a small plant, or a single tray looks cleaner than a centerpiece
that competes with the pattern.
Choose chairs with a calm silhouette
If the table is graphic, let chairs be simple. If your chairs are bold, keep the table’s blocks more subtle.
Design is basically a group projectsomeone has to be the responsible one.
Maintenance and Touch-Ups: How to Keep It Looking Fresh
- Clean gently: mild soap and water is usually enough. Avoid abrasive scrubbers.
- Use protection early: coasters and placemats prevent “new table panic.”
- Fix chips fast: small touch-ups are nearly invisible if you do them early.
- Refresh when needed: if the finish dulls over time, a light scuff and a fresh coat of clear finish can restore it.
Buying Instead of DIY: What to Look For in a Color Block Kitchen Table
Not everyone wants to paint furniture, and that’s okay. If you’re shopping for a ready-made color block table,
focus on durability details:
- Sealed edges: especially on veneer or laminate topsedges are where moisture damage starts.
- Hardwearing topcoat: look for tables marketed with protective finishes for daily use.
- Stable construction: wobble today becomes regret tomorrow.
- Color placement: blocks on the apron/legs hide scuffs better than a fully graphic top in some households.
Real-World Experiences With a Color Block Kitchen Table (Extra )
In real homes, a color block kitchen table isn’t just a design momentit’s a lifestyle experiment. One household
might treat the table like a museum piece. Another uses it as a command center for snacks, school papers, and the kind of
“quick craft” that somehow involves glitter. The good news is that color blocking can thrive in both worlds if you plan for how
you actually live.
Take the “family dinner + homework” house: the tabletop gets constant friction from plates, elbows, and notebooks. In that case,
the best experience usually comes from choosing a simpler block layout (like a border frame or a two-tone split) and investing the
effort in the protective finish. People who skipped a clear topcoat often reported that the table looked great for a few weeks and
then started showing shiny wear spots where hands and plates repeated the same movements. The fix wasn’t dramaticlight sanding and
a proper clear finish brought the look backbut it taught a valuable lesson: a kitchen table is not the place to “hope for the best.”
In smaller apartments, color blocking often feels like a cheat code. A tiny eat-in kitchen can look flat and forgettable, but a table
with a bold geometric top gives the whole space a focal pointalmost like adding artwork, except you can set pizza on it. One common
experience in tight spaces is realizing that bright colors reflect onto nearby surfaces. A vivid yellow block can bounce warmth into white
cabinets (cute!), while a strong red might cast a pinkish tint at night under warm bulbs (less cute, depending on your vibe). People who
tested colors in their actual lighting tended to be happiest long-term.
If you live with roommates, the table becomes a shared objectand shared objects need “shared rules,” even if they’re unspoken. In those
setups, the most successful color block tables typically used a satin or semi-gloss protective finish that wiped clean easily and didn’t
cling to every fingerprint. Roommates who went with super-matte finishes often loved the look but found themselves doing more maintenance
than expected, because kitchens are messy and humans are… optimistic.
For renters, the experience is usually about reversible personality. A color block table adds character without painting walls or changing
cabinets. The smartest approach renters shared was building the palette around portable items they already owneddish towels, art prints,
rugsso the table could move with them and still “match” in the next place. In other words: don’t paint your table neon coral because it
looks amazing online unless you’re also prepared to become a neon coral person in every future apartment.
Across all these experiences, the pattern is consistent: the best results come from honest planning (how do you use the table?), solid prep
(clean, scuff, prime), thin paint coats, and a protective topcoat with enough cure time before daily heavy use. Color blocking may look bold,
but the process is mostly patienceand patience is cheaper than repainting.
Conclusion
A color block kitchen table is one of the rare upgrades that’s both design-forward and practical: it adds style,
refreshes a tired piece, and can even hide the little scuffs that come from real life. The key is balancing creativity with durability
pick a palette that fits your kitchen, prep the surface like it matters (it does), and protect your work with a finish that can handle
daily use. Do that, and your table won’t just look goodit’ll keep looking good long after the “new project excitement” wears off.