Table of Contents >> Show >> Hide
- Why Changing the Language in Word Can Feel Confusing
- How to Change the Display Language in Word on Windows
- How to Change the Editing and Authoring Language in Word on Windows
- How to Change the Proofing Language in Word
- How to Change the Language in Word on Mac
- How to Change the Language in Word for the Web
- What to Do If Your Language Is Not Available
- Common Problems When Word Won’t Change Language
- Best Practices for Multilingual Word Documents
- Final Thoughts
- Real-World Experiences With Changing the Language in Word
- SEO Tags
If Microsoft Word suddenly starts underlining perfectly normal words like they just insulted its ancestors, chances are the language settings are off. The good news is that fixing Word’s language is usually simple once you know which language setting you actually need to change. And yes, that distinction matters more than most people expect.
Here is the part that trips people up: Word does not have just one master language button. It usually works with three different language layers. There is the display language, which changes the menus and buttons. There is the authoring or editing language, which affects how you type and which keyboard or writing tools are available. Then there is the proofing language, which controls spelling and grammar checks. If you change the wrong one, Word may still act like it is living in another country.
This guide walks you through the easy steps to change the language in Word on Windows, Mac, and Word for the web. It also covers the most common reasons Word refuses to cooperate, because sometimes the app behaves like it needs a pep talk before it listens.
Why Changing the Language in Word Can Feel Confusing
People often search for how to change the language in Word when they really mean one of several different things:
- They want Word’s menus to appear in English, Spanish, French, or another language.
- They want spell check to stop marking every word as wrong.
- They want to write in multiple languages in the same document.
- They want Word on Mac, Windows, or the web version to match their preferred language.
Once you know whether you want to change the interface, the typing language, or the proofing language, the steps become much easier. Think of Word as a very smart assistant that still insists on being extremely literal.
How to Change the Display Language in Word on Windows
If you want the ribbon, menus, buttons, and settings panels to appear in a different language, you need to change the display language.
Easy steps for Windows
- Open Word.
- Click File.
- Select Options.
- Click Language.
- Under Office display language, find the language you want.
- Select it and choose Set as Preferred.
- Restart Word.
If your preferred language is not listed, click Add a Language and follow the prompts. In many cases, Word can add the display language from within the app. If the language pack is not fully installed, Word may ask you to download additional support files.
A helpful detail many people miss: you can also tell Office to match the Microsoft Windows display language. That is useful if you want Word to follow your system settings automatically instead of managing everything separately.
How to Change the Editing and Authoring Language in Word on Windows
If you want to type in another language and use the right writing tools, keyboard support, and related settings, change the authoring language.
Steps to change the authoring language
- Open Word.
- Go to File > Options > Language.
- Under Office authoring languages and proofing, look for the language you want.
- If it is there, select it and click Set as Preferred.
- If it is missing, click Add a Language.
- Finish the setup and restart Word if needed.
This step matters because Word can show one language in the interface while letting you write in another. For example, you can keep the menus in English but write documents in French or German. That is especially useful for bilingual users, translators, students, international teams, and anyone whose keyboard deserves better than daily identity confusion.
How to Change the Proofing Language in Word
This is the setting most people are actually looking for. If Word keeps flagging correct words as errors, or if grammar suggestions seem wildly off, the proofing language is probably wrong.
Change proofing language for selected text
- Open your Word document.
- Select the text you want to change.
- Go to the Review tab.
- Click Language.
- Select Set Proofing Language.
- Choose the correct language.
- Click OK.
If you want to change the proofing language for the entire document, press Ctrl + A first to select all text, then follow the same steps. That tiny shortcut can save you from manually fixing section after section like a person trapped in a very boring escape room.
Turn on automatic language detection
If you regularly switch between languages in one document, Word may be able to detect the language automatically.
- Go to Review > Language > Set Proofing Language.
- Check Detect language automatically.
- Click OK.
This feature can be helpful, but it is not perfect. In documents with short phrases, names, slang, or mixed-language sentences, Word may guess wrong. In those cases, manually assigning the proofing language is usually faster and more accurate.
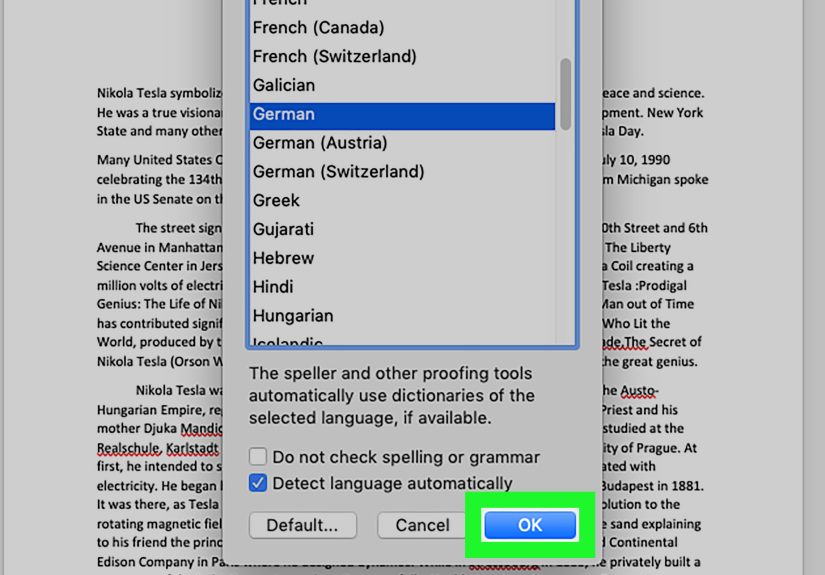
How to Change the Language in Word on Mac
Word for Mac handles language a little differently. The display language for Office on Mac follows the primary language set for macOS. So if you want Word’s menus to appear in another language, you generally need to change the Mac system language first.
Change the display language on Mac
- Open your Mac’s system language settings.
- Go to Language & Region.
- Move your preferred language to the top of the list.
- Restart Word.
For editing and proofing in Word on Mac, the process is more direct.
Change editing or proofing language in Word for Mac
- Open Word.
- Click Tools in the top menu.
- Select Language.
- Choose the language you want.
- Click Default if you want it for all new documents.
- Click OK.
One nice bonus for Mac users is that Office for Mac already includes many proofing tools out of the box, so you usually do not need extra downloads. That said, language support still varies by language, so some languages have more complete proofing features than others.
How to Change the Language in Word for the Web
Word for the web is convenient, but its language behavior is a little more limited than the desktop version. The display language typically follows the language settings of the service hosting the document, such as OneDrive or SharePoint. In other words, the browser version likes to borrow its personality from wherever the file lives.
Change proofing language in Word for the web
- Open the document in Word for the web.
- Select the text you want to change, or press Ctrl + A for the whole document.
- Go to the Review tab.
- Choose Editor > Set Proofing Language.
- Select the language you want.
- Click OK.
If you need the whole interface to appear in a different language, you may need to change the language settings for your Microsoft account, OneDrive, SharePoint, or another host service rather than changing it inside Word for the web itself.
What to Do If Your Language Is Not Available
Sometimes the language you want is missing. When that happens, do not assume Word is broken. It often just means you need a language pack or proofing tools.
Try these fixes
- Add the language from File > Options > Language in Word on Windows.
- Install the necessary Language Accessory Pack if proofing tools are available but not yet installed.
- Add the matching keyboard in Windows if you also want the correct typing layout.
- Restart Word after installation so the new language loads properly.
If Word shows a status like Proofing available instead of Proofing installed, that usually means the language exists but the proofing tools are not fully active yet.
Common Problems When Word Won’t Change Language
Sometimes you follow every step correctly and Word still behaves like it never got the memo. Here are the most common reasons that happens.
1. Spell check is turned off for the selected text
In the proofing language dialog, Word can be set to Do not check spelling or grammar. If that option is selected, Word will stop checking the chosen text or document. That can make it look like the language tools are broken when they are really just disabled.
2. The wrong section of text is selected
Word can apply different proofing languages to different parts of the same document. So if only one paragraph keeps acting strange, it may have been assigned a different language earlier. Select that section and reset the proofing language manually.
3. Automatic spell check is off
Even with the correct language selected, Word will not underline mistakes if automatic spelling and grammar checks are disabled. In Word on Windows, check the Proofing settings if nothing is being flagged at all.
4. Document-specific exceptions are blocking proofing
Word allows exceptions such as hiding spelling or grammar errors for the current document only. This can make one file behave oddly while every other file works fine. If one stubborn document refuses to show corrections, this setting is worth checking.
5. Add-ins are interfering
Third-party writing tools and add-ins can sometimes conflict with Word’s built-in proofing settings. If the language seems correct but the behavior is still weird, disabling add-ins one by one may help identify the troublemaker.
Best Practices for Multilingual Word Documents
If you write in more than one language regularly, a few habits can save you a lot of time.
- Set your main authoring language first before starting a document.
- Use Ctrl + A to apply proofing language to the whole document when needed.
- Turn on Detect language automatically if you frequently mix languages.
- Install the matching keyboard layout, not just the proofing language.
- Double-check document exceptions when spell check stops working.
These small steps reduce the chances of Word randomly deciding your college essay is now in French Canadian for reasons known only to the software gods.
Final Thoughts
Learning how to change the language in Word is easier once you separate the task into the right category: display language, authoring language, or proofing language. On Windows, most of the important controls live in File > Options > Language. On Mac, the display language follows your system settings, while editing language is handled through Tools > Language. In Word for the web, proofing can be changed inside the document, but display language usually depends on your account or hosting service.
The key takeaway is simple: if Word is speaking one language while spell check is thinking in another, you are probably dealing with two separate settings. Fix the right one, and Word becomes much less dramatic.
Real-World Experiences With Changing the Language in Word
In real-world use, changing the language in Word is rarely just a technical setting. It is usually tied to work, school, travel, immigration paperwork, translation jobs, or daily communication with people in different countries. That is why a small language mismatch inside Word can feel far bigger than it sounds.
A common experience happens when someone borrows a laptop, signs into a shared computer, or opens a document created by another person. Suddenly, Word starts checking English text with Spanish proofing rules, or it marks British spelling as incorrect because it is set to U.S. English. The document looks normal, but every other line is covered in red squiggles. At that moment, people often assume the file is corrupted, when the real issue is simply the proofing language attached to the text.
Students run into this problem all the time. A student writing a paper in English might paste a quotation from a French or German source, and Word begins acting confused in the paragraph that follows. Another student may switch between American and British spelling for an application essay, only to discover Word is judging one version like an overly strict grammar teacher. Once they learn how to set proofing for selected text, the stress level drops fast.
Professionals have similar stories. Remote teams often work across multiple countries, and shared Word documents can pick up language settings from different contributors. One person writes in English, another reviews in Spanish, and a third opens the file on a Mac configured in Portuguese. Nobody is wrong, but Word can become hilariously unhelpful unless the team standardizes the language settings before final editing.
Freelance writers, editors, and translators tend to become especially aware of this. Many of them keep Word’s interface in English, write in one language, and proofread in another depending on the client. For these users, understanding the difference between display language and proofing language is not just convenient. It is part of the workflow. It saves time, reduces false corrections, and prevents embarrassing mistakes in finished documents.
There is also the emotional side of the experience, which is surprisingly real. When software refuses to recognize the language you are writing in, it can feel oddly personal. You know the word is correct. Word insists it is wrong. It becomes a tiny battle of confidence versus settings. The good news is that once users learn where these controls live, they usually feel much more in charge of the app.
That is why this topic stays popular. It is not only about clicking a menu. It is about making Word fit the way real people actually work: across languages, across devices, across countries, and sometimes across a deadline that was due ten minutes ago.