
Table of Contents >> Show >> Hide
- What Is Demo Mode on Android?
- Demo Mode vs. Retail Demo Mode: Do Not Mix These Up
- What You Need Before You Start
- Method 1: Enable Demo Mode from Android Settings
- Method 2: How It Looks on Popular Android Brands
- Method 3: Enable Demo Mode with ADB
- How to Turn Off Demo Mode from Settings
- Why Demo Mode Sometimes Does Not Appear
- Best Uses for Android Demo Mode
- Common Mistakes to Avoid
- Conclusion
- Practical Experiences and Lessons From Using Android Demo Mode
- SEO Tags
If you have ever tried to take a beautiful Android screenshot only to discover a messy status bar, three random notifications, a suspiciously low battery, and a clock that makes your phone look like it has been awake for 19 straight hours, welcome to the club. Android Demo Mode exists for exactly this reason. It creates a cleaner, more controlled status bar so screenshots, app previews, tutorials, and presentation images look polished instead of chaotic.
This guide explains exactly how to enable Demo Mode on Android, what it does, when to use it, how to turn it off, and how to troubleshoot the feature when your phone acts like it has never heard of it. We will also cover the ADB method for people who want more control and explain why Demo Mode is not the same thing as retail demo mode on store display phones. That distinction matters more than most people realize.
What Is Demo Mode on Android?
Android Demo Mode, often labeled System UI Demo Mode, is a developer-oriented feature that makes the status bar look neat and predictable. Instead of showing your real notifications, battery state, and ever-changing network icons, it displays a simplified visual setup that is better for screenshots and screen recordings.
In plain English, it helps your phone stop oversharing. No notification clutter. No weird warning icons. No accidental evidence that you have 4% battery and 92 unread messages.
Demo Mode is especially useful for:
- Taking app screenshots for blogs, websites, or app store listings
- Creating tutorials and how-to guides
- Recording Android demos for YouTube or product walkthroughs
- Testing how the System UI looks with specific status bar states
- Making marketing images look cleaner and more consistent
Demo Mode vs. Retail Demo Mode: Do Not Mix These Up
Before we go any further, let us clear up one of Android’s sneakiest sources of confusion. System UI Demo Mode is the feature most users mean when they want clean screenshots. It affects the status bar and is usually tucked inside Developer options.
Retail demo mode is a different beast. That is the showroom-style mode used on store display devices. It can involve locked-down policies, custom launcher behavior, demo videos, disabled account changes, and restrictions that make a normal user want to stare into the distance for a while. If your phone is a former display unit, you may be dealing with retail demo behavior, not the screenshot-friendly System UI Demo Mode.
So if you simply want a clean status bar, this guide is about System UI Demo Mode.
What You Need Before You Start
For most phones, enabling Demo Mode is easy, but there are a few basics:
- An Android phone running a reasonably recent version of Android
- Access to Developer options
- For the ADB method, a computer with Android SDK Platform Tools installed
- A little patience, because some manufacturers bury these settings like treasure
Also, keep in mind that not every Android phone exposes Demo Mode in the same way. Some manufacturers include it directly. Others hide or rename parts of the menu. And some devices may not fully support the ADB commands used to control the feature.
Method 1: Enable Demo Mode from Android Settings
Step 1: Unlock Developer Options
On most Android phones, Developer options are hidden by default. To reveal them:
- Open Settings
- Go to About phone
- Find Build number
- Tap it seven times
- Enter your PIN, password, or pattern if prompted
After that, Android should confirm that Developer options are now enabled. Congratulations. You have unlocked the door to the part of Settings where Android starts sounding like it was designed in a laboratory.
Step 2: Open Developer Options
Now go back to the main Settings screen. Depending on your device, Developer options may appear:
- Under Settings > System
- At the very bottom of the main Settings menu
- Inside a manufacturer-specific submenu
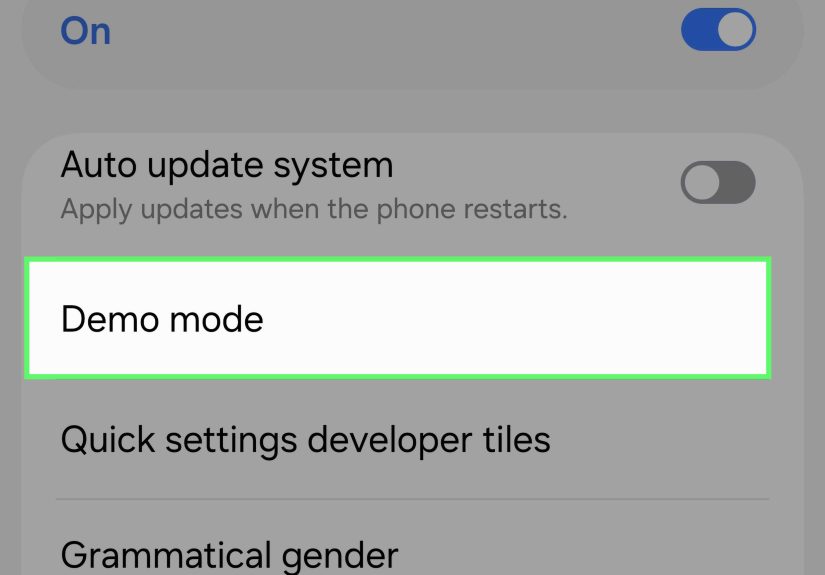
Step 3: Find System UI Demo Mode
Scroll through Developer options and look for System UI demo mode or simply Demo mode. On many phones, you will see two switches:
- Enable demo mode
- Show demo mode
Turn on Enable demo mode first. Then turn on Show demo mode. The status bar should switch to a cleaner, preset appearance.
That is it. On supported devices, you are done.
Method 2: How It Looks on Popular Android Brands
Pixel and Near-Stock Android
On Pixel-style Android, the process is usually the cleanest. You unlock Developer options by tapping Build number, then head into Developer options and look for the Demo Mode setting. This is generally the easiest path for bloggers, app testers, and anyone who wants quick screenshot cleanup without opening a computer.
Samsung Galaxy Phones
Samsung typically places the unlock path under:
Settings > About phone > Software information > Build number
After enabling Developer options, the menu appears in Settings. From there, search for Demo Mode or scroll through the developer list. Samsung’s interface can be a little more layered than stock Android, but the core process is similar.
Motorola Phones
Motorola devices also hide Developer options until you tap Build number seven times. Depending on the model, you may reach it from:
Settings > About phone or Settings > System > About phone
Once enabled, Developer options usually appear under Settings > System.
Other Android Phones
OnePlus, Xiaomi, Realme, and other Android brands often follow the same general idea, but menu names can vary. If you cannot find Demo Mode, use the Settings search bar and try these terms:
- Demo
- System UI demo mode
- Developer options
- Build number
If nothing appears, your phone may not expose the feature in the normal interface.
Method 3: Enable Demo Mode with ADB
If your phone supports the underlying System UI demo commands, ADB gives you more control than the simple on-screen toggle. This is the method power users, testers, and Android tinkerers tend to prefer.
What Is ADB?
ADB stands for Android Debug Bridge. It is a command-line tool that lets a computer communicate with an Android device. You can use it for debugging, file operations, testing, and, yes, telling your status bar to behave like it is in a professional photo shoot.
Before You Use ADB
- Install Android SDK Platform Tools on your computer
- Enable USB debugging in Developer options
- Connect your phone by USB
- Allow the computer when Android asks for USB debugging authorization
ADB Commands to Enable Demo Mode
Open a terminal or command prompt and use the following commands:
That enables the feature and puts the device into demo mode.
Customize the Status Bar
You can then set specific visual states. For example:
Those commands can set:
- The clock to a specific time
- The battery icon to a chosen percentage
- Wi-Fi and cellular strength icons
- Notification visibility
This is excellent for app screenshots because you can produce a consistent look across dozens of images instead of manually hoping Android feels cooperative that day.
Turn Demo Mode Off with ADB
That tells Android to leave demo mode and return the status bar to real-world behavior.
How to Turn Off Demo Mode from Settings
If you enabled Demo Mode through Developer options, turning it off is simple:
- Open Settings
- Go to Developer options
- Open System UI demo mode
- Turn off Show demo mode
- Turn off Enable demo mode if you no longer need it
Your normal status bar should return immediately. Your notifications were not deleted. They were just hiding backstage like shy actors waiting for their cue.
Why Demo Mode Sometimes Does Not Appear
If you cannot find Demo Mode, one of these explanations is usually the culprit:
1. Developer Options Are Not Actually Enabled
If tapping Build number did nothing, make sure you tapped the correct field and completed the phone’s security prompt if it appeared.
2. Your Phone Manufacturer Hid the Feature
Some OEM skins expose Demo Mode more clearly than others. A few bury it. Some may leave the infrastructure partially available but not show the switch in Settings.
3. ADB Support Is Incomplete on Your Device
Even if Demo Mode exists in Android documentation, not every manufacturer validates the ADB demo commands the same way. That means the commands may work beautifully on one phone and shrug politely on another.
4. You Are Dealing with Retail Demo Mode Instead
If your device behaves like a store display phone, loops demo content, restricts accounts, or seems unusually locked down, you may be dealing with retail demo mode, which is a separate setup and not the standard screenshot-oriented feature.
Best Uses for Android Demo Mode
Demo Mode is not just a niche feature for developers wearing black hoodies and carrying three USB cables. It is genuinely useful for a lot of people.
- Bloggers and content writers: Clean screenshots look more professional in tutorials and reviews
- App developers: Consistent UI images help with product pages and QA comparisons
- YouTubers: Screen recordings look less distracting without notification clutter
- Designers: Mockups and promotional images look more polished
- Trainers and educators: Demonstrations are easier to follow when the interface is simplified
It is one of those Android tools that feels oddly minor until you use it once, then suddenly every dirty status bar screenshot starts offending your sense of order.
Common Mistakes to Avoid
- Do not confuse Enable demo mode with Show demo mode; on many phones you need both
- Do not assume every Android skin places Developer options in the same location
- Do not rely on ADB commands working identically across all devices
- Do not panic if your notifications disappear in Demo Mode; they usually return when you exit
- Do not assume a store display device can be fixed with the same steps used for System UI Demo Mode
Conclusion
Android Demo Mode is one of the platform’s most underrated tools. It is simple, practical, and perfect for anyone who needs a cleaner status bar for screenshots, tutorials, or product visuals. On many devices, all you need to do is unlock Developer options, enable System UI Demo Mode, and flip the switch. If you want deeper control, ADB commands can help you fine-tune the clock, battery, Wi-Fi, and notification icons.
The biggest takeaway is this: Demo Mode is about presentation, not permanent system changes. It helps Android look tidy when you need it to, and then steps out of the way when you are done. Whether you are writing a blog post, testing an app, or just trying to make your screenshots look less like digital clutter, it is a feature worth knowing.
Practical Experiences and Lessons From Using Android Demo Mode
After using Android Demo Mode across different phones and content workflows, one thing becomes obvious fast: this feature saves far more time than it first appears. The biggest improvement is consistency. Without Demo Mode, every screenshot reflects whatever chaotic little moment your phone happens to be living through. One image has a low battery warning, another has a silent icon, another has three app notifications, and another shows your carrier struggling for signal like it is hiking in the wilderness. Put those screenshots together in a blog post, and the page instantly looks less polished.
With Demo Mode enabled, screenshots start looking intentional. That matters whether you are publishing a how-to article, building a product tutorial, or simply sending visuals to a client. A clean status bar helps the reader focus on the app, the setting, or the feature being explained. It sounds like a tiny detail, but presentation is often the difference between content that looks casually assembled and content that looks professionally produced.
Another real-world advantage is speed during editing. If you are capturing ten, twenty, or fifty screenshots for a long tutorial, it is frustrating to crop around notifications or retouch the status bar in every image. Demo Mode reduces that cleanup work dramatically. For writers and marketers, that can turn into a serious productivity boost. For developers, it also makes comparison images easier because the UI stays visually stable between shots.
There are, however, a few lessons learned the hard way. First, device variation is real. On one phone, Demo Mode appears exactly where you expect it. On another, you have to hunt through menus like you are solving a scavenger hunt designed by an exhausted engineer. On some devices, the simple toggle works beautifully. On others, ADB is the only practical option. And even then, command behavior can vary, which means testing is important before you build an entire workflow around it.
Second, it is smart to decide in advance what your screenshot style will be. Pick a clock time, battery level, and network look, then keep those choices consistent throughout your project. Your readers may never consciously notice that consistency, but they absolutely feel it. Clean, uniform images make an article easier to trust and easier to scan.
Finally, Demo Mode is a reminder that Android has a lot of hidden tools designed for practical work, not just geeky experimentation. Once you know where it lives and how to use it, it becomes one of those features you end up recommending all the time. It is simple, slightly buried, weirdly powerful, and very on-brand for Android. In other words, it is classic Android magic: half utility, half treasure hunt, and fully worth learning.


