
Table of Contents >> Show >> Hide
- What You Need Before You Start
- How to Sew Hair Extensions to a Clip: 11 Steps
- Step 1: Choose the Right Hair Extension Weft
- Step 2: Pick Clips That Match Your Hair and Scalp Comfort
- Step 3: Measure Where the Clips Should Go
- Step 4: Thread the Needle
- Step 5: Secure the First Clip in Place
- Step 6: Sew Through Each Clip Hole Several Times
- Step 7: Add Wraparound Stitches for Extra Strength
- Step 8: Knot the Thread Securely
- Step 9: Repeat for the Remaining Clips
- Step 10: Test the Clips Before Wearing
- Step 11: Clip In, Blend, and Style Gently
- How Many Clips Should You Sew Onto Each Weft?
- Best Thread and Needle for Sewing Hair Extensions to Clips
- Common Mistakes to Avoid
- How to Care for DIY Clip-In Hair Extensions
- Safety and Comfort Tips
- When Should You Replace a Clip?
- Real-Life Experience: What Sewing Hair Extensions to Clips Teaches You
- Conclusion
Sewing hair extensions to a clip is one of those beauty skills that sounds oddly intimidating until you try it once. Then you realize it is basically a tiny craft project with better hair at the end. Whether you are replacing a broken clip, turning a weft into a clip-in extension, or customizing a set so it sits more comfortably on your head, the process is simple, affordable, and surprisingly satisfying.
The beauty of DIY clip-in hair extensions is control. You can decide where each clip goes, how many clips a weft needs, how snug the hold should feel, and whether the finished piece works for a quick ponytail, a layered blowout, or a “yes, I woke up with this much hair” moment. You do not need a salon chair, a professional sewing machine, or a mysterious beauty-school diploma. You just need the right clips, strong thread, a needle, and a little patience.
This guide walks you through how to sew hair extensions to a clip in 11 clear steps. You will also learn how to choose the best materials, avoid bulky stitches, test the clips safely, and care for your finished clip-in extensions so they last longer and behave better than a tangled charging cable at the bottom of a backpack.
What You Need Before You Start
Before sewing, gather everything in one place. A flat table, good lighting, and a towel or cloth underneath the hair weft can make the job easier. Hair extensions like to slide around dramatically, because apparently even loose hair has a flair for theater.
Basic Supplies
- Hair extension weft or track
- Snap clips or wig clips made for extensions
- Strong weaving thread or polyester thread
- Curved or straight sewing needle
- Sharp scissors
- Small clips or pins to hold the weft in place
- Comb or extension brush
- Optional: measuring tape and fabric marker
Choose thread that closely matches the color of the weft seam, not necessarily the hair itself. If the top band is dark brown, use dark brown thread. If the weft is blonde but the stitched band is beige, choose beige or tan. The goal is invisible stitching, not a surprise craft border.
How to Sew Hair Extensions to a Clip: 11 Steps
Step 1: Choose the Right Hair Extension Weft
Start with a clean, dry weft. If you are using human hair extensions, make sure they are detangled before sewing. If you are using synthetic extensions, avoid pulling too hard because synthetic fibers can frizz or stretch when handled roughly.
Check the top seam of the weft. It should be sturdy enough to hold stitches. A double-wefted track is usually stronger and fuller, while a thinner weft may feel lighter and flatter against the head. If you are making clip-ins for fine hair, a lighter weft may blend more naturally. If you want more fullness, a thicker weft can help, but it may need extra clips for support.
Step 2: Pick Clips That Match Your Hair and Scalp Comfort
Most hair extension clips are small snap clips with comb-like teeth and tiny sewing holes along the top or sides. Many also have silicone backing, which helps grip the hair without needing as much teasing or tension.
For small side pieces, use two clips. For wider back pieces, use three or four clips. A good rule is simple: the wider and heavier the weft, the more clips it needs. One tiny clip trying to hold a long heavy weft is not bravery; it is a future wardrobe malfunction.
Step 3: Measure Where the Clips Should Go
Lay the weft flat with the stitched band facing you. Place the clips along the top seam before you sew anything. For a short weft, position one clip near each end. For a medium weft, place clips at both ends and one in the center. For a long weft, add four clips spaced evenly apart.
Keep each clip slightly inside the edge of the weft, not hanging off the end. This prevents the clip from poking out when worn. Make sure the comb teeth point downward, because that is how the clip grips your natural hair. The curved side should face the head when installed.
Step 4: Thread the Needle
Cut about 18 to 24 inches of thread. Longer thread may seem efficient, but it can twist, knot, and test your emotional maturity. Thread the needle and pull both ends together so you are sewing with a doubled strand. Tie two or three knots at the end for extra hold.
If you are using a curved needle, it may feel strange at first, but it can help you pass through thick weft seams more easily. A straight needle works too, especially for thinner wefts. Use what feels easier in your hand.
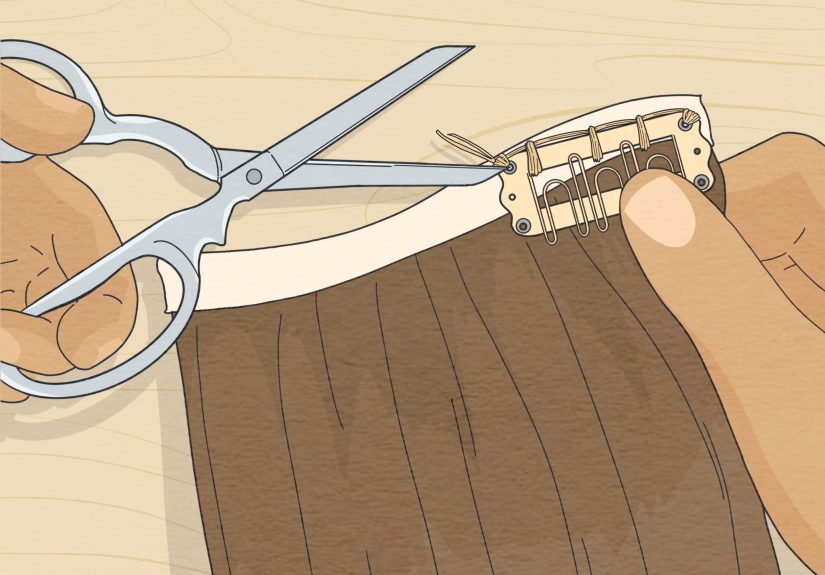
Step 5: Secure the First Clip in Place
Hold the clip against the top seam of the weft. The clip should be closed while you sew so it stays stable. Start at one outer sewing hole. Push the needle through the weft seam from back to front, then pass it through the hole in the clip.
Pull the thread until the knot sits snugly against the back of the weft. Do not yank so hard that the seam puckers. You want firm, flat stitches. Think “secure,” not “I am trying to win a tug-of-war against a tiny metal clip.”
Step 6: Sew Through Each Clip Hole Several Times
Most extension clips have small holes designed for sewing. Stitch through each hole two to four times, depending on the thickness of the weft and how often you plan to wear the extensions. The outer holes usually need the strongest stitching because they handle the most movement.
Pass the needle through the weft, through the clip hole, and back again. Keep your loops neat and close together. If your stitches look messy, do not panic. They will be hidden behind your hair. Still, tighter stitches help the clip sit flatter and last longer.
Step 7: Add Wraparound Stitches for Extra Strength
Once the holes are stitched, add a few wraparound stitches over the top edge of the clip and through the weft seam. This helps anchor the clip so it does not wiggle. It is especially helpful if the extension is thick, long, or made from heavier human hair.
A wraparound stitch is exactly what it sounds like: loop the thread around the top bar of the clip and through the weft. Pull snugly after each pass. This small step can make a big difference in how secure the finished clip-in feels.
Step 8: Knot the Thread Securely
When the first clip feels secure, finish with several knots on the back side of the weft. To make a knot, slide the needle under a nearby stitch, pull until a small loop forms, pass the needle through the loop, and tighten. Repeat two or three times.
Trim the thread close to the knot, but do not cut the weft seam. That is the kind of tiny mistake that can turn a calm DIY project into a dramatic staring contest with your scissors.
Step 9: Repeat for the Remaining Clips
Move across the weft and sew the rest of the clips in the same way. Keep checking that every clip faces the same direction. The teeth should point downward on all clips. The snap side should open and close easily after sewing.
If you are sewing a long weft, start with the center clip first, then sew the outer clips. This helps keep the spacing balanced. For shorter side pieces, sew both clips near the ends, leaving enough room so the extension can bend naturally with your head shape.
Step 10: Test the Clips Before Wearing
After sewing, gently tug each clip away from the weft. If it shifts, add more stitches. Open and close every clip to make sure thread is not blocking the snap mechanism. The clip should close smoothly and feel stable.
Next, hold the extension against your head where you plan to wear it. This is not the final install; it is just a comfort test. If a clip lands in an awkward spot, such as too close to the temple or too high near a visible part, remove it and resew it in a better position.
Step 11: Clip In, Blend, and Style Gently
To wear your finished clip-in extension, part your hair horizontally where the weft will sit. Open the clips, slide the teeth into the roots, and snap them closed. The clip should feel secure but not painfully tight. If it pulls, remove it and reposition it. Comfort matters.
Brush your natural hair over the weft to hide the seam. If the extension is human hair, you can usually curl or straighten it with heat, but use a heat protectant and moderate temperature. If it is synthetic, check the product label first. Some synthetic hair is heat-resistant, but some is not. Nobody wants a curling iron tragedy.
How Many Clips Should You Sew Onto Each Weft?
The number of clips depends on the width and weight of the hair extension. A narrow two-inch piece may need only one small clip. A four-inch side piece usually works better with two clips. A full back weft may need three or four clips so the weight is spread evenly.
For thicker hair, more clips can help the extension stay secure. For fine or delicate hair, lightweight wefts and smaller clips are often more comfortable. The goal is a stable hold without too much tension. Clip-in extensions should not hurt, pull, or leave your scalp feeling sore after wear.
Best Thread and Needle for Sewing Hair Extensions to Clips
Regular sewing thread can work for quick repairs, but weaving thread or strong polyester thread is better for long-term use. Hair extensions move throughout the day, especially when you brush, style, or toss your hair like you are in a shampoo commercial. Strong thread helps the clips stay attached.
A curved needle is popular because it can move through thick weft seams with less effort. However, a straight needle is fine for beginners and easy to control. Choose a needle strong enough to pass through the weft without bending.
Common Mistakes to Avoid
Sewing the Clip Upside Down
Before stitching, check the direction of the clip. The teeth should point downward when the weft is worn. If the clip is upside down, it will not grip properly.
Using Weak Thread
Thin craft thread may snap after a few wears. Use strong thread, especially for heavy wefts.
Placing Clips Too Close to the Edge
Clips sewn too close to the edge can show when the hair moves. Place them slightly inward for a more natural look.
Making the Stitches Too Loose
Loose stitches allow the clip to wobble. Keep stitches tight and flat, but avoid pulling so hard that the weft bends.
Skipping the Comfort Test
A clip may look perfect on the table and feel annoying on your head. Always test placement before wearing the extension for several hours.
How to Care for DIY Clip-In Hair Extensions
After you sew clips onto hair extensions, care makes a major difference. Brush the extensions gently before and after wearing them. Start at the ends and work upward to prevent tugging and shedding. A wide-tooth comb, loop brush, or soft bristle brush is usually best.
Wash clip-in extensions only when they need it, such as after product buildup, sweat, or repeated styling. Since clip-ins are not attached to your scalp, they do not collect natural oils as quickly as your own hair. Overwashing can dry them out, especially human hair extensions.
When washing, use lukewarm water and a gentle shampoo. Condition the mid-lengths and ends, then rinse thoroughly. Lay the extensions flat on a towel or hang them to air dry. Avoid brushing wet extensions aggressively because wet hair is more fragile.
Store your clip-ins flat, dry, and detangled. A satin bag, extension hanger, or clean storage box works well. Do not throw them into a drawer and hope for the best. Hair extensions remember chaos.
Safety and Comfort Tips
Clip-in hair extensions should feel comfortable. If you feel pulling, pinching, or soreness, remove the piece and adjust the placement. Do not sleep in clip-ins, because the clips can tug on your natural hair while you move. Remove them before swimming, intense workouts, or showering.
If you have a sensitive scalp, very fine hair, or areas prone to breakage, use lighter wefts and fewer heavy pieces. You can also ask a hairstylist to help customize your clip placement. DIY beauty is fun, but comfort and hair health should always win.
When Should You Replace a Clip?
Replace a clip when it no longer snaps tightly, loses teeth, bends out of shape, or pulls away from the weft. A loose clip can make the extension slip or sit unevenly. Fortunately, replacing a clip is the same process as sewing one on: remove the old stitches, position the new clip, and sew it securely through each hole.
Keep a few spare clips and matching thread in a small beauty kit. That way, if a clip breaks before an event, you can fix it quickly instead of having a tiny hair emergency five minutes before leaving the house.
Real-Life Experience: What Sewing Hair Extensions to Clips Teaches You
The first thing you learn when sewing hair extensions to clips is that placement matters more than perfection. A beginner often worries about making every stitch look professional, but the real test is whether the clip feels comfortable, holds securely, and disappears under the hair. The stitches can be humble. The result can still be fabulous.
One helpful experience is to test the weft on your head before sewing all the clips permanently. Lay the extension against the area where you want to wear it, then mark the best clip positions. The center back of the head usually handles wider wefts well, while the sides need shorter, lighter pieces. If a weft feels too bulky near the temples, trim it into smaller sections instead of forcing one large piece to behave. Hair extensions, much like group projects, work better when everyone is assigned the right role.
Another practical lesson is that strong thread is worth it. Many people try regular thread because it is already in the house. It may work for a quick fix, but after a few wears, the clip can loosen. Weaving thread or durable polyester thread holds better, especially when the weft is thick. Doubling the thread also gives extra strength without making the stitch too bulky.
Color matching is another small detail that makes a big difference. The thread does not need to match every highlight in the hair. It should match the weft band or clip color. Dark clips on dark roots are easier to hide, while lighter extensions may look better with beige or blonde-toned thread. If you are creating a set for balayage or highlighted hair, place darker clips where the roots will cover them.
Comfort is the biggest lesson. A clip-in extension can look amazing in the mirror but feel wrong after an hour if the clip is too tight or placed on a sensitive area. The best DIY set is not the heaviest or longest one. It is the one you can wear without constantly thinking about it. If a clip pulls, move it. If a weft feels too heavy, add another clip or divide the weft into smaller pieces.
Blending also improves with practice. After clipping in the extensions, lightly brush your natural hair over the weft. If the ends look too blunt, curl the extensions and natural hair together in loose sections. Waves are forgiving because they help different lengths blend. Straight styles can work beautifully too, but they usually require more careful trimming and placement.
Maintenance becomes easier once you build a routine. Remove the extensions at night, brush them gently, and store them neatly. Wash them only when they feel coated with product or harder to style. Too much washing can make extensions dry, while too much heat styling can shorten their life. Treat them like a nice sweater: useful, pretty, and not something you throw into a corner after every wear.
Finally, sewing your own clips gives you confidence. You stop seeing clip-in extensions as fragile mystery pieces and start understanding how they work. You can repair a loose clip, customize a weft, or create a small volume piece for a specific hairstyle. It is a tiny skill, but it saves money, reduces waste, and gives you more control over your look. Plus, there is something deeply satisfying about saying, “Yes, I made these,” while your hair is having its main-character moment.
Conclusion
Learning how to sew hair extensions to a clip is a simple DIY beauty skill with a big payoff. With the right clips, strong thread, neat stitches, and smart placement, you can repair old clip-ins or create a custom set from wefts. The process is beginner-friendly, budget-friendly, and flexible enough for different hair types, lengths, and styles.
The key is to work slowly, test your placement, and prioritize comfort. A secure clip-in extension should feel stable without pulling. Once your clips are sewn on, proper brushing, gentle washing, and careful storage will help your extensions last longer and look smoother.


