Table of Contents >> Show >> Hide
- Why Learn the Hanging Leg Raise?
- What Muscles Does a Hanging Leg Raise Work?
- Before You Start
- How to Do a Hanging Leg Raise: 12 Steps
- Step 1: Warm up for 5 to 10 minutes
- Step 2: Grab a sturdy bar with an overhand grip
- Step 3: Set your shoulders before you move
- Step 4: Brace your core and find a neutral spine
- Step 5: Start with a still body
- Step 6: Begin with the bent-knee version if you are a beginner
- Step 7: Exhale as you lift your knees or legs
- Step 8: Lift until your thighs reach about parallel
- Step 9: Add a brief pause at the top
- Step 10: Lower slowly for full control
- Step 11: Stop the set when form breaks
- Step 12: Progress gradually
- Common Mistakes to Avoid
- Beginner-Friendly Progressions
- Sets, Reps, and Programming
- What You Should Feel
- Real-World Experiences With Hanging Leg Raises
- Conclusion
- SEO Tags
If you have ever grabbed a pull-up bar and thought, “How hard can this be?” the hanging leg raise is here to answer with a very confident, “Hard enough.” It looks simple: hang there, lift your legs, become an ab legend. In reality, it is a full-body skill that asks your core, hip flexors, grip, shoulders, and self-respect to work together like a team that actually reads the group chat.
The good news is that you do not need circus-level talent to learn it. You just need a smart setup, controlled movement, and the patience to stop turning each rep into a playground swing contest. Below, you will learn how to do a hanging leg raise with strong form, how to make it easier or harder, and how to avoid the common mistakes that make your lower back file a complaint.
Why Learn the Hanging Leg Raise?
The hanging leg raise is popular for a reason. It challenges the muscles around your trunk, including your abs and obliques, while also demanding shoulder stability, grip strength, and coordination. Unlike lying leg raises, the hanging version forces you to control your body in space. That means it is not just about lifting your legs. It is also about resisting swing, staying tall through your upper body, and keeping your ribs and pelvis from drifting into a messy, floppy position.
Done well, this exercise can fit nicely into a core routine focused on control and strength. Done badly, it becomes a hip-flexor yank with bonus lower-back drama. So yes, technique matters here. A lot.
What Muscles Does a Hanging Leg Raise Work?
The stars of the show are your rectus abdominis, transverse abdominis, and obliques. These muscles help brace your trunk and control the motion of your pelvis as your legs move. Your hip flexors also work hard, especially as your knees or legs lift upward. On top of that, your lats, forearms, hands, and shoulders help you hold onto the bar and keep your upper body stable.
That is why a hanging leg raise can feel like an ab move, a grip test, and a posture lesson all at once. If your grip gives out before your core does, congratulations: your body has offered useful feedback. Listen to it.
Before You Start
You will need a sturdy pull-up bar, enough space to hang freely, and a body that feels reasonably happy with overhead hanging. If you have shoulder pain, a recent hip flexor strain, or a history of low back issues, it is smart to use an easier variation first, such as a captain’s chair knee raise, reverse crunch, or dead bug. There is no trophy for skipping the basics and immediately regretting it.
Also, warm up. A few minutes of light cardio, shoulder circles, hanging scapular engagement, and gentle hip mobility can make a big difference. Going from desk posture to advanced core move in ten seconds is one of the less glamorous ways to meet a physical therapist.
How to Do a Hanging Leg Raise: 12 Steps
Step 1: Warm up for 5 to 10 minutes
Start with brisk walking, cycling, or another light cardio option. Then add shoulder rolls, arm circles, hip swings, and a few easy core drills such as dead bugs or hollow holds. Your goal is to raise your body temperature, wake up your trunk, and make overhead hanging feel less shocking.
Step 2: Grab a sturdy bar with an overhand grip
Use a pull-up bar you trust. Grip it about shoulder-width apart. Wrap your thumbs around the bar and let your body hang tall. If your setup feels shaky, fix that before you even think about lifting your legs. A hanging leg raise should challenge your abs, not your faith in hardware.
Step 3: Set your shoulders before you move
Do not just dangle like wet laundry. Pull your shoulders slightly down and away from your ears so your upper body feels active. Think “tall chest, packed shoulders.” This creates a more stable base and helps you avoid collapsing through the neck and upper traps.
Step 4: Brace your core and find a neutral spine
Before the legs move, tighten your trunk as if you are about to be lightly poked in the stomach by a very annoying friend. Keep your ribs from flaring and avoid dramatically arching your lower back. You want control, not theatrical spinal movement.
Step 5: Start with a still body
Let your legs hang together with a slight bend in the knees if needed. Pause for a moment and eliminate any swing. This matters more than most people realize. If you start swinging first and lifting second, your momentum will do part of the job, and your abs will send a formal complaint.
Step 6: Begin with the bent-knee version if you are a beginner
There is zero shame in starting with hanging knee raises. In fact, it is often the smartest way to learn the pattern. Bend your knees and bring them upward under control. This shortens the lever, reduces strain, and helps you focus on your trunk position. Straight-leg raises are a progression, not a personality trait.
Step 7: Exhale as you lift your knees or legs
Breathe on purpose. Exhale during the upward phase while keeping your midsection braced. That breath can help reinforce control and keep you from holding tension in all the wrong places, like your jaw, neck, and soul.
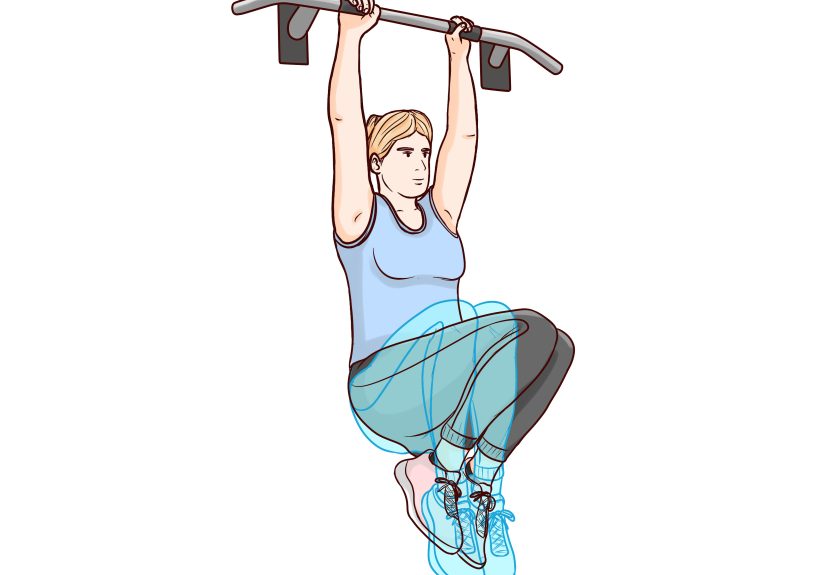
Step 8: Lift until your thighs reach about parallel
For most people, a solid target is to bring the thighs roughly parallel to the floor. If you are doing knee raises, you may lift the knees closer to your chest. If you are doing straight-leg raises, only go as high as you can without losing posture or swinging wildly. Range of motion should be earned, not borrowed.
Step 9: Add a brief pause at the top
Pause for a second at the top position. This tiny hold forces you to own the rep instead of bouncing through it. If the pause feels impossible, that is a clue that you may be using too much momentum or choosing a variation that is too advanced right now.
Step 10: Lower slowly for full control
This is where the exercise gets honest. Lower your legs with control rather than letting gravity win immediately. A slow descent keeps tension on the trunk and helps reduce swinging. If the way down looks like an emergency exit, the rep was not as clean as it felt.
Step 11: Stop the set when form breaks
End the set when your shoulders shrug up, your lower back arches excessively, your body starts swinging like a church bell, or your grip is the only thing keeping the situation together. Quality beats quantity here. Five sharp reps are far better than twelve chaotic ones.
Step 12: Progress gradually
Once bent-knee raises feel steady, move to straighter legs, slower tempos, longer pauses, or more reps. You can also progress by lifting the knees higher with a posterior pelvic tilt at the top. Advanced athletes may eventually work toward straight-leg toes-to-bar variations, but there is no need to rush there like it is a flight boarding call.
Common Mistakes to Avoid
Using momentum instead of muscle
The biggest mistake is turning the movement into a swing. Momentum makes the exercise look easier while secretly making it sloppier. Reset between reps if needed.
Arching the lower back
If your ribs flare and your lower back arches hard, the move becomes less controlled and more stressful. Keep the trunk braced and think about moving from the hips while maintaining strong body position.
Going too advanced too soon
Straight-leg raises look cool. They also demand more control. Start with bent-knee raises if you cannot keep your body still. Earning the harder variation is part of the process.
Ignoring pain
Muscular effort is normal. Sharp pain in the shoulders, hips, or lower back is not your body “getting stronger.” It is your body asking you to make a better decision.
Beginner-Friendly Progressions
If a full hanging leg raise feels out of reach right now, use one of these stepping stones:
- Dead bug: Great for learning core bracing and pelvic control without hanging.
- Reverse crunch: Helps train the lower-ab control people usually think they have after watching one fitness video.
- Captain’s chair knee raise: Offers support so you can focus more on the leg-lifting pattern.
- Hanging knee raise: The most direct progression to a full hanging leg raise.
- Single-leg raise from a hang: Lift one leg at a time to reduce difficulty and improve control.
Sets, Reps, and Programming
For beginners, try 2 to 3 sets of 5 to 8 controlled hanging knee raises. Intermediate lifters can work with 3 sets of 8 to 12 reps. If you are doing strict straight-leg raises, expect the number to be lower at first. That is normal.
You can place hanging leg raises after your warm-up as part of core work, or later in your workout if your grip and shoulders are not already cooked. Two or three sessions per week is plenty for most people. More is not always better. Better is better.
What You Should Feel
A good hanging leg raise usually creates tension in the abs, front of the hips, and the muscles that help stabilize your upper body. You may also notice your grip working hard. What you should not feel is pinching in the front of the hip, sharp lower-back pain, or shoulder irritation that gets worse with each rep.
If you do, step back. Improve your warm-up, shorten the range of motion, switch to bent knees, or use a regression. Smart adjustments are a sign of good training, not weakness.
Real-World Experiences With Hanging Leg Raises
Most people’s first experience with a hanging leg raise is humbling in a very memorable way. They hop onto the bar expecting a crisp set of ten, only to discover that hanging still is already half the challenge. The body wobbles, the grip feels strangely dramatic, and the legs seem to have their own chaotic agenda. That experience is normal. In fact, it is one of the most useful parts of learning the exercise because it teaches you that core control is not just about “feeling the burn.” It is about organizing your whole body under tension.
Beginners often report that bent-knee raises feel much more manageable than straight-leg raises, and that makes sense. The shorter lever lets them focus on shoulders-down posture, braced abs, and slower lowering. Once they stop trying to impress the room and start trying to own each rep, progress usually comes faster. A very common breakthrough happens when someone learns to pause at the bottom, eliminate swinging, and exhale during the lift. Suddenly the movement feels less like a random struggle and more like a deliberate skill.
Intermediate exercisers often notice another truth: the hanging leg raise is sneaky. You may think your abs are the limiting factor, but your grip, lats, or hip flexors may speak up first. Some people feel fatigue in the front of the hips and assume they are doing the movement wrong. Sometimes they are. Sometimes they simply need more practice, better trunk positioning, and more mobility work around the hips. That is why paying attention to the quality of the sensation matters. “Hard work” is fine. “Something feels sketchy” is not.
There is also the mental side. Many people become much more confident in the exercise after filming one set and seeing what is actually happening. What felt controlled may look like mild weather damage. That feedback can be incredibly helpful. A person might realize they are arching the low back, shrugging the shoulders, or letting the legs drop too fast. Clean up one of those issues, and the exercise often improves immediately.
More experienced lifters tend to describe hanging leg raises as one of those moves that rewards honesty. You cannot fake a strict rep for long. The pause at the top tells the truth. The lowering phase tells the truth. The absence of swing tells the truth. And while that may bruise the ego a little, it is excellent for training. Over time, many people find that the exercise carries over to other skills too, especially pull-ups, hollow body work, climbing, gymnastics-style drills, and overall body awareness.
Perhaps the most relatable experience of all is this: the movement gets better when people stop chasing the hardest version and start mastering the version they can actually control. That is true for beginners using knee raises, office workers rebuilding strength after a long stretch of sitting, and seasoned gym-goers polishing technique. In other words, the best hanging leg raise is not the flashiest one. It is the one that looks calm, controlled, and repeatable. Glamorous? Maybe not. Effective? Absolutely.
Conclusion
The hanging leg raise is simple on paper and surprisingly demanding in real life. That is exactly why it deserves respect. Warm up first, set your shoulders, brace your core, start with the variation you can control, and lower each rep like you mean it. If you do that consistently, this exercise can become a powerful part of your core routine instead of a dramatic reenactment of losing a fight with gravity.