Table of Contents >> Show >> Hide
- Why an Easter Egg Stand Is Worth Making
- What Makes This DIY Easter Egg Stand Easy?
- Supplies You Will Need
- Step-by-Step: How to Make an Easy Easter Egg Stand
- Design Ideas for Different Easter Decor Styles
- Best Eggs to Use for an Easter Egg Display Stand
- How to Style Your Easter Egg Stand Like a Designer
- Where to Use Your DIY Easter Egg Stand
- Common Mistakes to Avoid
- Budget-Friendly Tips
- Experience Notes: What I Learned Making an Easter Egg Stand
- Conclusion
Easter eggs are tiny works of art with a very unfair career path. You dye them, marble them, speckle them, sticker them, maybe even whisper, “This one belongs in a museum,” and then what happens? They get tossed into a bowl like colorful potatoes. Not this year. This easy Easter egg stand DIY gives your decorated eggs the stage they deserve, turning a simple spring craft into a polished Easter centerpiece for your table, mantel, entryway, buffet, or kitchen island.
The best part is that you do not need a garage full of power tools or a mysterious uncle named Larry who “knows wood.” This project uses basic craft supplies, inexpensive wood pieces, paint, glue, and a little styling confidence. The result looks charming, custom, and surprisingly high-end, even if your crafting playlist is mostly you muttering, “Where did I put the scissors?”
In this guide, you will learn how to make a simple Easter egg display stand, how to decorate it for different home styles, what materials work best, how to keep real eggs safe, and how to style the finished piece so it looks intentional instead of “I panicked at the craft store.”
Why an Easter Egg Stand Is Worth Making
An Easter egg stand is a decorative holder designed to display dyed, painted, wooden, foam, ceramic, or plastic eggs upright. Instead of hiding your eggs in a basket, the stand lifts them, separates them, and lets each design shine. Think of it as a tiny art gallery, but with more pastels and fewer people pretending to understand abstract sculpture.
This DIY project is especially useful if you love creating detailed Easter eggs. Speckled eggs, decoupage eggs, natural-dyed eggs, floral eggs, metallic eggs, and hand-painted eggs all look better when they are displayed with space around them. A stand also adds height to your Easter decor, which is one of the easiest ways to make a holiday vignette feel professionally styled.
A simple wooden Easter egg stand can also be reused year after year. Paint it white for farmhouse decor, stain it for rustic charm, use soft green or blush for a cottage look, or go bold with yellow, coral, or robin’s egg blue. Once the base is made, you can change the eggs, ribbon, moss, flowers, and accessories every spring.
What Makes This DIY Easter Egg Stand Easy?
This project is beginner-friendly because it uses a flat wooden base and small supports that hold the eggs in place. You can make it with a wooden board and dowel pieces, or you can use wooden craft rings, mini egg cups, or small unfinished wood discs from a craft store. The idea is simple: create secure spots where eggs can sit upright without rolling dramatically across the table like they are auditioning for an action movie.
You can complete the basic version in an afternoon. Drying time will depend on the paint, stain, glue, or sealer you choose. If you are making this with kids, use non-toxic paint, avoid sharp tools, and prepare pre-cut pieces before starting. If adults are crafting, a small drill can make the stand sturdier, but you can also make a no-drill version with strong craft glue and wooden rings.
Supplies You Will Need
Before you begin, gather your materials. You can keep the project simple or dress it up depending on the look you want.
Basic Materials
- One unfinished wooden board, about 12 to 18 inches long
- Six to twelve small wooden craft rings, mini egg cups, or short dowel pieces
- Wood glue or strong craft glue
- Sandpaper
- Acrylic craft paint, chalk paint, or wood stain
- Paintbrush or foam brush
- Clear matte sealer, optional
- Decorated Easter eggs, wooden eggs, foam eggs, ceramic eggs, plastic eggs, or blown eggs
Optional Decorative Extras
- Preserved moss or faux grass
- Mini faux flowers
- Ribbon, twine, or lace
- Small bunny figurines
- Wood beads
- Gold leaf, metallic paint, or rub-on transfers
- Letter stickers or a small “Happy Easter” sign
If you want a clean modern look, use fewer accessories. If you love cottage-style Easter decor, bring on the moss, flowers, and tiny rabbits. There is no judgment here. Tiny rabbits know how to pull a look together.
Step-by-Step: How to Make an Easy Easter Egg Stand
Step 1: Choose the Size of Your Stand
Start by deciding how many eggs you want to display. A six-egg stand works well for a small table, shelf, or windowsill. A twelve-egg stand makes a stronger centerpiece for a dining table, brunch buffet, or mantel. If you are using standard chicken-size eggs, leave at least two inches between each holder so the display does not look crowded.
For a balanced design, measure and mark the placement before gluing anything down. You can arrange the holders in a straight line, two staggered rows, or a gentle zigzag. A staggered layout often looks more natural and gives each egg better visibility.
Step 2: Sand the Wood
Lightly sand the wooden board and any unfinished wood pieces. Focus on rough edges and corners. This step makes the stand feel smoother, helps paint apply evenly, and prevents splinters from making a surprise guest appearance at Easter brunch.
After sanding, wipe away dust with a dry cloth or slightly damp rag. Paint and glue stick better to clean surfaces.
Step 3: Paint or Stain the Base
Now choose your finish. White chalk paint creates a classic farmhouse Easter stand. Pale green, lavender, soft yellow, or blush pink adds a fresh spring mood. Natural wood stain gives the project a rustic, heirloom look that pairs beautifully with neutral eggs and linen table runners.
Apply one thin coat, let it dry, then add a second coat if needed. Thin coats look smoother than one heavy coat. If you want a distressed finish, lightly sand the edges after the paint dries. If you want a polished finish, add a clear matte sealer once everything is completely dry.
Step 4: Attach the Egg Holders
Place your wooden rings, mini cups, or dowel pieces on the marked spots. Check the spacing with your eggs before gluing. This is the moment to catch problems, not after everything is stuck down forever like a craft-store fossil.
Apply wood glue or strong craft glue to each holder and press it firmly onto the base. Wipe away excess glue with a cotton swab or damp cloth. Let the glue cure according to the product instructions. If you want an extra-sturdy stand, drill shallow pilot holes and attach dowel supports with screws from the underside of the base.
Step 5: Add Decorative Texture
Once the holders are secure, add small decorative details. A thin line of preserved moss along the center makes the stand feel like a spring garden. Faux flowers tucked around the eggs add color and softness. Twine wrapped around the ends gives a rustic touch, while metallic accents make the display feel more elegant.
Do not cover the egg holders completely. The eggs need to sit securely. The goal is “charming Easter meadow,” not “floral landslide.”
Step 6: Arrange the Eggs
Place your decorated eggs on the stand and adjust the colors. A good display usually includes contrast. Try pairing solid eggs with patterned eggs, matte eggs with metallic eggs, or pale eggs with one or two bold accent colors. If every egg is shouting for attention, the display can feel busy. Let a few eggs be the quiet friends of the group.
For a cohesive look, repeat colors throughout the stand. For example, if one egg has gold speckles, add a small gold ribbon or metallic flower nearby. If your eggs are blue and white, keep the base neutral and add greenery for freshness.
Design Ideas for Different Easter Decor Styles
Farmhouse Easter Egg Stand
Paint the base creamy white and lightly distress the edges. Use brown, white, pale blue, and speckled eggs. Add faux moss, twine, and a small wooden bunny. This style looks beautiful on a rustic dining table, open kitchen shelf, or entryway console.
Modern Minimalist Egg Stand
Use a smooth natural wood base or matte black paint. Choose eggs in white, beige, pale gray, and soft green. Skip heavy embellishments and let the shape of the eggs do the work. This version is ideal for modern homes where holiday decor needs to whisper instead of shout.
Cottage Garden Egg Stand
Paint the stand sage green, dusty rose, or soft blue. Add floral-painted eggs, tiny faux blossoms, and a little moss. This look feels romantic, cozy, and cheerful, like spring walked in wearing a floral apron.
Kids’ Colorful Easter Stand
Use bright craft paint and plastic eggs. Let kids decorate the eggs with stickers, markers, washi tape, pom-poms, or glitter glue. Keep the stand sturdy and washable. This version is perfect for family craft day and makes a fun centerpiece for a children’s Easter table.
Elegant Brunch Centerpiece
Choose a stained wood or white base, then display eggs in pearl, gold, blush, and champagne tones. Add small white flowers and taper candles nearby, but keep open flames away from moss, paper, ribbon, and other flammable materials. The result feels special enough for Easter brunch without requiring you to fold napkins into swans.
Best Eggs to Use for an Easter Egg Display Stand
The type of egg you choose affects how long your display lasts and where you can place it. Wooden eggs are durable, reusable, and easy to paint. Foam eggs are lightweight and good for kids’ crafts. Ceramic eggs look refined and can be used year after year. Plastic eggs are inexpensive, colorful, and practical for family homes. Blown eggs are delicate but beautiful for heirloom-style displays.
Real hard-boiled eggs can be used for short-term displays, but they need careful handling. If the eggs are intended for eating, keep them refrigerated until display time, use food-safe dyes, and do not leave them at room temperature for more than two hours. For long-lasting decor, faux eggs are the smarter choice. They will not spoil, crack, or make your centerpiece smell like a regrettable science experiment.
How to Style Your Easter Egg Stand Like a Designer
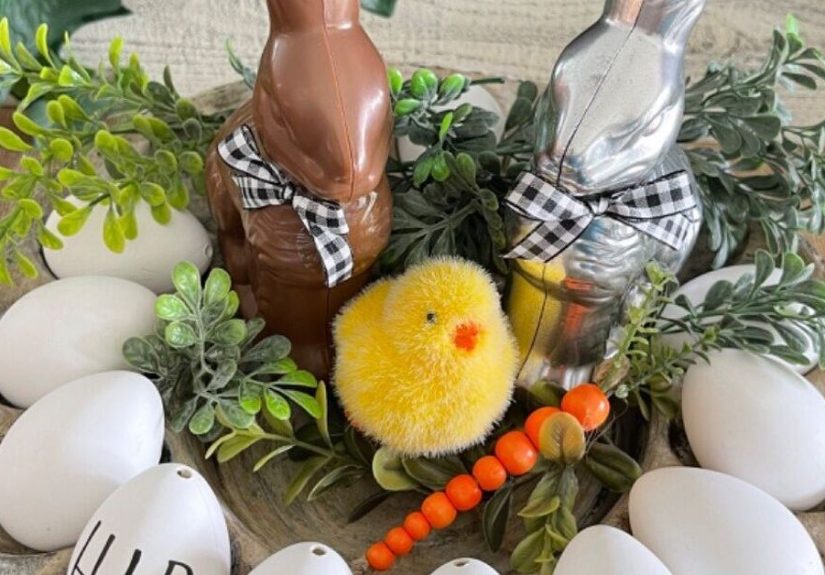
Once your stand is finished, styling makes all the difference. Place it on a table runner, wood tray, cake stand, or folded linen napkin to define the display area. Add height behind it with a vase of tulips, daffodils, branches, or greenery. Use smaller pieces in front, such as mini nests, chocolate eggs, or tiny ceramic bunnies.
A good rule is to style in layers: background, main display, and small finishing accents. The egg stand should be the star, while the surrounding pieces support it. If you add too many decorations, the eggs get lost. If you add too few, the stand can look lonely. Think of your decor as a brunch guest list: enough personality to be fun, not so much chaos that someone ends up in the punch bowl.
Color balance also matters. If your eggs are very colorful, keep the base and accessories simple. If your eggs are neutral, add interest with texture: moss, linen, woven baskets, wood grain, or flowers. Repeating one color three times in the display can make the whole arrangement feel intentional.
Where to Use Your DIY Easter Egg Stand
This easy Easter egg stand DIY works in many areas of the home. On a dining table, it becomes a festive centerpiece. On a mantel, it adds color without taking up too much depth. On a kitchen island, it brings spring charm to everyday routines. On an entryway table, it welcomes guests with a cheerful seasonal touch.
You can also use the stand as part of an Easter dessert table. Place it near cupcakes, cookies, fruit, or a spring charcuterie board for a coordinated holiday spread. If you host Easter brunch, add name tags to each egg and turn the display into creative place cards. Guests can take their egg home as a small favor, which is much better than sending them away with leftover casserole in a suspicious container.
Common Mistakes to Avoid
Using Too Much Glue
More glue does not always mean more strength. It often means more mess. Use enough to secure the holders, but wipe away excess before it dries.
Skipping the Spacing Test
Always test the eggs on the stand before gluing the holders. Eggs need room to sit without bumping each other.
Choosing Unstable Holders
If your holders are too small or too shallow, the eggs may wobble. Wooden rings, small cups, or slightly cupped discs work best.
Overdecorating the Base
Decorations should enhance the eggs, not bury them. Keep moss and flowers low enough so the eggs remain visible.
Displaying Edible Eggs Too Long
If you plan to eat real eggs, remember the two-hour room-temperature guideline. For all-day decorating, use wooden, foam, ceramic, or plastic eggs instead.
Budget-Friendly Tips
You do not need expensive supplies to make a beautiful Easter egg display stand. Look for unfinished wood pieces at craft stores, use leftover paint from another project, or repurpose scrap wood. Plastic eggs can be transformed with matte spray paint, acrylic paint, decoupage, or speckled paint techniques. Old ribbon, fabric scraps, paper flowers, and even clean egg cartons can inspire creative details.
If you want the display to look more expensive, focus on a limited color palette. Three or four colors usually look more polished than ten unrelated shades. Soft white, sage, blush, and gold make a graceful palette. Blue, white, and natural wood feel fresh and classic. Lavender, yellow, and green create a cheerful garden mood.
Experience Notes: What I Learned Making an Easter Egg Stand
The first time I made an Easter egg stand, I had a very confident vision and a very questionable plan. I imagined a charming little display full of pastel eggs, moss, and flowers. In my head, it looked like something from a spring magazine. In reality, my first layout looked like a tiny egg parking lot designed by someone who forgot eggs are round. A few rolled, one leaned dramatically to the left, and one fell off the board as if it had somewhere better to be.
The biggest lesson was spacing. I originally placed the holders too close together because I wanted the stand to look full. Once the eggs were added, the display felt crowded. Giving each egg a little breathing room instantly made the stand look cleaner and more expensive. It also made the individual egg designs easier to see. If you spend time painting flowers, speckles, stripes, or metallic details, you want people to notice them without needing a magnifying glass and a formal invitation.
Another helpful discovery was that neutral bases are forgiving. A white or natural wood stand works with almost any egg color. When I tried a bright base with bright eggs, the whole thing became a pastel parade with no traffic lights. It was fun, but a little overwhelming. A quieter base allowed the eggs to shine and made the display easier to reuse the next year.
I also learned that faux moss is powerful. A little moss adds freshness and texture; too much moss makes it look like the eggs are being slowly reclaimed by the forest. The best method was to add small pieces between holders and leave the front edge of the stand mostly clean. That created a natural look without hiding the shape of the project.
For family crafting, plastic and wooden eggs were the most practical. Kids could decorate them freely, adults did not have to worry about refrigeration, and the finished eggs could be stored for future Easter displays. Real dyed eggs are beautiful, but they are better for short-term use, especially if you plan to eat them later.
My favorite version used a simple whitewashed base, pale blue eggs, a few speckled wooden eggs, and tiny white flowers tucked between the holders. It looked calm, springy, and handmade in the best way. Handmade decor does not need to be perfect. In fact, the tiny brush marks, uneven speckles, and slightly different egg designs are what make it feel personal. Store-bought decorations can be pretty, but a DIY Easter egg stand carries a little story with it. It says someone took the time to make the holiday table feel special, and honestly, that is the kind of detail guests remember.
Conclusion
Creating a stunning display with this easy Easter egg stand DIY is a simple way to elevate your spring decor without spending a fortune. With a wooden base, a few egg holders, paint, glue, and decorated eggs, you can make a centerpiece that feels festive, personal, and reusable. Whether your style is farmhouse, modern, cottage, colorful, or elegant, the stand can be customized to match your home and your Easter celebration.
The real magic of this project is that it gives your eggs a proper place to shine. Instead of disappearing into a basket, each egg becomes part of a thoughtful display. Add moss, flowers, ribbon, or a simple tray, and you have a charming Easter decoration that works for brunch, mantel styling, entryway decor, or family craft day. It is easy, affordable, and cheerful enough to make even the most suspicious plastic egg feel important.
Note: For long-lasting displays, use wooden, foam, ceramic, or plastic eggs. If you use real hard-boiled eggs and plan to eat them, keep them refrigerated and limit room-temperature display time to two hours or less.