Table of Contents >> Show >> Hide
- What Is a Drill Bit Flute?
- Why Drill Bit Flutes Matter
- Basic Drill Bit Anatomy Around the Flute
- Types of Drill Bit Flutes
- What Is Flute Length?
- What Is Helix Angle?
- How Flute Design Affects Different Materials
- Common Problems Related to Drill Bit Flutes
- How to Choose the Right Flute for the Job
- Simple Example: Why the Flute Saves the Day
- Practical Experiences With Drill Bit Flutes
- Conclusion
A drill bit flute is one of those tool features that looks simple until you actually need a clean hole, a cooler cut, or a drill bit that does not squeal like it is auditioning for a horror movie. In plain English, a drill bit flute is the groove that runs along the body of a drill bit. On most twist drill bits, the flutes spiral from the cutting tip toward the shank. Their main job is to remove chips, reduce friction, help cutting fluid reach the cutting edge, and support the overall cutting action of the bit.
That may sound like a tiny design detail, but the flute is a big deal. Without flutes, the material being drilled would have nowhere to go. Wood shavings, metal chips, plastic curls, masonry dust, and other debris would pack into the hole, heat would build quickly, and the bit could bind, burn, wander, or snap. In short, the flute is the drill bit’s built-in escape route for waste material. It is part conveyor belt, part cooling lane, part cutting geometry, and part traffic controller.
Understanding the definition of a drill bit flute helps you choose better bits, drill cleaner holes, avoid common mistakes, and sound impressively handy at the hardware store. Let’s break it down without turning this into a graduate seminar in chip formationalthough, honestly, chips do deserve a little respect.
What Is a Drill Bit Flute?
A drill bit flute is a shaped groove formed into the body of a drill bit. It may be spiral, straight, deep, shallow, polished, narrow, wide, long, short, or specially shaped depending on the type of bit and the material it is designed to cut.
On a standard twist drill bit, the flute is the helical groove that wraps around the bit. When the bit rotates, its cutting lips shear material from the workpiece. The flutes then guide those chips upward and out of the hole. This is why a twist drill often seems to “pull” curls of metal, wood, or plastic out as it drills. The flute is doing the housekeeping while the cutting edge does the heavy lifting.
A helpful definition is this: a drill bit flute is the groove in the drill body that helps create the cutting edge, provides space for chip removal, and allows air or cutting fluid to reach the cutting area.
Think of drilling as digging a tunnel. The cutting tip is the worker at the front. The flute is the tunnel cart that carries debris out before everything clogs. If the cart is too small, too rough, or too short for the job, the work slows down fast.
Why Drill Bit Flutes Matter
Flutes are not decorative swirls added to make drill bits look athletic. They directly affect drilling speed, hole quality, bit life, heat control, and safety. A good flute design can make drilling feel smooth and controlled. A poor match between flute design and material can make even a powerful drill feel like it is chewing gravel.
1. Flutes Remove Chips From the Hole
Chip evacuation is the flute’s headline job. As the drill cuts into material, small pieces break away. These pieces are called chips in machining and shavings or dust in everyday DIY language. If those chips stay trapped in the hole, they rub against the bit and the hole wall. This creates heat, friction, binding, and sometimes a very dramatic broken bit.
In metal drilling, chip removal is especially important because metal chips can be sharp, hot, and stubborn. In woodworking, packed shavings can cause burning and rough holes. In masonry, dust can reduce cutting efficiency and make the bit feel dull long before it actually is.
2. Flutes Help Control Heat
Drilling creates heat because cutting and friction happen at the same time. Flutes help reduce that heat by giving chips somewhere to go and by allowing air or cutting fluid to reach the tip. In metalworking, cutting oil or coolant can flow through or along the flute area, reducing friction and helping protect the cutting edge.
If you have ever seen a drill bit turn blue after drilling metal, that color is often a sign of overheating. The culprit may be too much speed, too little lubrication, a dull bit, or poor chip evacuation. The flute cannot fix every mistake, but it plays a major role in keeping the cut under control.
3. Flutes Influence Hole Accuracy
The flute does more than clear debris. Its shape affects how stable the drill bit feels in the hole. Flute length, web thickness, margins, and helix angle all influence rigidity. A long bit with long flutes can reach deeper, but it may flex more. A shorter bit is usually stiffer and better for accuracy in shallow holes.
This is why machinists often choose the shortest drill bit that can reach the required depth. It is not because they dislike long bits. It is because short, rigid tools tend to drill straighter holes with less wandering.
Basic Drill Bit Anatomy Around the Flute
To understand flutes clearly, it helps to know the nearby parts of a drill bit. You do not need to memorize every term, but a few key names make the whole tool easier to understand.
Shank
The shank is the part of the drill bit held by the drill chuck. It is usually smooth or shaped for better grip. The shank does not do the cutting; it transfers torque from the drill to the bit.
Body
The body is the working portion of the drill bit between the shank and the cutting point. The flutes are formed into this body.
Cutting Lips
The cutting lips are the sharpened edges at the point of the bit. On a common two-flute twist drill, there are two main cutting lips. These edges slice into the material and create chips.
Web
The web is the central core of the drill bit between the flutes. A thicker web can make the bit stronger, but it may reduce flute space and make chip evacuation harder. A thinner web can improve chip space but may reduce strength. Like many tool-design choices, it is a balancing act.
Lands and Margins
The lands are the raised areas between the flutes. The margin is the narrow outer edge that helps guide the drill in the hole. These surfaces help stabilize the bit, but too much rubbing can create heat. Good drill geometry tries to guide without dragging.
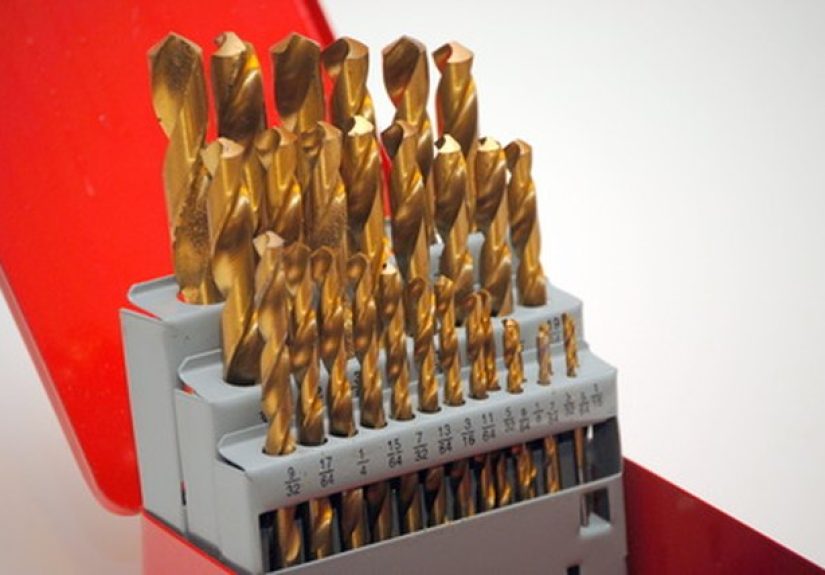
Types of Drill Bit Flutes
Not all flutes are shaped the same way. Different materials produce different kinds of chips, so flute design changes depending on the job. A bit meant for aluminum, a bit meant for cast iron, and a bit meant for deep holes in steel may all look similar at first glance, but their flute geometry can be very different.
Spiral Flutes
Spiral flutes are the most familiar type. They wrap around the drill body in a helix. Most general-purpose twist drill bits use two spiral flutes. The spiral shape helps lift chips out of the hole as the drill rotates.
Spiral flutes are common because they work well in many materials, including metal, wood, plastic, and general shop use. They are the reliable pickup truck of the drill bit world: not always specialized, but useful in a lot of situations.
Straight Flutes
Straight flute drills have grooves that run more directly along the length of the bit instead of spiraling. These are often used for materials that produce short chips, such as cast iron, some cast aluminum, brass, or copper. Because straight flutes do not create the same lifting action as spiral flutes, chip evacuation can be more limited, but the design can reduce grabbing in certain materials.
For example, brass can sometimes grab a high-helix twist drill too aggressively. A straight flute or specially ground drill can help prevent the bit from pulling itself into the workpiece like it has somewhere urgent to be.
Parabolic Flutes
Parabolic flutes are wider and deeper than standard twist drill flutes. They are designed to move larger volumes of chips, especially in deeper holes. When drilling deep holes, chips must travel farther to escape. A parabolic flute gives those chips more room, reducing clogging and heat buildup.
Parabolic flute drill bits are often useful in wood, aluminum, plastics, and deep-hole metal drilling when the setup calls for better chip evacuation. They are not magic wands, but they can make deep drilling far less frustrating.
Multiple-Flute Drills
Many standard drill bits have two flutes, but some specialized drills have three or more. More flutes can mean more cutting edges and potentially faster feed rates, but they also reduce the amount of open flute space available for chips. That is why flute count must match the material and operation.
In short-chipping materials, three-flute drills can work well because the chips are easier to clear. In long-chipping materials, too many flutes can crowd the chip space unless the drill is carefully designed.
What Is Flute Length?
Flute length is the length of the grooved portion of the drill bit. It usually extends from near the cutting tip to the point where the flutes end before the shank or neck. Flute length affects how deep the bit can drill while still allowing chips to escape.
A common mistake is assuming overall bit length equals drilling depth. It does not. The usable drilling depth is more closely related to flute length because the flutes must be long enough to carry chips out of the hole. If the hole is deeper than the flute length, chips can pack around the smooth shank area, causing heat, binding, and poor hole quality.
For example, a jobber-length drill bit is a common general-purpose choice because it offers a practical balance between reach and strength. A stub-length drill bit is shorter and stiffer, making it a good choice for accurate shallow holes. An aircraft extension bit is long for reach, but that does not always mean it has extra-long flutes for deep drilling. Reach and chip evacuation are related, but they are not the same thing.
What Is Helix Angle?
The helix angle is the angle of the flute spiral compared with the drill bit’s centerline. In everyday terms, it describes how tightly or gently the flute wraps around the bit.
A low helix angle has a slower twist. It is often used for harder or short-chipping materials such as cast iron, brass, and some hardened steels. A high helix angle has a faster twist and can be helpful for softer, long-chipping materials because it helps pull chips out more efficiently.
Many general-purpose twist drills use a medium helix angle, often around 30 degrees. That middle-ground design works in many common materials. However, the best helix angle depends on the material, hole depth, speed, feed rate, coolant, and machine rigidity.
How Flute Design Affects Different Materials
Metal
Metal drilling demands good chip control. Steel often creates curled chips, aluminum can create sticky chips, and stainless steel can work-harden if the drill rubs instead of cutting. Flutes must move chips away quickly enough to prevent recutting, heat buildup, and edge damage. Polished flutes can help in materials like aluminum because they reduce the tendency of chips to stick.
Wood
Wood chips and shavings are usually larger and lighter than metal chips. Auger bits, brad-point bits, and spade bits use different flute or waste-removal designs depending on whether the goal is speed, clean edges, or deep boring. A deep spiral auger flute, for example, is excellent at pulling wood chips out of deep holes.
Plastic
Plastic can melt or chip depending on the type. A flute that clears material efficiently helps prevent heat buildup. Sharp bits, moderate speed, and steady feed pressure are important because melted plastic can clog flutes quickly.
Masonry
Masonry bits do not create chips in the same way as metal-cutting twist drills. They crush and pulverize material with a carbide tip while the flute removes dust. If the dust cannot escape, drilling slows and the bit overheats. Pulling the bit out occasionally helps clear the flute when drilling concrete or brick.
Common Problems Related to Drill Bit Flutes
Clogged Flutes
Clogged flutes happen when chips cannot escape. This is common when drilling too deep without clearing chips, using the wrong bit, drilling too fast, or skipping lubrication in metal. The fix is usually simple: stop, back the bit out, clear the chips, add lubricant if appropriate, and continue with better control.
Burning or Overheating
If wood smells burnt or metal turns blue, the bit is getting too hot. Dull cutting lips, clogged flutes, excessive speed, and poor pressure can all contribute. Flutes help remove heat indirectly by clearing chips, but they cannot save a dull bit from a heroic but doomed drilling session.
Bit Wandering
Bit wandering occurs when the drill does not start accurately or flexes during the cut. Flute length and overall rigidity matter here. A shorter bit, a center punch for metal, a pilot hole for wood, or a brad-point bit can help improve starting accuracy.
Broken Bits
Broken drill bits often result from binding, side pressure, poor chip evacuation, or forcing the tool. When chips jam inside the flutes, torque rises. If the bit cannot handle the stress, it snaps. The sound is small, but the disappointment is large.
How to Choose the Right Flute for the Job
Choosing a drill bit is not just about diameter. Diameter tells you the hole size, but flute design tells you how the bit handles material removal. For general home use, a standard two-flute twist drill set is a good starting point. For cleaner holes in wood, choose brad-point or auger bits. For deep holes, consider parabolic flute bits or auger-style designs. For brass, cast iron, and other short-chipping materials, a straight flute or low-helix option may be better.
Also consider flute length. Do not use a long drill bit just because it looks more capable. Longer bits flex more easily. If the hole is shallow, a shorter bit often gives better control and cleaner results. Use the shortest bit that can safely reach the required depth while leaving enough flute length to evacuate chips.
Simple Example: Why the Flute Saves the Day
Imagine drilling a 1/4-inch hole through a steel bracket. The cutting lips begin shaving metal. Those chips curl into the spiral flutes and move upward. You add a few drops of cutting oil, which reaches the cutting area along the flute. The bit stays cooler, the chips escape, and the hole stays round.
Now imagine the same job with clogged flutes. Chips pack into the hole. The bit rubs instead of cuts. Heat rises. The drill squeaks. You push harder. The bit grabs. Suddenly you are learning the exciting new hobby of extracting broken drill bits. This is why flute design and chip clearing matter.
Practical Experiences With Drill Bit Flutes
After using many drill bits in real projects, one lesson becomes obvious: the flute tells you a lot about how the bit will behave before it ever touches the workpiece. A clean, sharp twist drill with open flutes feels smooth in mild steel when used with cutting oil and steady pressure. The chips come out in neat curls, and the drill feels like it is actually cutting instead of complaining. But if those flutes clog, everything changes. The drill slows, heat rises, and the bit starts to squeal. That sound is not music. It is a warning.
In woodworking, flute design becomes noticeable when drilling deeper holes. A regular twist bit can handle shallow pilot holes, but it may pack with chips in thicker lumber. Pulling the bit out every inch or so helps clear the flutes. When using an auger bit, the difference is dramatic. The deep spiral flute carries chips out more aggressively, which makes deep boring faster and cleaner. It is like comparing a spoon to a snow shovel.
Plastic teaches another flute lesson. Drill too fast, and the heat can soften or melt the plastic. Once melted material sticks in the flutes, the bit stops cutting cleanly. A sharp bit, slower speed, and gentle pressure usually produce better results. Clearing the flute often keeps the hole from becoming a ragged, overheated mess.
Metal is less forgiving. When drilling steel, I have found that pausing to clear chips is often the difference between a clean hole and a ruined bit. Cutting oil helps, but it works best when the flute is doing its job. If the chips are coming out, the operation usually feels controlled. If the chips disappear into the hole and stay there, trouble is getting ready to send an invoice.
Another practical habit is matching flute length to hole depth. Many beginners grab the longest bit in the box because it seems more versatile. In reality, a shorter bit is usually more rigid and easier to control. For shallow holes, stubby or mechanics-length bits often drill straighter. Long bits are useful for reach, but they flex more and can wander if the setup is not stable.
Finally, inspecting flutes before drilling saves headaches. If a bit has packed debris, chipped edges, rust, or rough flute surfaces, it will not perform like a fresh tool. Cleaning the flutes, choosing the right geometry, and letting the bit cut at the correct speed can make ordinary drilling feel surprisingly professional. The flute may be a groove, but it is not a minor detail. It is the path that keeps the cut clean, cool, and under control.
Conclusion
The definition of a drill bit flute is simple: it is the groove in the body of a drill bit that helps form the cutting edge, removes chips, and allows air or cutting fluid to reach the cutting area. But its importance is much bigger than the definition. Flute shape, length, width, finish, helix angle, and count all influence how well a bit drills, how clean the hole looks, how hot the tool gets, and how long the bit lasts.
For everyday users, the key takeaway is practical: choose a bit with flute geometry suited to the material and hole depth. Keep the flutes clear. Use lubrication when drilling metal. Avoid forcing the tool. And remember that the spiral groove on a drill bit is not just there for style. It is the quiet little engineering feature that keeps your project moving instead of turning into a smoky, squeaky, chip-jammed adventure.