Table of Contents >> Show >> Hide
- Why Make Handmade Fabric Baby Shoes?
- Before You Sew: Baby Footwear Safety Comes First
- Supplies You Need for DIY Handmade Fabric Baby Shoes
- Choosing the Best Fabric for Baby Shoes
- How to Make DIY Handmade Fabric Baby Shoes
- Design Ideas for Handmade Fabric Baby Shoes
- Common Mistakes to Avoid
- How to Wash and Care for Fabric Baby Shoes
- DIY Handmade Fabric Baby Shoes as Gifts
- Real-World Experience: What Sewing Baby Shoes Teaches You
- Conclusion
There are tiny things in life that make adults lose all sense of proportion: miniature socks, newborn hats, and baby shoes so small they look like they were designed for a very stylish potato. DIY handmade fabric baby shoes sit proudly in that category. They are adorable, practical, budget-friendly, and surprisingly satisfying to seweven if your sewing machine occasionally behaves like it needs a nap.
Handmade fabric baby shoes are soft shoes, booties, or slippers made from cotton, flannel, fleece, linen, denim, corduroy, or other baby-friendly fabrics. They are usually designed for newborns, pre-walkers, crawlers, or early walkers who need warmth and light protection rather than stiff support. The best fabric baby shoes are flexible, breathable, washable, and comfortable enough that a baby does not immediately kick them into another zip code.
This guide explains how to choose materials, plan the pattern, sew a simple pair, avoid common mistakes, and personalize your handmade baby shoes beautifully. Whether you are making a baby shower gift, using leftover fabric scraps, or trying to create a matching outfit moment that deserves applause, this DIY project is a sweet place to start.
Why Make Handmade Fabric Baby Shoes?
Store-bought baby shoes can be cute, but handmade fabric baby shoes offer something mass-produced pairs rarely do: personality. You can match the shoes to a handmade dress, a romper, holiday pajamas, nursery colors, or the general vibe of “tiny woodland creature attending brunch.”
They are also a great scrap-busting sewing project. A pair of baby booties needs only small pieces of fabric, which makes it ideal for using leftover cotton prints, flannel remnants, old denim, or soft quilting scraps. If you already sew, you may have enough supplies sitting in a drawer right now. If you are new to sewing, this project teaches useful skills without demanding a mountain of fabric or the patience of a saint.
Handmade fabric baby shoes are especially useful for indoor wear, stroller outings, chilly mornings, family photos, and baby shower gifts. They can keep little feet warm while still allowing natural movement. For babies who are not walking yet, soft soles are usually the goal. For babies beginning to cruise or toddle, a non-slip sole material can help add traction on smooth floors.
Before You Sew: Baby Footwear Safety Comes First
Baby shoes should be cute, but comfort and safety matter more than whether the fabric has tiny lemons, dinosaurs, or suspiciously cheerful ducks printed on it. Babies’ feet are still developing, and soft, flexible footwear is generally preferred for pre-walkers and early walkers. Stiff shoes are not necessary for indoor practice and can make movement feel clumsy.
Use Soft, Flexible Materials
Choose fabrics that bend easily with the foot. Quilting cotton, flannel, soft denim, corduroy, fleece, and linen blends can all work well. For lining, use breathable cotton, flannel, jersey knit, or lightweight fleece. Avoid scratchy seams, stiff plastics, or heavy materials that create pressure on tiny toes.
Avoid Small Detachable Decorations
Skip loose buttons, beads, rhinestones, charms, pom-poms, or any decoration that could detach. If you add decorative stitching or appliqué, sew it securely and keep the inside smooth. For babies under 3, anything small enough to come off can become a choking concern. The safest baby shoes are often the simplest ones.
Think About Grip
For newborns and pre-walkers, a soft cotton or fleece sole is usually enough. For crawlers or babies starting to stand, consider adding non-slip fabric, grippy sole dots, suede cloth, or jiffy grip material. The shoe should bend easily, but the bottom should not slide like a penguin on polished tile.
Supplies You Need for DIY Handmade Fabric Baby Shoes
You do not need a professional sewing studio to make fabric baby shoes. A basic sewing machine, sharp scissors, and a little patience will do most of the heavy lifting.
Basic Materials
- Outer fabric such as cotton, corduroy, denim, linen, canvas, or flannel
- Lining fabric such as cotton, flannel, jersey, or fleece
- Lightweight fusible interfacing or fusible fleece
- Elastic, Velcro, snaps, or fabric ties for closure
- Non-slip sole fabric if the baby is standing or walking
- Matching thread
- Printed baby shoe pattern or your own drafted template
- Pins or sewing clips
- Scissors or rotary cutter
- Iron and ironing board
- Sewing machine or hand-sewing needle
A fat quarter is often enough for a small pair, especially for newborn or 0–3 month sizes. If you want to make several pairs, choose two or three coordinating fabrics and batch-cut your pattern pieces. This saves time and makes you feel impressively organized, even if your thread box says otherwise.
Choosing the Best Fabric for Baby Shoes
The fabric you choose affects the look, comfort, durability, and seasonality of the shoes. A lightweight cotton pair is lovely for spring and summer. Flannel or fleece-lined booties are better for cooler weather. Soft denim creates a tiny sneaker look, while corduroy gives a cozy vintage feel.
Cotton
Cotton is beginner-friendly, breathable, easy to wash, and available in endless prints. It is perfect for decorative uppers and linings. If the cotton is thin, add interfacing to give the shoe shape.
Flannel
Flannel is soft and warm, making it excellent for lining winter baby booties. It can stretch slightly, so press carefully and avoid pulling it while sewing.
Fleece
Fleece adds warmth and cushioning. It is ideal for soft indoor slippers, but it can be bulky in tiny seams. Trim seam allowances carefully to avoid lumpy edges.
Denim or Canvas
Lightweight denim and canvas work well for the outer layer. They add durability and structure. Avoid very thick denim because baby shoes are small, and bulky seams can quickly become a wrestling match between you and the presser foot.
Non-Slip Sole Fabric
For babies who are crawling, standing, or cruising, consider a grippy sole. Non-slip fabric, suede-like cloth, or rubberized sole material can help prevent slipping. Keep the sole flexible and soft, not stiff like adult footwear.
How to Make DIY Handmade Fabric Baby Shoes
The exact steps depend on the pattern style, but most handmade fabric baby shoes follow a similar structure: cut the sole, cut the upper, add lining, sew the heel or back seam, attach the upper to the sole, turn, finish, and add a closure.
Step 1: Measure the Baby’s Foot
If you have access to the baby’s foot, measure from heel to the longest toe and add a small amount of wiggle room. Babies grow quickly, so do not make the shoes too tight. If you are sewing a gift, use a size chart from your pattern. Common baby shoe sizes include newborn, 0–3 months, 3–6 months, 6–9 months, and 9–12 months.
Step 2: Print and Prepare the Pattern
Use a baby shoe sewing pattern that includes sole, upper, heel, and lining pieces. Print at 100% scale and check any test square included with the pattern. Cut the paper pieces carefully, then label each one. Tiny pattern pieces like to vanish under coffee mugs, fabric scraps, and possibly into another dimension.
Step 3: Cut the Fabric
Cut two soles from the outer fabric and two soles from the lining. Cut two upper pieces and two heel or back pieces from both the outer and lining fabrics. If your pattern requires interfacing, cut those pieces as well. Remember that shoes need mirror-image pieces, so pay attention to fabric direction and right sides.
Step 4: Apply Interfacing
Fuse lightweight interfacing or fusible fleece to the wrong side of the outer fabric pieces. This gives the shoes shape without making them rigid. Use a pressing cloth and follow the manufacturer’s heat setting. Let the pieces cool before moving them so the adhesive sets properly.
Step 5: Sew the Upper and Lining
Place the outer upper and lining pieces right sides together. Sew along the top edge, leaving the lower edge open where it will attach to the sole. Clip curves gently, turn right side out, and press. If your design includes a strap, sew the strap separately, turn it right side out, press it flat, and topstitch for a neat finish.
Step 6: Add Elastic or Closure
Many baby booties use elastic around the ankle to help them stay on. Others use Velcro tabs, soft ties, or snap closures. Elastic should be snug enough to hold the shoe on but never tight enough to leave marks. Velcro is convenient, but make sure the scratchy side does not touch the baby’s skin.
Step 7: Attach the Upper to the Sole
Mark the center front and center back of the sole. Match the center of the upper to the center front of the sole, right sides together. Pin or clip from the center outward. Curves are easier when you use many clips and sew slowly. Attach the heel or back piece the same way, overlapping edges as directed by your pattern.
Step 8: Sew Around the Sole
Sew around the sole using the seam allowance recommended by your pattern, often 1/4 inch or 3/8 inch. Go slowly around the toe curve. If the fabric bunches, stop with the needle down, lift the presser foot, smooth the fabric, and continue. Trim bulky seams and clip curves without cutting the stitches.
Step 9: Turn and Press
Turn the shoe right side out. Use your fingers or a blunt turning tool to shape the toe and heel. Press gently. Do not over-flatten padded fabrics; the goal is soft structure, not pancake footwear.
Step 10: Finish the Pair
Repeat the steps for the second shoe. Check that the closures face opposite directions, the soles are not both for the same foot unless the pattern is symmetrical, and the inside seams are smooth. Give both shoes a final inspection before gifting or using them.
Design Ideas for Handmade Fabric Baby Shoes
One of the best parts of this project is customization. You can make fabric baby shoes sweet, modern, rustic, seasonal, or delightfully over-the-top while still keeping them safe and comfortable.
Classic Cotton Booties
Use a printed cotton outer and solid cotton lining. Add soft elastic at the ankle. This is the easiest style for beginners and works beautifully for baby shower gifts.
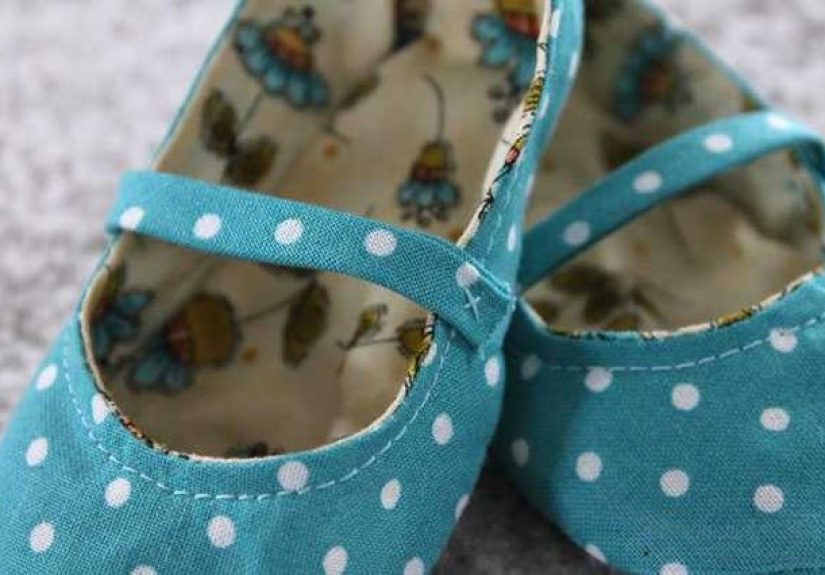
Mary Jane Fabric Baby Shoes
Mary Jane-style baby shoes include a strap across the top. Use Velcro instead of buttons for a safer, easier closure. They look adorable in floral cotton, chambray, linen, or gingham.
Cozy Winter Booties
Use corduroy or cotton on the outside and fleece or flannel inside. Add a slightly higher ankle shape to keep little feet warm in strollers, carriers, or chilly rooms.
Upcycled Baby Shoes
Turn soft old shirts, lightweight jeans, flannel pajamas, or cotton dresses into baby shoes. Upcycling gives the project sentimental value and reduces waste. Just avoid worn-out fabrics that tear easily.
Photo-Ready Baby Shoes
For milestone photos, choose fabric that coordinates with the outfit but does not overpower it. Tiny shoes in cream linen, dusty blue cotton, soft blush flannel, or neutral gingham look timeless in pictures.
Common Mistakes to Avoid
Baby shoes are small, which makes them quick to sewbut also slightly dramatic. A tiny measuring error can make a big difference. Here are the mistakes most beginners run into.
Using Fabric That Is Too Thick
Thick fabric creates bulky seams and makes turning difficult. If you want structure, use medium-weight fabric with lightweight interfacing instead of upholstery fabric or heavy denim.
Skipping the Test Pair
Make one practice shoe from scrap fabric before cutting your favorite material. This helps you understand the pattern and adjust the fit.
Forgetting Seam Allowance
Check whether the pattern includes seam allowance. If it does not, add it before cutting. Otherwise, the final shoes may be too small.
Adding Unsafe Decorations
Decorations must be secure, soft, and non-detachable. Embroidery is safer than glued embellishments. If you would not trust a decoration during a baby’s enthusiastic toe-grabbing session, leave it off.
Making the Ankle Too Tight
Elastic should keep the shoe on, not squeeze the baby’s ankle. Always check fit and comfort. Soft baby shoes should be cozy, not bossy.
How to Wash and Care for Fabric Baby Shoes
Fabric baby shoes should be washable because babies are adorable little chaos artists. Use machine-washable cotton, flannel, fleece, or denim whenever possible. Wash on a gentle cycle in cold water, then air dry. Heat from a dryer can shrink cotton, weaken elastic, or distort interfacing.
For small stains, spot-clean with mild soap and water. Avoid harsh detergents or strong fragrances that might irritate sensitive skin. If the shoes have non-slip soles, check them after washing to make sure the grip is still intact.
DIY Handmade Fabric Baby Shoes as Gifts
Handmade baby shoes make thoughtful gifts because they feel personal without requiring you to knit an entire blanket during three seasons of a TV show. Pair them with a matching bib, burp cloth, bonnet, or baby blanket for a coordinated handmade set.
For baby shower gifts, choose a slightly larger size such as 3–6 months or 6–9 months. Newborns often receive many tiny items, and bigger sizes give the baby room to grow. Add a small care card explaining the fabric content and washing instructions.
Real-World Experience: What Sewing Baby Shoes Teaches You
The first time you sew DIY handmade fabric baby shoes, you may feel confident right up until you try to attach the upper to the sole. Suddenly, that cute little curve looks like a geometry quiz wearing pajamas. This is normal. Baby shoes are small, and small sewing projects require precision. The good news is that each pair gets easier, and the learning curve is short enough that you can improve within one afternoon.
One useful experience is learning to respect fabric weight. A pair made from quilting cotton with flannel lining usually turns neatly and feels soft. A pair made from thick denim, fleece lining, and heavy interfacing may look sturdy on the table but become bulky at the seams. After making a test pair, many sewists realize that baby shoes need flexibility more than structure. A little interfacing is helpful; too much turns the shoe into a tiny fabric helmet.
Another lesson is that pinning or clipping matters more than speed. When attaching the sole, start by matching the center front and center back, then divide the remaining curve into smaller sections. This keeps the fabric from twisting. Sewing slowly around the toe makes a cleaner shape. If one shoe looks round and the other looks like it has strong opinions, the issue is usually uneven clipping or stretching while sewing.
Fit is also a practical teacher. Babies do not have identical feet, and patterns vary. A shoe that fits one 6-month-old may be snug on another. That is why a soft closure is valuable. Elastic, Velcro, or fabric ties allow slight adjustment. For gifts, it is safer to size up. A baby can grow into a slightly large pair, but a too-small pair becomes doll clothing almost immediately.
Washing is another real-life test. Before giving handmade baby shoes as a gift, wash and air-dry the test pair. This reveals whether the fabric shrinks, the interfacing bubbles, the elastic twists, or the sole loses shape. Prewashing cotton fabric is a smart habit because baby items are washed often. It is better to discover shrinkage before the shoes are wrapped in tissue paper and presented with great pride.
Finally, handmade baby shoes teach the value of simple design. It is tempting to add bows, buttons, beads, lace, and every cute thing in the craft drawer. But the most successful pairs are usually soft, secure, washable, and safe. A beautiful fabric, neat topstitching, and a comfortable fit are enough. Tiny feet do not need a full fashion committee.
The best experience of all is seeing the finished pair in use. Handmade fabric baby shoes have a charm that store-bought pairs cannot copy. They carry your fabric choice, your stitches, your slight imperfections, and your care. And when a baby inevitably kicks one off under the stroller, at least you can say, “That was handmade,” while everyone forms a search party.
Conclusion
DIY handmade fabric baby shoes are a charming, practical sewing project for beginners and experienced makers alike. They require only small fabric pieces, basic sewing tools, and a pattern that fits the baby’s stage. The most important rules are simple: choose soft breathable materials, keep the soles flexible, avoid detachable decorations, and focus on comfort before style.
With cotton, flannel, fleece, denim, or corduroy, you can create baby booties, Mary Jane shoes, soft slippers, or cozy winter pairs that feel personal and useful. Make a test pair, sew slowly around curves, check the inside seams, and keep closures gentle. Once you finish one pair, you may find yourself making five more, because baby shoes are tiny, addictive, and dangerously giftable.
Note: These DIY handmade fabric baby shoes are best for soft indoor wear, stroller use, photo outfits, and pre-walker comfort. For babies who are standing or walking, use flexible non-slip soles and supervise use carefully.