Table of Contents >> Show >> Hide
- What Is a Dotted Underline in Microsoft Word?
- Best Method: Make a Dotted Underline Under Text
- Can You Use the Underline Button for a Dotted Underline?
- How to Make a Dotted Underline for Blank Spaces
- How to Make a Dotted Line Under a Heading
- How to Create a Dotted Horizontal Line Across the Page
- How to Change the Color of a Dotted Underline
- How to Remove a Dotted Underline
- Why Is There a Dotted Line Under My Text?
- Dotted Underline vs. Dotted Border vs. Dot Leader
- Common Mistakes to Avoid
- Practical Examples
- of Real-World Experience: What Actually Works Best
- Conclusion
Microsoft Word has a funny way of hiding simple formatting tricks in places that feel like they were designed by a committee, locked in a drawer, then labeled “More Options.” A dotted underline is one of those tricks. You may see the regular underline button on the Home tab, click it, and wonder, “Great, but where are the dots?” The good news: making a dotted underline in Microsoft Word is easy once you know where to look.
Whether you are formatting a worksheet, creating a fill-in-the-blank document, designing a form, marking vocabulary terms, or simply trying to make text look a little less boring than a plain underline, Word gives you several ways to create dotted underlines. The best method depends on what you want: a dotted underline under words, a dotted line under blank spaces, a dotted divider across the page, or those classic dot leaders used in tables of contents.
This guide walks you through each method step by step, explains when to use each one, and helps you avoid the little formatting gremlins that make Word documents behave like they had too much coffee.
What Is a Dotted Underline in Microsoft Word?
A dotted underline is a text formatting style that places a line of small dots beneath selected text. Unlike a regular underline, which creates one continuous solid line, a dotted underline has a lighter, more decorative appearance. It is useful when you want emphasis without making the text look too heavy.
In Microsoft Word, dotted underlines are part of the font formatting options. That means they behave like bold, italic, font color, or font size. If you apply a dotted underline to a word, the underline travels with that word when you move, copy, or edit the text.
However, Word also has other “dotted line” features that are not technically underlines. A dotted paragraph border, for example, can create a dotted line beneath an entire heading. Dot leaders can create dots between a label and a page number. AutoFormat can create a horizontal dotted line when you type certain characters and press Enter. These features look similar, but they work differently.
Best Method: Make a Dotted Underline Under Text
If your goal is to underline actual words with dots, use the Font dialog box. This is the cleanest and most reliable method for making a dotted underline in Microsoft Word.
Steps for Word on Windows
- Open your Microsoft Word document.
- Select the text you want to underline with dots.
- Go to the Home tab.
- In the Font group, click the small arrow in the lower-right corner to open the Font dialog box. You can also press Ctrl + D.
- Find the Underline style drop-down menu.
- Select Dotted. Depending on your version of Word, you may also see similar choices such as dotted heavy or dotted styles with different weights.
- Optional: Choose an underline color from the Underline color menu.
- Click OK.
Your selected text should now have a neat dotted underline. Congratulations: you have officially unlocked one of Word’s tiny formatting secrets. Please use this power responsibly.
Steps for Word on Mac
- Select the text you want to format.
- Go to Format in the menu bar.
- Choose Font.
- Look for the underline options.
- Select a dotted underline style.
- Choose a color if needed.
- Click OK or close the dialog to apply the change.
The exact labels can vary slightly depending on your Word version, but the basic idea is the same: select text, open Font settings, choose a dotted underline style, and apply it.
Can You Use the Underline Button for a Dotted Underline?
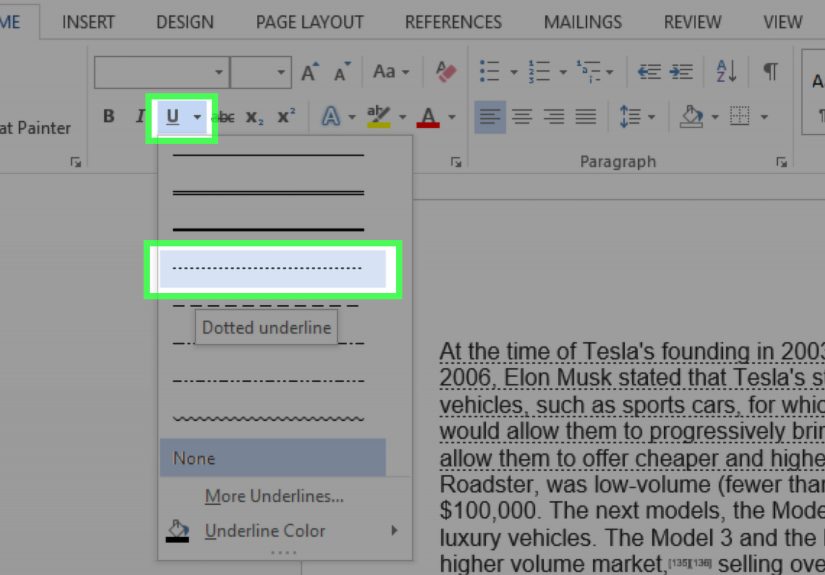
The regular underline button on the Home tab usually applies a basic single underline. It is fast, but it is not the best way to apply a dotted underline. Pressing Ctrl + U also applies or removes a standard underline, not a dotted one.
However, in many desktop versions of Word, the underline button has a small drop-down arrow beside it. Click that arrow and you may see several underline styles. If dotted underline appears there, you can select it directly. If you do not see it, choose More Underlines or open the Font dialog box with Ctrl + D.
Think of the regular underline button as the front door. The dotted underline is in the side room, wearing a tiny bow tie and waiting under “More Options.”
How to Make a Dotted Underline for Blank Spaces
Sometimes you do not want dots under words. You want a blank area where someone can write an answer, sign a name, or fill in information. For example:
Name: ……………………………
You have a few ways to create this effect in Word, but not all of them are equally good.
Option 1: Apply a Dotted Underline to Spaces
- Type your label, such as Name:.
- Press the spacebar several times to create blank space.
- Select the spaces after the label.
- Open the Font dialog box with Ctrl + D.
- Choose a dotted underline style.
- Click OK.
This works for simple documents, but it can be a little fragile. Spaces may shift when margins, fonts, or line breaks change. If you are making a professional form, there is a better method.
Option 2: Use Tab Stops with Dot Leaders
Dot leaders are the dots that run across a line after you press the Tab key. They are commonly used in tables of contents, menus, directories, and fill-in-the-blank layouts.
- Type your label, such as Name:.
- Click where you want the dotted line to end on the ruler, or open the Tabs dialog from paragraph settings.
- Set a tab stop position.
- Choose a dot leader option.
- Click OK.
- Press the Tab key after your label.
This creates a clean dotted line that stretches to the tab stop. It is much easier to align than a long row of typed periods. Typed periods are the duct tape of document design: useful in emergencies, but not what you want holding the whole thing together.
How to Make a Dotted Line Under a Heading
If you want a dotted line under an entire heading or paragraph, do not use text underline. Use a paragraph border instead. A border sits beneath the paragraph and can stretch across the page, making it ideal for section headings, printable worksheets, and professional reports.
Steps to Add a Dotted Bottom Border
- Click inside the paragraph or heading.
- Go to the Home tab.
- In the Paragraph group, open the Borders menu.
- Choose Borders and Shading for more control.
- Select a dotted line style.
- Choose the bottom border position.
- Adjust color and width if needed.
- Click OK.
This method is excellent when you want a line beneath a title such as “Homework Assignment,” “Client Notes,” or “Meeting Summary.” The line stays connected to the paragraph formatting rather than acting like text decoration.
How to Create a Dotted Horizontal Line Across the Page
Word can automatically create horizontal lines using AutoFormat. For example, typing three asterisks and pressing Enter may create a dotted or broken horizontal line, depending on your Word settings. This is not the same as a dotted underline, but it can be useful when you want a divider.
Try this:
- Place your cursor on a blank line.
- Type ***.
- Press Enter.
Word may convert the characters into a dotted horizontal line across the page. If nothing happens, AutoFormat border lines may be turned off in your settings.
One warning: automatic lines can be confusing because they are usually paragraph borders, not typed characters. If you try to select the line and delete it, Word may sit there smugly and refuse. To remove it, click in the paragraph above the line, open the Borders menu, and choose No Border.
How to Change the Color of a Dotted Underline
A dotted underline does not have to be black. You can change the underline color separately from the text color in many versions of Word.
- Select the underlined text.
- Press Ctrl + D to open the Font dialog box.
- Keep or choose your dotted underline style.
- Open the Underline color drop-down menu.
- Select the color you want.
- Click OK.
This is helpful when you want to mark terms in a teaching document, highlight fields in a form, or create a branded template. For professional documents, use color carefully. A subtle dark gray or brand color usually looks cleaner than neon green, unless your document is auditioning for a 1990s laser tag poster.
How to Remove a Dotted Underline
To remove a dotted underline from text, select the underlined text and open the Font dialog box. Change the underline style to None, then click OK. You can also try pressing Ctrl + U, but if the underline is a special style, you may need to press it more than once or remove it through the Font dialog.
If you want to remove all formatting from selected text, use Clear All Formatting on the Home tab. You can also use Ctrl + Spacebar to reset character formatting. Be careful, though: clearing formatting may remove font changes, bold, italic, color, and other styling along with the underline.
Why Is There a Dotted Line Under My Text?
Not every dotted line in Word is a dotted underline you applied yourself. Sometimes Word adds visual marks for spelling, grammar, editing suggestions, tracked changes, smart tags, or language-related tools. These marks may look like dotted or wavy underlines, but they are not regular formatting.
Here is the quick test: print preview the document or export it as a PDF. If the dotted line disappears, it is probably a proofing or editing mark rather than real formatting. If it remains, it is likely an actual underline, border, or inserted line.
If the dotted line is under only certain words, check spelling and grammar suggestions. If it runs under a full paragraph or across the page, check paragraph borders. If it appears only in a form field or template, it may be part of the document design.
Dotted Underline vs. Dotted Border vs. Dot Leader
Because Word offers several dot-based features, choosing the right one saves time and frustration.
Use a Dotted Underline When:
- You want dots directly under selected words.
- You are emphasizing text.
- You want the underline to move with the text.
- You are formatting short phrases, labels, or terms.
Use a Dotted Border When:
- You want a dotted line below a full heading.
- You need a section divider.
- You want the line to stretch across the page or paragraph width.
- You are formatting reports, handouts, or templates.
Use Dot Leaders When:
- You need dots between two items, such as a title and page number.
- You are creating a table of contents.
- You are making forms with blank answer spaces.
- You want dots to align neatly across multiple lines.
The short version: underline text with font formatting, underline paragraphs with borders, and fill space with tab leaders.
Common Mistakes to Avoid
Typing Periods Manually
Typing a long row of periods may look fine for five seconds, but it often breaks when the document is edited. Margins change, fonts shift, and suddenly your dots look like they wandered into traffic. Use dot leaders or borders instead.
Using Spaces for Alignment
Spaces are not reliable layout tools. They can work for quick personal notes, but they are not ideal for forms, resumes, contracts, or professional documents. Tabs, tables, and paragraph settings are more stable.
Confusing Borders with Underlines
If a dotted line stretches across the page, it is probably a border, not an underline. If you cannot delete it like normal text, go to the Borders menu and remove the border from the paragraph.
Overusing Decorative Underlines
A dotted underline can look stylish, but too many dotted lines make a document look busy. Use them where they serve a purpose: emphasis, structure, forms, or visual separation.
Practical Examples
Example 1: Vocabulary Worksheet
If you are creating a vocabulary worksheet, you might use dotted underlines under key terms. For example, underline “photosynthesis,” “evaporation,” or “metaphor” with dots so students know which words matter. This looks softer than bold formatting and keeps the page clean.
Example 2: Fill-in-the-Blank Form
For a form, use dot leaders after labels:
Student Name: ………………………………….
Date: ……………………………………………….
Dot leaders keep each line aligned, especially when labels are different lengths. Your form will look intentional instead of assembled during a printer emergency.
Example 3: Report Heading
For a business report, you might add a dotted bottom border under a heading like “Quarterly Results.” This creates a clean visual break without taking up much space. It also looks more professional than inserting random rows of symbols.
of Real-World Experience: What Actually Works Best
After working with Word documents for a long time, one lesson becomes painfully clear: the best formatting method is not always the one that looks right first. It is the one that still looks right after you edit the document, email it to someone, open it on another computer, convert it to PDF, and print it five minutes before a meeting while the printer makes noises like a tiny tractor.
For dotted underlines, the most dependable method for short text is the Font dialog box. If you are underlining a word, phrase, heading label, or short instruction, apply the dotted underline as character formatting. It is clean, simple, and portable. The underline stays attached to the text, so if you move the sentence, the dotted underline moves with it. This works well for study guides, classroom worksheets, editorial notes, and light design touches.
However, when you need a blank dotted line for someone to write on, the Font dialog box is not always the best choice. Underlining spaces can work, but spaces are sneaky. They can disappear at the end of a line, collapse visually, or shift when the font changes. If you are making a printable form, dot leaders are usually better. They create a controlled line of dots between a starting point and an ending point. Once you set the tab stop correctly, you can repeat the layout line after line without manually counting dots like you are decoding a secret message.
For headings, paragraph borders are the professional choice. A dotted underline applied to the heading text only runs beneath the words. That may be exactly what you want. But if you want a dotted rule that stretches across the page, use a bottom border. Borders are especially helpful in templates because they create consistent visual structure. They also prevent the common problem where one heading has a short underline and another has a long underline simply because the text lengths are different.
Another experience-based tip: avoid using typed periods for dotted lines in anything important. Typed periods are tempting because they are fast and obvious. Unfortunately, they are also easy to ruin. Change the font size, adjust margins, add a word, or open the file on a different device, and the neat row of dots may wrap awkwardly or stop short. It is fine for a quick note to yourself. It is not ideal for a document you plan to publish, print, or share.
Also, always check your dotted underline in Print Preview or PDF before finalizing the document. Word’s editing view can show proofing marks, layout guides, and temporary visual indicators that do not print. If a mysterious dotted line appears and you cannot remove it through Font settings, it may not be an underline at all. Check spelling and grammar indicators, tracked changes, comments, paragraph borders, and AutoFormat lines.
Finally, consistency matters. A dotted underline can make a document look polished when used with intention. But if some blanks are made with spaces, some with tabs, some with borders, and some with typed periods, the page can quickly look like four people formatted it during a thunderstorm. Pick one method for each purpose and stick with it. Your future self, your readers, and possibly your printer will thank you.
Conclusion
Making a dotted underline in Microsoft Word is simple once you understand which tool fits the job. For text, use the Font dialog box and choose a dotted underline style. For blank form lines, use dot leaders or carefully formatted spaces. For a dotted line under a heading, use a paragraph border. For a full-width dotted divider, use borders or AutoFormat with caution.
The key is knowing that Word has different types of dotted lines, and each one serves a different purpose. A dotted underline is text formatting. A dotted border is paragraph formatting. A dot leader is tab formatting. Once you separate those three ideas, the whole process becomes much easierand Word becomes slightly less mysterious, which is always a win.
Note: This guide is written for current Microsoft Word desktop-style layouts, including Microsoft 365 and recent Word versions. Menu names and available underline styles may vary slightly by device, operating system, and Word edition.