Table of Contents >> Show >> Hide
- Why a Dresser Is Perfect for a DIY Pet Feeding Station
- Before You Start: Plan the Feeding Station Around Your Pet
- Tools and Materials You Will Likely Need
- Step-by-Step: How to Make a DIY Pet Feeding Station From a Dresser
- 1. Choose a Sturdy Dresser With Good Bones
- 2. Clean It Like You Mean It
- 3. Make Repairs Before the Pretty Part
- 4. Sand for Adhesion
- 5. Mark the Bowl Placement
- 6. Cut the Openings Slowly
- 7. Prime the Entire Piece
- 8. Paint in Thin, Even Coats
- 9. Add a Protective Topcoat
- 10. Upgrade the Storage
- 11. Install the Bowls and Test It With Your Pet
- Pet-Safe Details That Make the Project Better
- Design Ideas to Make Your Dresser Feeding Station Look Custom
- Common Mistakes to Avoid
- Conclusion
- Real-World Experiences and Lessons From a Dresser Feeding Station Makeover
- SEO Tags
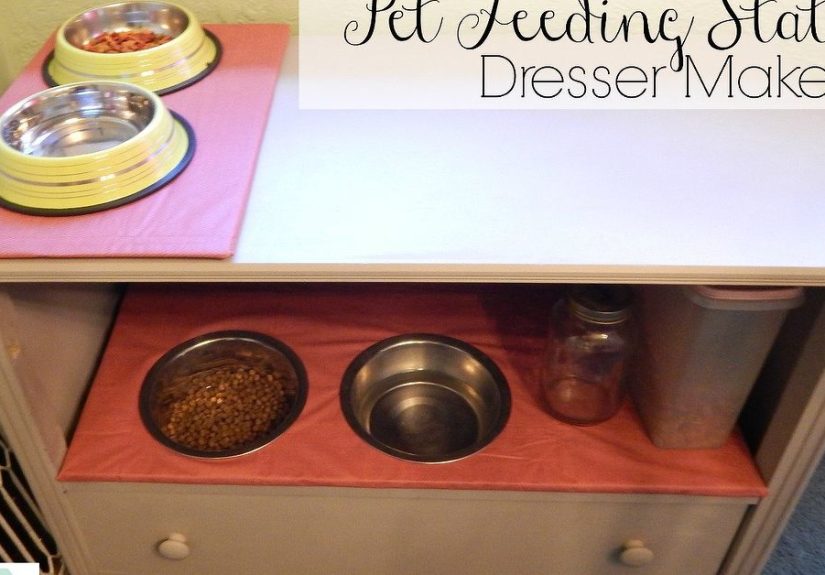
If your kitchen floor looks like your dog or cat hosts a tiny cereal tornado twice a day, a DIY pet feeding station might be your new favorite project. Better yet, making one from an old dresser gives you two wins for the price of one: you create a stylish feeding area and finally do something useful with that forgotten furniture piece that has been silently judging you from the garage.
A dresser makeover is one of the smartest ways to build a custom pet feeding station because the hard part is already done. You already have storage, structure, and a piece of furniture that is built to live indoors without looking like a science fair project. With a few practical cuts, a solid paint job, and some thoughtful pet-friendly details, you can turn a worn-out dresser into a feeding station that looks intentional, keeps bowls in one place, and hides kibble, leashes, treats, placemats, scoopers, and all the other furry little accessories that somehow multiply overnight.
This guide walks you through the entire process, from choosing the right dresser to cutting the bowl openings, refinishing the surface, and setting it up so it works for real life. Not Pinterest life. Real life, where pets splash water, shed fur, sniff paint, and somehow know exactly where the treat drawer is at all times.
Why a Dresser Is Perfect for a DIY Pet Feeding Station
A dresser is one of the best upcycling candidates for a pet feeding station because it already solves three big problems: storage, stability, and style. Unlike a flimsy side table or a basic wood crate, a dresser usually has enough weight to stay put while your pet eats. That matters more than people think. A feeding station should not scoot across the floor like it is trying to escape breakfast.
The drawers are the real magic. You can use them to store dry food, canned food, treats, grooming wipes, waste bags, medicine, extra bowls, placemats, and even a small towel for water dribbles. If you are working with a shallow dresser, one drawer can become a pull-out feeding platform. If you have a wider dresser, the top can be modified to hold bowls while the lower drawers keep all supplies organized.
There is also the design factor. A dresser makeover lets your pet feeding station blend into your home instead of shouting, “Hello, I am a giant plastic bin full of kibble.” You can paint it to match your mudroom, laundry room, kitchen, breakfast nook, or entryway. That makes the station feel like part of the room rather than a pet-related afterthought.
Before You Start: Plan the Feeding Station Around Your Pet
Measure Bowl Size First
Start with the bowls, not the furniture color. Measure the diameter and depth of the bowls you plan to use. If the bowl will sit inside a cut opening, the hole should be slightly smaller than the bowl rim so the lip rests securely on the surface. If you guess this part, your bowl may wobble, sink, or perform a dramatic disappearing act into the dresser top.
Think About Height Carefully
Not every pet needs a raised feeder. Some dogs and cats do perfectly well eating from bowls on the floor, while some senior pets or mobility-compromised dogs may benefit from bowls placed higher. If your pet has arthritis, neck discomfort, or trouble bending, talk to your veterinarian about an appropriate bowl height before you build. A pretty feeding station is nice. A comfortable pet is nicer.
Pick the Right Room
Choose a low-traffic area where your pet can eat without being bumped by people, toddlers, or other pets zooming by like caffeinated raccoons. A feeding station works best in a space that is easy to clean and close enough to water and storage, but not so exposed that your pet feels stressed while eating. Corners of kitchens, mudrooms, laundry rooms, and breakfast nooks often work well.
Tools and Materials You Will Likely Need
- Old dresser, nightstand, or small chest of drawers
- Measuring tape and pencil
- Painter’s tape
- Drill and drill bits
- Jigsaw or hole-cutting tool
- Sandpaper in medium and fine grits
- Wood filler
- Primer
- Furniture paint or cabinet-grade paint
- Topcoat or sealer suitable for furniture
- Tack cloth or damp microfiber cloth
- Replacement hardware, if desired
- Stainless steel bowls
- Optional liner, mat, or removable tray for spill control
If your dresser is made from MDF or laminate instead of solid wood, do not panic. You can still use it. You just need better prep. MDF edges in particular tend to drink primer and paint like they have been stranded in the desert, so sealing edges and sanding well matters.
Step-by-Step: How to Make a DIY Pet Feeding Station From a Dresser
1. Choose a Sturdy Dresser With Good Bones
Look for a dresser that feels solid, sits level, and has drawers that still function. Cosmetic issues are fine. Bad paint, old hardware, scratches, and awkward stain colors are all fixable. Structural damage is where things get messy. If the frame wobbles, the top is warped, or the drawer slides are shot, the makeover quickly turns from charming to annoying.
A shorter dresser works especially well for dogs, while a single low drawer or slide-out tray can be adapted for cats. If you have more than one pet, choose a wider dresser so bowls can be spaced apart. Nobody enjoys dining elbow-to-elbow with a food thief.
2. Clean It Like You Mean It
Before sanding or painting, clean every surface thoroughly. Old furniture collects wax, oils, dust, and mystery residue that can ruin adhesion. Wipe down the top, sides, drawers, handles, and inside compartments. Let everything dry completely.
This step feels boring, which is exactly why people rush through it. Resist that urge. A great finish starts with a piece that is genuinely clean.
3. Make Repairs Before the Pretty Part
Fill dents, chips, and unused hardware holes with wood filler. Tighten loose screws. Reglue any separated joints. If a drawer bottom sags, reinforce it now. It is much easier to fix a problem before the paint goes on than after you have emotionally committed to your beautiful sage green masterpiece.
4. Sand for Adhesion
Lightly sand the surfaces to scuff the finish and help primer grab. If the dresser is MDF, pay special attention to the edges and use a lighter touch so you do not gouge the material. Wipe away dust with a tack cloth or a slightly damp microfiber cloth. No dust, no drama.
5. Mark the Bowl Placement
Set your bowls on the dresser top and test the layout before drawing anything. Make sure there is enough room between bowls for your pet’s face, ears, and enthusiastic eating style. Leave enough material around each cutout so the top remains strong. Use painter’s tape and pencil to mark the center points and trace the circles.
If you are cutting with a jigsaw, drill a starter hole inside each circle. If you are using a large hole cutter, double-check the size against the bowl rim before you go full power-tool hero.
6. Cut the Openings Slowly
Cut the bowl openings carefully and support the top well while you work. A jigsaw is a common DIY choice for circles and curves, especially when the bowl size is too large for a standard hole saw. Go slowly, keep the cut smooth, and sand the edges afterward until they feel clean and even.
If you are nervous about cutting directly into the dresser top, another option is to remove the original top and replace it with a fresh wood panel or butcher-block piece, then cut the bowl openings there. That gives you a cleaner surface and lets you save the original top if you ever want to reverse the project.
7. Prime the Entire Piece
Prime first, especially if the dresser is dark, glossy, laminate-coated, or made from MDF. Primer helps with adhesion, blocks old stains from bleeding through, and gives you a more even finish. For MDF, sealing edges is especially important so they do not absorb moisture and paint unevenly.
Use a brush for corners and detail work, and a small foam roller for flat surfaces if you want a smoother finish. Let the primer dry fully before moving on.
8. Paint in Thin, Even Coats
Choose a furniture or cabinet-friendly paint with a durable finish. Thin, even coats usually look better than one thick coat that tries to do too much. Let each coat dry properly, then lightly sand between coats if needed for a smoother look. Two coats are common, but some colors may need a third.
Popular color choices for a pet feeding station include soft white, matte black, navy, warm greige, olive green, or a cheerful muted blue. Basically, anything that says, “I love my pet,” but not, “My dog picked this color himself.”
9. Add a Protective Topcoat
A feeding station deals with splashes, drips, kibble dust, paw smudges, and frequent wiping. That means durability matters. Add a clear protective topcoat or sealer recommended for painted furniture. Pay extra attention to the top and around the bowl openings.
Then do something very hard for excited DIYers: wait. Dry time and cure time are not the same thing. Paint may feel dry quickly but still need days or weeks to fully cure. If you rush and set wet bowls, heavy containers, or curious pets on the surface too early, the finish can scratch, dent, or stick.
10. Upgrade the Storage
Use the drawers intentionally. One can hold dry food in its original bag placed inside a lidded container. Another can store treats, scoopers, meds, wipes, and placemats. Add baskets, dividers, labels, or drawer liners if you want the inside to look as organized as the outside.
If you want a more custom look, swap the hardware. Leather pulls, matte black knobs, brass cup handles, or vintage ceramic knobs can completely change the vibe.
11. Install the Bowls and Test It With Your Pet
Once the finish is fully cured, drop in the bowls and test the height, spacing, and overall function. Watch how your pet approaches the station. Do they seem comfortable? Are they bumping the edge? Is water splashing behind the piece? The first test meal will tell you more than an hour of overthinking ever could.
Pet-Safe Details That Make the Project Better
Use Stainless Steel Bowls
Stainless steel bowls are a smart choice for a DIY pet feeding station because they are durable, easy to clean, non-porous, and less likely to hang onto odors or bacteria. Ceramic can work too, but only if it is food-safe and not chipped. Plastic bowls are cheap, but they scratch more easily and can become harder to sanitize over time.
Keep Food Storage Smart
If you store dry food inside the station, keep it in the original bag when possible and place that bag inside a clean container with a snug lid. That helps protect freshness and keeps product information available if there is ever a recall. Also, store food in a cool, dry area and clean the container between bags. Old crumbs and oils are not exactly gourmet.
Make Cleanup Easy
Wipe spills quickly, wash food bowls after each use, and clean water bowls daily. A removable mat under or around the bowls can make life much easier. If your pet is a world-class slobber artist, consider adding a washable backsplash panel or placing the dresser against an easy-to-clean wall surface.
Choose Cleaning Products Wisely
Use cleaning products according to label directions, rinse thoroughly when needed, and keep pets away from freshly cleaned or disinfected surfaces until they are safe and dry. If you have cats, be especially careful with products containing phenols. And no matter how tempting it is, do not let your pet “help” while you clean. Their qualifications are mostly tail-based.
Design Ideas to Make Your Dresser Feeding Station Look Custom
- Farmhouse style: White paint, black cup pulls, wood top, wire baskets.
- Modern style: Flat-front drawers, matte paint, minimal hardware, clean lines.
- Vintage style: Distressed finish, antique knobs, muted chalky paint color.
- Built-in look: Add trim around the base and top so it feels like cabinetry.
- Pet pantry version: Dedicate one drawer to food, one to grooming, one to toys.
You can also personalize the station with a small name plaque, framed pet photo above it, labeled treat jar, or hooks on the side for leashes and harnesses. Just do not overdecorate the top where whiskers, noses, and flying water droplets need space to exist.
Common Mistakes to Avoid
- Choosing the dresser before measuring the bowls
- Making bowl holes too large
- Skipping prep and sanding
- Painting over dusty or greasy surfaces
- Using the station before the paint fully cures
- Picking a high-traffic area where your pet feels crowded
- Pouring new kibble on top of old kibble in a dirty bin
- Assuming every pet wants or needs a raised feeding setup
Conclusion
A DIY pet feeding station made from a dresser is one of those rare home projects that is practical, attractive, and genuinely satisfying to use every day. It helps corral mess, creates dedicated storage, and turns an ordinary pet routine into something that feels thoughtfully designed. More importantly, it can be customized to your pet’s size, habits, and comfort level, which makes it far more useful than a generic store-bought stand.
The key is balancing style with function. Build around the bowls, prep the furniture properly, choose durable finishes, store food safely, and place the station somewhere your pet can eat in peace. Do that, and your old dresser will go from “maybe I should donate this someday” to “why didn’t I do this sooner?”
And yes, your pet will still somehow know when you open the treat drawer from three rooms away. Some things cannot be improved by design.
Real-World Experiences and Lessons From a Dresser Feeding Station Makeover
One of the most common experiences people have with a dresser feeding station makeover is realizing that the project is less about cutting circles in wood and more about solving daily annoyances. The old setup may have worked in the technical sense, but it probably involved bowls drifting across the floor, bags of food leaning awkwardly in a corner, measuring scoops going missing, and a permanent sprinkle of kibble hiding under the table legs. Once everything is consolidated into one station, the room immediately feels calmer. That is often the first surprise: the makeover changes the routine as much as it changes the furniture.
Another real-world lesson is that storage ends up mattering just as much as the feeding surface. People often start the project thinking the bowl cutouts are the star of the show, then discover that the drawer holding food, treats, supplements, wipes, and backup bowls is what makes the station truly useful. A feeding area becomes easier to maintain when the essentials are already there. Instead of making separate trips for food, medication, and cleanup supplies, everything is in one place. That simple convenience adds up fast, especially for busy mornings or late-night feedings when nobody is feeling especially elegant.
There is also usually a learning curve with height and placement. A station can look amazing in one corner and still be wrong for the pet if it is too exposed, too cramped, or too close to foot traffic. Many DIYers discover that pets have strong opinions about where they want to eat. Some dogs prefer a quiet wall with a clear view of the room. Some cats want separation from dogs, noise, and chaos. If the station is placed where people constantly step around it, the project may look magazine-worthy but function poorly. The best makeovers are the ones that adjust to the pet, not just the room layout.
Another common experience is underestimating the finishing process. Painting furniture sounds simple until you rush the prep, skip the sanding, or put bowls on the surface before the paint cures. That is when fingerprints, scratches, sticky rings, and regret show up. People who are happiest with the final result are usually the ones who take their time between steps. They clean the dresser properly, repair flaws first, seal tricky edges, apply thin coats, and let the finish harden before using it. In other words, patience is not the glamorous part of the makeover, but it is absolutely the part that makes the project hold up.
Finally, a dresser feeding station often becomes one of those small household upgrades that feels bigger than expected. It makes the pet area look intentional. It helps guests see the space as organized rather than cluttered. It can even make feeding routines easier for kids, partners, or pet sitters because everything is labeled and easy to find. Most of all, it proves that a practical pet project does not have to look cheap or temporary. With a little creativity, an old dresser can become a hardworking piece of furniture that serves the whole household while still keeping your pet comfortable, fed, and happily convinced they are the center of the decorating budget.