Table of Contents >> Show >> Hide
- Why Outside Faucets Freeze in the First Place
- 14 Steps to Prevent an Outside Faucet from Freezing
- 1. Remove every hose, splitter, timer, and spray attachment
- 2. Drain the hose before storing it
- 3. Find the indoor shut-off valve for the outdoor faucet
- 4. Turn off the water supply to the faucet
- 5. Open the outside faucet and drain it completely
- 6. Leave the faucet in the correct post-drain position
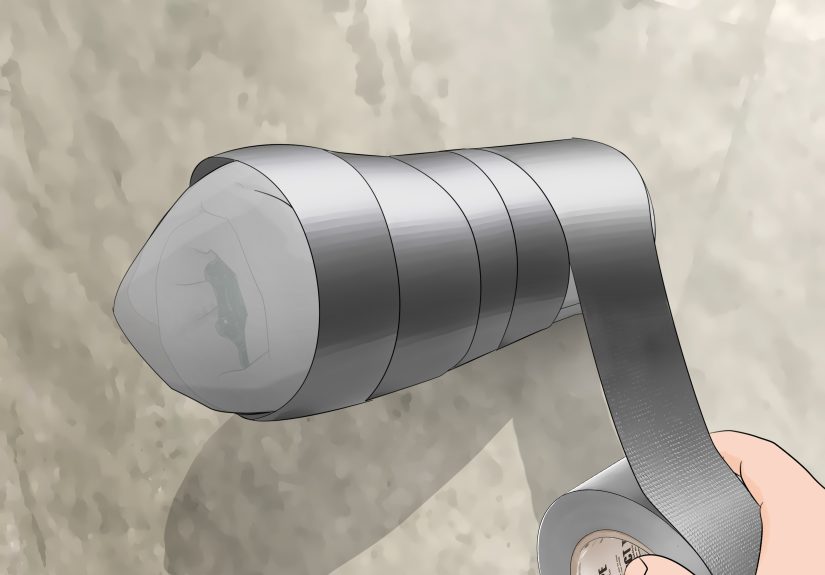
- 7. Install an insulated faucet cover
- 8. Insulate any exposed pipe leading to the faucet
- 9. Seal gaps and cracks around the faucet penetration
- 10. Fix drips and small leaks before winter gets serious
- 11. Protect nearby unheated spaces
- 12. Keep the house warm when you travel
- 13. During deep freezes, let a faucet drip if needed
- 14. Upgrade to a frost-free faucet if freezing is a recurring problem
- Common Mistakes That Cause Frozen Outdoor Faucets
- What to Do If the Faucet Is Already Frozen
- Experience-Based Tips Homeowners Learn the Hard Way
- Final Thoughts
- SEO Tags
When winter gets dramatic, your outside faucet is often the first actor to overdo it. One hard freeze, a little trapped water, and suddenly your innocent-looking spigot is plotting a plumbing disaster behind the wall. The good news is that preventing an outside faucet from freezing is not complicated. It mostly comes down to draining water, blocking cold air, adding insulation, and avoiding a few painfully common mistakes.
This guide breaks the job into 14 practical steps you can actually follow without turning your weekend into a home-improvement hostage situation. Whether you call it an outdoor faucet, hose bib, spigot, or sillcock, the goal is the same: keep water from freezing inside the faucet and supply line, and avoid a burst pipe that turns spring into repair season.
Why Outside Faucets Freeze in the First Place
Water expands when it freezes. That expansion creates pressure inside the faucet body or the short pipe section just inside the wall. In many homes, the real problem is not the visible spigot outside, but the hidden supply pipe behind it. If that pipe sits in an uninsulated wall, crawl space, garage, or drafty basement, it can freeze faster than homeowners expect.
Even worse, a faucet can look perfectly fine from the outside while the pipe behind it is one cold snap away from cracking. That is why smart winter prep focuses on the whole setup, not just the shiny metal bit sticking out of the siding.
14 Steps to Prevent an Outside Faucet from Freezing
1. Remove every hose, splitter, timer, and spray attachment
This is the first rule of outdoor faucet winterizing, and it is also the rule people ignore right before regretting everything. Leaving a hose attached can trap water in the faucet assembly and prevent proper draining. Disconnect garden hoses, Y-splitters, watering timers, nozzles, and quick-connect fittings. Your faucet cannot dry out if it is still wearing accessories like it is headed to a summer barbecue.
2. Drain the hose before storing it
Do not just yank the hose off and toss it into a corner like a defeated garden snake. Drain it completely, coil it neatly, and store it in a garage, shed, or basement. A hose full of water can freeze, crack, and turn into an annoying surprise next spring. If you still use a hose occasionally in winter, drain it again after each use instead of assuming cold weather will be forgiving. It will not.
3. Find the indoor shut-off valve for the outdoor faucet
Many homes have a shut-off valve inside the basement, crawl space, utility room, or near the wall where the outdoor faucet connects. If you do not know where it is, now is the time to play detective, not the night before a freeze warning. Labeling the valve can save you time later, especially when temperatures drop fast and your brain suddenly forgets where anything is.
4. Turn off the water supply to the faucet
Once you find the dedicated indoor shut-off, close it fully. This step stops fresh water from feeding the outdoor spigot during freezing weather. If your home does not have a separate shut-off for that faucet, consider adding one in the future. It is one of those small plumbing upgrades that feels boring until it saves you from a much bigger bill.
5. Open the outside faucet and drain it completely
After the indoor shut-off is closed, go outside and open the faucet. Let as much water as possible drain from the line. If there is even a little water left sitting in the faucet or the short run of pipe, that leftover water can freeze and expand. In other words, “mostly drained” is not the same as “safe.”
6. Leave the faucet in the correct post-drain position
For many standard outdoor faucets with an indoor shut-off, leaving the outdoor faucet open after draining is a smart move because it gives any remaining water room to expand instead of building pressure. That said, if you have a frost-free faucet or a specific manufacturer setup, follow the product instructions. The main point is simple: do not trap water in the line after you shut it off.
7. Install an insulated faucet cover
A faucet cover is not magic, but it is useful. Foam covers and more rugged hard-shell insulated covers help protect the spigot from direct exposure to icy air. In milder climates, a basic cover may be enough. In colder regions with repeated deep freezes, choose a heavier-duty model that fits snugly and stays secure in wind, sleet, and snow. Think of it as a winter coat for the faucet, except this coat actually earns its closet space.
8. Insulate any exposed pipe leading to the faucet
If you can see the supply pipe in a basement, crawl space, garage, or utility area, insulate it. Foam pipe sleeves are inexpensive and easy to install. In more severe conditions, thermostatically controlled heat tape or heat cables may offer extra protection, but they should always be installed exactly as directed by the manufacturer. The goal is to protect the weak link behind the faucet, not just the faucet itself.
9. Seal gaps and cracks around the faucet penetration
Cold air loves sneaking into the house anywhere a pipe passes through an exterior wall. Check around the faucet opening, nearby vents, and other wall penetrations. If you find cracks or gaps, seal them with an appropriate exterior-grade caulk or insulation product. A tiny draft can chill the pipe behind the wall far more than most homeowners realize.
10. Fix drips and small leaks before winter gets serious
A dripping faucet is not just annoying background music. A leak can signal worn washers, damaged components, or a poor seal, all of which make the faucet more vulnerable during freezing weather. If the spigot drips, repair it before the next hard freeze. Winter is a terrible time to let a “small plumbing issue” audition for the lead role in a bigger disaster.
11. Protect nearby unheated spaces
If the pipe serving your outside faucet runs through a garage, crawl space, attic edge, or cabinet near an exterior wall, that area matters. Keep garage doors closed when cold weather moves in. Add insulation where needed. If interior pipes run near cabinets on outside walls, opening those cabinet doors during very cold weather can help warm air circulate around the plumbing.
12. Keep the house warm when you travel
If you leave home in winter, do not shut the heat off to “save money” and accidentally fund a future ceiling repair. Keep the thermostat set to a safe minimum, usually around 55 degrees Fahrenheit, so the hidden plumbing inside walls and floor cavities stays above freezing. It is also wise to ask a neighbor or friend to check the house if you will be gone during a cold stretch.
13. During deep freezes, let a faucet drip if needed
When temperatures plunge or a cold snap lasts longer than usual, a small trickle of water can help reduce freeze risk in vulnerable pipes. This is especially helpful when pipes run along exterior walls or through less insulated areas. You do not need a stream worthy of a mountain postcard. A small drip is usually enough to keep water moving and reduce pressure buildup.
14. Upgrade to a frost-free faucet if freezing is a recurring problem
If your current faucet freezes every winter no matter how much you baby it, the better answer may be a frost-free sillcock. These faucets are designed so the shut-off point sits deeper inside the warmer part of the house, reducing the chance of freezing near the exterior wall. They are not a free pass to ignore winterization, but they are a smart long-term upgrade in cold climates.
Common Mistakes That Cause Frozen Outdoor Faucets
The biggest mistake is leaving the hose attached. A close second is assuming an insulated faucet cover alone will solve everything. Covers help, but they are not a substitute for shutting off and draining the line. Another common problem is ignoring the hidden pipe inside the wall. Homeowners often protect the faucet and forget the supply line behind it, which is a bit like putting a hat on your head while leaving your coat at home in a blizzard.
People also underestimate small air leaks. A pencil-thin gap around a pipe opening can let in enough cold air to chill the plumbing in the wall cavity. Finally, many homeowners wait until the first freeze warning to start winter prep. Outdoor faucet winterization works best when done before temperatures dive, not while you are trying to install a cover with numb fingers and bad life choices.
What to Do If the Faucet Is Already Frozen
If you turn on the faucet and get only a trickle or nothing at all, suspect freezing. First, check for visible cracks, bulges, or leaks. If you believe a pipe has already burst, shut off the main water supply and call a plumber. If the pipe is frozen but not broken, apply gentle heat using a hair dryer, heating pad, warm towels, or a safe space heater aimed at the area. Never use a torch, propane heater, charcoal device, or open flame. That is not plumbing maintenance; that is a future insurance story.
As the pipe thaws, keep the faucet open so melting water and pressure can escape. Also check other faucets in the home. Frozen plumbing often travels with friends.
Experience-Based Tips Homeowners Learn the Hard Way
Anyone who has lived through a hard freeze learns that outdoor faucet problems almost never feel urgent until they suddenly become very urgent. One homeowner notices the hose was left attached after the last fall leaf cleanup and thinks, “It’ll probably be fine.” Then a January freeze arrives, and by morning the faucet is locked up tighter than a pickle jar in a sitcom. Another homeowner remembers the faucet cover but forgets the indoor shut-off valve, so the spigot looks protected while the pipe inside the wall quietly turns into an ice sculpture.
A very common experience is discovering that the visible faucet is not where the real trouble lives. The damage often happens just inside the wall, especially in older homes with spotty insulation. People sometimes make it through the freeze with no obvious issue, only to find a leak later when the pipe thaws and water begins dripping into a basement, crawl space, or wall cavity. That delayed surprise is part of what makes frozen outdoor faucets so frustrating. The problem does not always announce itself right away.
Homeowners in milder climates often get caught off guard because they assume outdoor faucet freezing is only a northern problem. Then one unusually cold night proves otherwise. In places where deep freezes are uncommon, people are less likely to have frost-free faucets, insulated crawl spaces, or established winter routines. That means a short, sharp cold snap can do outsized damage simply because the plumbing system was never prepared for it.
There is also the classic “I thought the faucet cover was enough” experience. Many people buy a foam cover, feel wonderfully responsible, and call it a day. Then they learn that covers help most when combined with draining the line, sealing nearby drafts, and insulating exposed indoor pipe. On the flip side, homeowners who do the full routine once usually become enthusiastic evangelists for it. After one expensive winter plumbing repair, people suddenly become very passionate about hose removal.
Another real-world lesson involves travel. People leave for a holiday trip, turn the thermostat way down, and come home to a house that smells damp and expensive. The smarter experience is much less dramatic: keep the heat on, set it to a safe temperature, ask someone to check the house, and sleep better while you are away. It is not glamorous advice, but it is the kind that saves floors, drywall, and tempers.
What most experienced homeowners eventually discover is that preventing an outside faucet from freezing is really about habits. Remove the hose. Shut off the indoor valve. Drain the faucet. Add insulation. Seal the drafts. Check the vulnerable pipe. Do those things before winter gets nasty, and your outdoor spigot becomes boring again. In home maintenance, boring is beautiful. Boring means dry walls, intact pipes, and a spring season that does not begin with a plumber standing in your yard looking concerned.
Final Thoughts
Preventing an outside faucet from freezing is less about fancy gear and more about following a smart sequence. Shut off the water, drain the line, insulate what is exposed, seal out drafts, and stay ahead of deep freezes. If your faucet has frozen before, treat that as a warning, not a personality quirk. A little prep before winter can spare you a burst pipe, soaked drywall, mold headaches, and a repair bill that makes your coffee taste like stress.
Take the 14 steps once, turn them into a routine, and your outdoor faucet should make it through winter without drama. That is the dream: fewer surprises, fewer leaks, and one less thing trying to ruin February.