Table of Contents >> Show >> Hide
- Before You Program Anything, Know What You’re Working With
- How to Program a Genie Remote
- How to Program a Genie Wireless Keypad
- Common Problems and the Fixes That Usually Work
- Security Tips Most Homeowners Ignore Until They Wish They Hadn’t
- Experience Section: What Programming a Genie Opener Feels Like in Real Life
- Final Thoughts
Programming a Genie garage door opener sounds like one of those jobs that should take two minutes but somehow turns into a full garage-floor meditation session. You climb a ladder, stare at blinking lights, press one button too fast, and suddenly your opener behaves like it has trust issues. The good news is that programming a Genie remote or keypad is usually very doable once you know which kind of opener you have and which sequence actually matters.
Whether you are pairing a new remote, setting up a wireless keypad, replacing a lost transmitter, or just trying to stop your garage from acting like it forgot your family, this guide walks through the process in plain English. No fluff, no weird forum folklore, and no “just jiggle it and hope.” You will learn how to identify your Genie system, program a remote, set up a keypad, fix common pairing problems, and tighten up security if a remote has gone missing. If your garage door has been giving you drama, consider this your peace treaty.
Note: Exact button labels and indicator lights can vary slightly by model. Keep your Genie owner’s manual nearby if you have it, especially for older openers or universal accessories.
Before You Program Anything, Know What You’re Working With
Not all Genie openers behave exactly the same. In broad terms, most homeowners run into one of two setups. Newer Genie openers typically use a PROGRAM/SET button and LED sequence. Older Genie units often use a LEARN CODE button. That difference matters because the pairing sequence starts at the opener head, not at the remote or keypad.
It also helps to know whether you are using a Genie-only accessory or a universal accessory. A Genie wireless keypad designed for Intellicode systems is great for Genie-compatible setups, but if you are trying to control multiple brands or an older dip-switch style system, a universal keypad is often the smarter choice. In other words, buying the wrong keypad is a fantastic way to spend Saturday afternoon learning new vocabulary.
What you should gather first
- Your Genie remote or wireless keypad
- A sturdy ladder so you can reach the opener safely
- Fresh batteries if the accessory is new or unreliable
- Your opener model number, if compatibility is in question
- A little patience, because garage doors can sense panic
Safety comes first
Make sure the garage door path is clear before programming or testing. Keep kids, pets, cars, ladders, and random storage bins out of the travel area. If the door behaves oddly, reverses, grinds, or looks crooked, stop troubleshooting the controls and inspect the system before forcing more tests. And if a spring, cable, or track issue is suspected, that is pro territory, not “I watched two videos and believe in myself” territory.
How to Program a Genie Remote
Programming a Genie remote is usually the simpler half of the job. The biggest trick is knowing whether your opener is a newer PROGRAM/SET model or an older LEARN CODE model. Once the opener enters programming mode, the remote is usually paired by pressing the chosen button in a deliberate sequence.
Step 1: Find the opener’s programming button
Stand on your ladder and look at the opener head mounted on the ceiling. On newer Genie models, press and hold the PROGRAM/SET button until the round LED turns blue. Release it, and the long LED should begin flashing purple. On older Genie models, press and release the LEARN CODE button once so the red LED begins flashing. That flashing light is your opener basically saying, “Okay, I’m listening now, but not forever.”
Step 2: Pair the remote
Take the remote and choose the button you want to assign to that door. If it is a new remote, remove the protective battery tab first. Then press and release the selected remote button slowly two times. On compatible Genie systems, the opener LEDs should flash and then go off, confirming the remote has been learned. Press the same remote button a third time to test the door.
One smart detail many people miss: do not stand right under the opener while programming the remote. A little distance helps. Think of it like trying to hear someone on speakerphone from inside the speaker.
What if your remote still does not work?
If the opener does not respond, do not assume the remote is defective right away. Start with the boring checks because boring checks solve a shocking number of garage problems:
- Battery issue: Replace the remote battery, especially if the remote seems weak or inconsistent.
- Compatibility problem: Make sure the remote matches your Genie system. Some remotes are Intellicode-specific, some are universal, and some older systems need different technology.
- Timing problem: Many openers give you only a short window to complete pairing. If you waited too long, restart the process.
- Button speed problem: Pressing too fast or too lightly can interrupt confirmation. Slow and steady wins the garage.
When to erase all remotes and start fresh
If you lost a remote, bought a house with mystery clickers, or suspect unauthorized access, clear the opener memory and reprogram everything from scratch. On many Genie systems, clearing the opener memory removes all paired remotes and keypads, so be ready to reconnect every device you still want to use. This is not a bug. This is security doing its job.
How to Program a Genie Wireless Keypad
The keypad takes a little longer because it usually involves two separate jobs: first you create the PIN, then you teach the keypad to talk to the opener. Once it is programmed, though, it is wonderfully convenient. No remote? No problem. No keys? Still no problem. No coffee yet? Now we are asking a lot.
Step 1: Create your keypad PIN
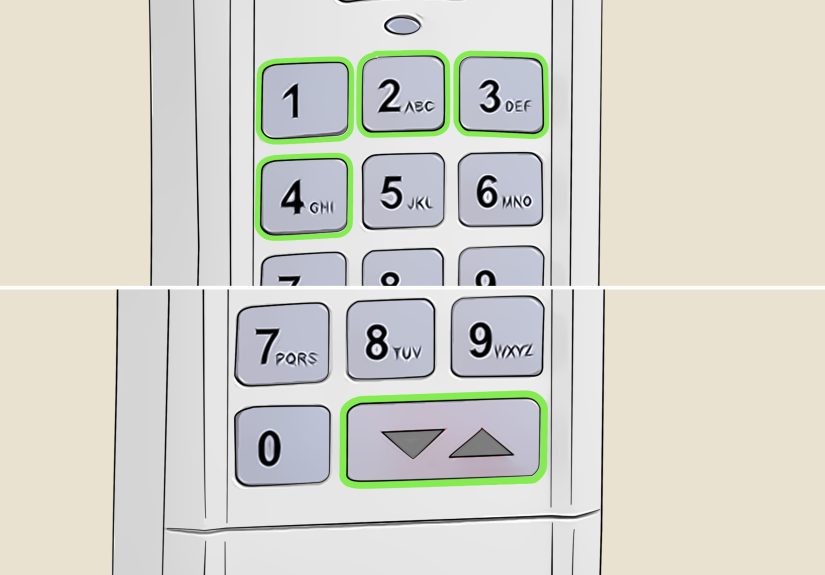
On current Genie wireless keypads, the first-time setup usually starts with the keypad backlighting off. Then:
- Press 3-5-7 in sequence.
- Press the PROGRAM key.
- Enter your chosen PIN, typically 3 to 8 digits.
- Press the PROGRAM key again.
If done correctly, the LED should blink and shut off, meaning your keypad now has a PIN and is ready to be linked to the opener. Choose a code that is easy for you to remember but hard for strangers to guess. So maybe skip 1234, 0000, and your house number if it is practically wearing a name tag on the mailbox.
Step 2: Program the keypad to one Genie opener
Now put the opener into programming mode. On newer models, hold the PROGRAM/SET button until the round LED turns blue, then release so the long LED flashes purple. On many older Genie units, press and release the LEARN CODE button once until the red LED flashes.
Then return to the keypad and follow this sequence:
- Make sure the keypad backlighting is off.
- Enter your PIN.
- Press the UP/DOWN key.
- Press the UP/DOWN key slowly 3 to 4 times until the opener activates.
Once the door responds, the keypad is paired. Test it once more by entering the PIN and pressing the UP/DOWN key. If the door opens or closes as expected, congratulations: you have successfully taught a garage door to trust numbers.
Programming the keypad for multiple doors
If your keypad will control two or three openers, the setup is slightly more advanced but still manageable. After programming the PIN, you tell the keypad how many openers it will operate. Then you pair each door one at a time.
- Enter your PIN.
- Press the PROGRAM key twice.
- Enter the total number of openers you want the keypad to control, usually 2 or 3.
- Press PROGRAM again.
Then for each individual door:
- Put that specific opener into programming mode.
- Enter your PIN on the keypad.
- Press the UP/DOWN key once.
- Press the number for the desired door: 1, 2, or 3.
- Press the UP/DOWN key slowly 3 to 4 times until that opener responds.
Once finished, daily operation is easy: enter the PIN, press UP/DOWN, then choose the door number. It is surprisingly elegant for a device that lives outside in heat, dust, and the occasional spider condo.
How to reset a Genie keypad
If the keypad becomes confused, forgetful, or generally dramatic, reset it. On current Genie keypads, a factory reset often involves holding the PROGRAM and UP/DOWN keys together for about five seconds until the lights flash and shut off. After that, you will start over by creating a new PIN and reprogramming the opener connection.
One reassuring detail: on many Genie keypads, normal battery replacement does not erase programming. So if you swap batteries and the keypad still fails, the issue is probably not memory loss. It may simply need a fresh programming cycle or a closer look at compatibility.
Common Problems and the Fixes That Usually Work
The keypad lights up, but the door does nothing
This usually points to a pairing issue rather than a dead keypad. Re-enter programming mode on the opener and repeat the pairing sequence slowly. Also check whether the opener timed out before you finished. Many systems only give you about 30 seconds.
The remote used to work, now it works only sometimes
Start with the battery. Then verify range. Then make sure you are using a compatible remote frequency and technology. If your opener and remote are not speaking the same language, no amount of button mashing will turn them into best friends.
The door won’t move even though programming seems successful
The accessory may be fine while the door system itself is not. Check for blocked safety sensors, a locked or manually disconnected door, or a general opener issue. If the wall control also fails or the door makes unusual noises, move away from programming and into mechanical troubleshooting.
You lost a remote
This is when you should stop being casual and start being strategic. Clear the opener memory, reprogram the remotes you still own, and change the keypad PIN. If you have a keypad, it becomes your handy backup while you replace missing remotes. If you have no keypad, this is a good moment to add one.
Security Tips Most Homeowners Ignore Until They Wish They Hadn’t
Genie Intellicode rolling-code technology is designed so the access code changes as the remote is used, which is far more secure than old fixed-code systems. That is good news, but even good technology still needs good habits.
- Change your keypad PIN after a lost remote or after moving into a new home.
- Do not keep the opener remote visible in an unlocked car.
- Use a unique PIN that is not tied to your address or birthday.
- If you inherit old remotes from previous owners, erase memory and reprogram only the devices you trust.
- Consider a universal keypad if you manage multiple doors or mixed opener brands.
Experience Section: What Programming a Genie Opener Feels Like in Real Life
The real-world experience of programming a Genie garage door opener is usually less about technical complexity and more about tiny human errors. The first time most people do it, they assume the process is broken when really they just pressed the button too fast, stood too close to the opener, or waited too long after entering programming mode. Garage openers are not especially forgiving. They are a little like self-checkout machines: surprisingly helpful when you do everything exactly right, emotionally unavailable when you do not.
A very common homeowner experience is successfully programming the remote on the second try and then feeling irrationally powerful, as though they just hacked a satellite. The keypad, however, tends to humble people. It is not difficult, but it does require paying attention to the sequence. One missed press or one impatient tap on the UP/DOWN key can send you back to the start. That is why reading the full sequence before touching anything is so useful.
Another common experience is discovering that the problem was never the programming at all. People often assume the remote is dead when the actual issue is a blocked safety sensor, an old battery, or a compatibility mismatch between the opener and the accessory they bought online at midnight with heroic optimism. In those cases, reprogramming becomes a side quest instead of the main event.
Homeowners with more than one garage door usually love the keypad once it is finally set up. Being able to walk, bike, or jog without carrying a remote feels surprisingly modern for something mounted next to a garage frame. Families also appreciate being able to share access without handing out clickers like party favors. That said, households with multiple users quickly learn that one shared PIN can become a tiny drama factory if nobody agrees on what the number should be.
There is also a distinct emotional difference between programming a new accessory and reprogramming after a lost remote. The first feels like regular home maintenance. The second feels like security triage. In that situation, clearing the opener memory and setting a fresh keypad code gives homeowners peace of mind fast. It is one of those chores that feels mildly annoying while you do it and deeply satisfying once it is done.
Perhaps the most honest takeaway from real-life Genie programming is this: once you understand the pattern, it stops feeling mysterious. Find the opener button. Put the opener into programming mode. Enter the accessory sequence slowly. Test. Repeat if necessary. That is the rhythm. After you have done it once, future programming sessions are dramatically easier. You may even become the household expert, which is great news until every neighbor within a two-driveway radius starts asking for help with their garage too.
Final Thoughts
If you need to program a Genie garage door opener remote or keypad, the job is usually straightforward once you identify your opener type and follow the correct sequence. Newer Genie units generally use the PROGRAM/SET button and blue-purple LED pattern. Older models usually rely on a LEARN CODE button. Remotes pair quickly, while keypads require a bit more setup because you create a PIN first and then link the keypad to the opener.
The secret is to go slowly, confirm compatibility, use fresh batteries, and reset the system when security is a concern. Do that, and your garage door should stop acting like an unpredictable roommate and start behaving like the obedient household machine it was always meant to be.