Table of Contents >> Show >> Hide
- Why Stained Glass Is a Sneaky-Good Porch Privacy Solution
- Types of Stained Glass Privacy Panels (And Which Ones Belong Outdoors)
- 1) Traditional Leaded Stained Glass (Classic, Beautiful, Needs Smart Protection)
- 2) Stained Glass Encapsulated in Tempered Glass (The “Porch-Proof” Upgrade)
- 3) Fused Glass or Kiln-Formed Panels (Strong, Contemporary, Great Texture)
- 4) Painted or Printed “Stained Glass” on Tempered Glass (Crisp Look, Lower Maintenance)
- 5) Faux Stained Glass Window Film (Budget-Friendly, Best for Sheltered Areas)
- Safety First: Codes, “Hazard Locations,” and Why Tempered Glass Comes Up a Lot
- Design Choices That Actually Improve Privacy (Not Just Decoration)
- Where to Put a Stained Glass Privacy Panel on a Porch
- Installation Options: From “Weekend Project” to “Call the Pros”
- Weatherproofing and Maintenance: Keep the Glow, Skip the Grief
- Cost and Planning: What Drives the Price Up (and What Doesn’t)
- Specific Porch Examples (So You Can Picture It)
- Common Mistakes to Avoid (A Short Horror Story List)
- Conclusion: Porch Privacy That Still Feels Like a Porch
- Porch Stories and Lessons People Keep Sharing (About )
You love your porch. The breeze, the coffee, the dramatic staring into the distance like you’re in a movie.
You know what you don’t love? Feeling like you’re performing a live-action home tour for every dog-walker
who passes by. A stained glass privacy panel for your porch fixes that problem in the most
charming way possible: it blocks sightlines, keeps the light, and makes your front entry look like it has
a personal stylist.
Done right, stained glass is a privacy upgrade that doesn’t feel like a “privacy upgrade.” It feels like a
design choice. A confident one. The kind that says, “Yes, I do enjoy sunlight… but only on my terms.”
Let’s break down how to choose the right panel, where it works best, what “outdoor-ready” actually means,
and how to install it without turning your porch into a rattling wind chime.
Why Stained Glass Is a Sneaky-Good Porch Privacy Solution
Most porch privacy fixes fall into two camps: block everything (hello, fortress fence) or
barely block anything (hello, sheer curtain that waves politely at your neighbors).
Stained glass sits in the sweet spot. The texture, color, and pattern blur faces and movement while still
letting daylight through. That means your porch stays bright, your house doesn’t feel closed in, and you
get privacy without committing to the aesthetic of “bank vault chic.”
Light Control Without the Cave Effect
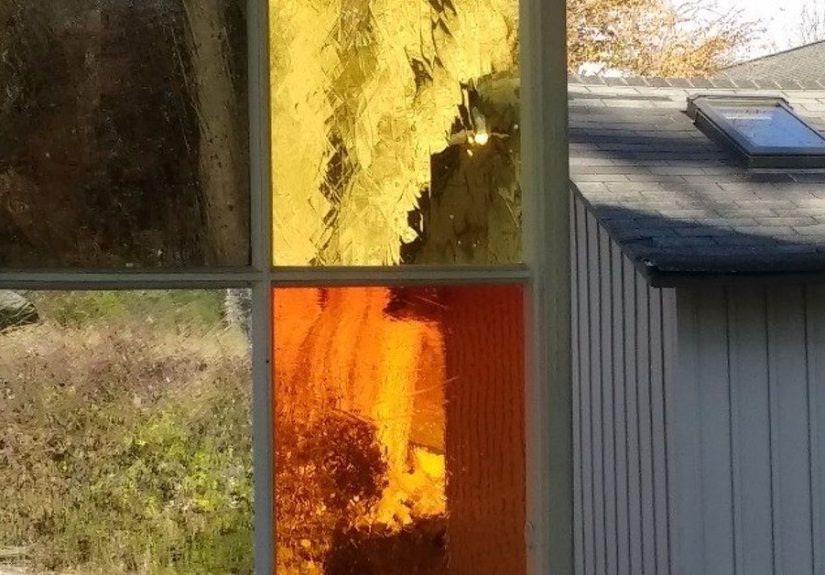
Depending on the glass you chooseclear textured, frosted, opalescent, or heavily coloredyou can tune how
much light and visibility you want. Clear rippled glass gives “privacy with sparkle.” Opalescent glass
gives “privacy with mood lighting.” And if you pick a bold pattern, you’ll get shifting color puddles on
your porch floor when the sun hits. It’s basically a daily art show, minus the ticket fees.
It Adds Value You Can Actually See
A porch privacy screen is often just… a screen. A stained glass panel can become a focal pointespecially
near your front door, seating area, or side exposure to the street. If curb appeal is the first impression,
stained glass is the firm handshake and direct eye contact.
Types of Stained Glass Privacy Panels (And Which Ones Belong Outdoors)
Not all stained glass is created equalespecially when weather gets involved. Here are the main options,
with realistic pros and cons for porch use.
1) Traditional Leaded Stained Glass (Classic, Beautiful, Needs Smart Protection)
This is the “cathedral vibes” version: individual pieces of colored glass joined with lead came (or copper
foil), often sealed with cement to strengthen and weatherproof the panel. Traditional panels can work on
porches, but they’re happiest when not directly exposed to driving rain, constant moisture, or extreme
temperature swings.
The outdoor-friendly move is to place the stained glass behind a protective layerthink of it like a phone
case for your art. Many homeowners use a “sandwich” approach: stained glass set inside a frame with a
protective outer pane (often tempered) so wind and rain hit the shield, not the delicate joins.
2) Stained Glass Encapsulated in Tempered Glass (The “Porch-Proof” Upgrade)
If your panel will be in a high-traffic area (near a door, railing, or where people might lean), consider
a panel that’s built as a sealed unit using safety glass (tempered or laminated) as the
exterior faces. This protects the artwork and can help you align with safety glazing expectations in
“hazard” locations (more on that in a minute).
3) Fused Glass or Kiln-Formed Panels (Strong, Contemporary, Great Texture)
Fused glass is made by melting layers of glass together in a kiln. It can be thicker, less “joint-heavy,”
and very durableexcellent for modern porches. It also shines for privacy because it can include heavy
texture, swirls, and opacity that blurs visibility without going dark.
4) Painted or Printed “Stained Glass” on Tempered Glass (Crisp Look, Lower Maintenance)
Some decorative panels use ceramic frit or durable paints baked onto tempered glass. You get the stained
glass look with the strength of a single safety glass sheet. It can feel more modern and graphic
(think geometric patterns, clean lines), and it’s often easier to clean and maintain outdoors.
5) Faux Stained Glass Window Film (Budget-Friendly, Best for Sheltered Areas)
If you’re renting, testing the vibe, or just not ready to commit, faux stained glass film can mimic the
look on an existing porch window. It’s not the same depth or glow as real glass, but it can add privacy
quicklyespecially for enclosed or screened porches where the film is protected from constant weather.
Safety First: Codes, “Hazard Locations,” and Why Tempered Glass Comes Up a Lot
Here’s the boring-but-important part: porches are full of spots where glass can be bumped, leaned on, or
accidentally introduced to a flying toy. In many jurisdictions, building codes require safety
glazing (like tempered or laminated glass) in certain “hazardous locations,” such as glass near
doors, near walking surfaces, or low to the floor.
That doesn’t mean you can’t have stained glass. It means you should plan it like a grown-up:
use safety glass where required, keep panels properly framed, and consider protective glazingespecially
for large panels or anything that behaves like a guard or windscreen.
- Rule of thumb: If someone could fall into it, lean into it, or slam a door near it, assume safety glass matters.
- Best practice: Ask your local building department or contractor if your installation area triggers safety glazing rules.
- Simple workaround: Place stained glass higher (clerestory-style) or behind a guard/rail so it’s less “impact accessible.”
Design Choices That Actually Improve Privacy (Not Just Decoration)
Privacy isn’t just about color. A stained glass privacy panel works because it breaks up sightlines with
pattern, texture, and diffusion. Here’s how to design for “people can’t see me” without ending up with
“my porch is now a nightclub.”
Pick the Right Glass Finish
- Textured clear glass (rippled, hammered, reeded): Great daylight, strong distortion.
- Opalescent glass: Creamy, semi-opaque, excellent privacyeven at close range.
- Frosted or glue-chip styles: High privacy with soft light.
- Beveled elements: Adds sparkle, but don’t rely on bevels alone for privacy.
Use Pattern Like a Visual “Firewall”
Large open clear sections can become accidental peepholes. If you want real porch seclusion, pick a design
with repeating geometry (prairie style grids, diamonds, mosaic layouts) or organic shapes that don’t leave
big uninterrupted “windows.” Your goal is to make your porch look like art, not like a VIP lounge with a
single obvious viewing panel.
Color Strategy: Bright vs. Subtle
If your porch faces harsh sun, deeper colors (amber, cobalt, forest green) can reduce glare. If your porch
is shaded, lighter palettes (clear textures, pale blues, soft ambers) keep it from feeling dim. A solid
trick is mixing mostly clear textured glass with a few colored accentsprivacy stays high, daylight stays
generous, and your porch doesn’t feel like it’s wearing sunglasses indoors.
Where to Put a Stained Glass Privacy Panel on a Porch
Placement is everything. Put stained glass in the right spot and you’ll wonder how you ever lived without
it. Put it in the wrong spot and you’ll create a very pretty way for the wind to test your patience.
High-Impact Placement Ideas
- Between porch posts: Perfect for side exposure to the street or neighbor’s driveway.
- In a half-wall or knee-wall opening: Adds privacy while keeping airflow.
- Beside the front door (sidelight-style): Great if your entry is visible from the sidewalk.
- Above eye level (transom-style): Light and color without creating a bumpable panel.
- As a porch windscreen panel: Beautiful, but plan for safety glass and sturdy mounting.
Sun Direction Matters (A Lot)
South- and west-facing porches get stronger afternoon sun, which can make colors popbut also increases
heat and UV exposure. North-facing porches may stay cooler and more shaded, so you’ll want brighter glass
and more clear texture to avoid darkening the space. If you’re unsure, take a few porch photos at
morning/noon/late afternoon and choose glass intensity accordingly.
Installation Options: From “Weekend Project” to “Call the Pros”
A stained glass porch privacy screen can be installed a few different ways. Your best choice depends on
your porch structure, weather exposure, and whether the panel is safety-glass-rated.
Option A: Frame It Like a Window (Most Common, Most Stable)
This is the gold standard: build or buy a frame, set the panel in a rabbet, cushion it with glazing tape,
and seal appropriately for exterior use. If the panel will see weather, adding an exterior protective pane
(or using an insulated/sealed unit) helps prevent water intrusion and reduces maintenance.
Option B: Mount It Between Posts With Brackets or Standoffs (Modern Look)
For a sleek “floating panel” effect, some people mount glass with standoffs or clamp hardware. This can be
gorgeous for a porch windscreen or side privacy barrier, but it must be done with the right hardware and
substrate prepespecially outdoors where water can sneak into fastener holes. Use exterior-rated materials,
corrosion-resistant hardware, and sealing details that keep moisture out.
Option C: Hang It (Best for Sheltered Porches Only)
Hanging stained glass panels look charming in a screened-in porch, especially when the panel isn’t
directly exposed to storms. The downside? Wind. Even mild gusts can turn a hanging panel into a
tinkly percussion instrument. If you hang one, consider a bottom stabilizer or discreet side anchors.
Weatherproofing and Maintenance: Keep the Glow, Skip the Grief
Outdoor conditions are relentless. Sun expands materials. Cold contracts them. Rain finds the one place
you forgot to seal. The goal is to keep your stained glass panel stable, dry where it needs to be dry,
and able to breathe where it should breathe.
What “Outdoor-Ready” Really Means
- Protected face: An exterior pane or sealed unit keeps weather off the lead joints.
- Proper sealing: Exterior-grade sealants and glazing methods prevent water intrusion.
- Drainage/venting: Frames should avoid trapping moisture against the panel.
- Smart placement: Under roof cover beats fully exposed every single time.
Cleaning Without Ruining Anything
Keep it gentle. Use a soft cloth, mild soap, and water. Avoid harsh abrasives and strong ammonia cleaners
that can attack finishes, sealants, and older materials. If your panel is historic, delicate, or has
visible looseness, treat it like a museum piece and get professional advice before scrubbing enthusiastically.
Periodic Checkups
Once or twice a year, give your panel a quick “porch health exam.” Look for rattling, gaps in sealant,
water staining inside the frame, or loosened joints. Catching small problems early prevents the dreaded
“Why is my stained glass crying?” moment later.
Cost and Planning: What Drives the Price Up (and What Doesn’t)
Stained glass pricing ranges widely because you’re not just buying glassyou’re buying design time,
fabrication, framing, and sometimes safety glazing.
- Size: Bigger panels cost more (and demand stronger support).
- Complexity: More pieces and detail = more labor.
- Glass type: Specialty textures and opalescents raise cost.
- Outdoor protection: Sealed units or protective tempered glass adds expense but saves headaches.
- Installation: A pro install can be worth it for structural or code-sensitive locations.
Specific Porch Examples (So You Can Picture It)
Example 1: Front Porch Side Exposure to the Sidewalk
Problem: You want to sit and read, but you’re basically on display.
Solution: Install a framed stained glass privacy panel between two posts on the sidewalk side. Use mostly
clear textured glass with a geometric grid and a few color accents. You’ll block faces and movement but
keep the porch brightperfect for daytime lounging.
Example 2: Screened Porch That Needs “Soft Privacy,” Not a Wall
Problem: Your screened porch is visible from a neighbor’s second-floor window.
Solution: Hang or frame two narrower stained glass panels at eye level on the most exposed side. Choose
higher-opacity glass (opalescent or frosted textures) so nighttime interior lighting doesn’t turn your porch
into a shadow theater.
Example 3: Porch Windscreen Near Seating
Problem: Wind, glare, and street views all hit your seating corner.
Solution: Use a safety-glass-rated decorative panel system (tempered/laminated outer layer) mounted securely
to posts. Keep the design more translucent than dark so you still get a cheerful, open feelingjust minus
the wind and unwanted eyeballs.
Common Mistakes to Avoid (A Short Horror Story List)
- Installing unprotected leaded panels in direct rain: Beautiful at first, stressful later.
- Ignoring safety glass needs: Especially near doors, railings, or low placements.
- Over-darkening a shaded porch: Your porch should feel inviting, not like a permanent eclipse.
- Weak mounting: Wind loads are real. Your panel shouldn’t wiggle when someone sneezes nearby.
- Trapping moisture in the frame: Water loves hidden pockets. Don’t give it one.
Conclusion: Porch Privacy That Still Feels Like a Porch
A stained glass privacy panel for a porch is one of those rare upgrades that solves a practical problem
and makes your home look better at the same time. The key is matching the panel type to the location:
more protection and safety glass for exposed or impact-prone areas; lighter, artistic panels for sheltered,
decorative placements. Choose glass textures and patterns that blur views without killing the daylight,
mount it like it matters (because it does), and you’ll get privacy with personalityno fortress required.
Porch Stories and Lessons People Keep Sharing (About )
After you talk to enough homeowners about porch privacy, you start to hear the same “I wish I’d known that”
momentsusually delivered with equal parts pride and mild regret. Here are some real-world patterns people
report when they add stained glass to a porch.
The “I Picked the Darkest Glass and Now It’s Moody” Moment
One common experience: someone falls in love with deep jewel tones onlinecobalt blues, ruby reds, smoky
ambersthen installs the panel on a shaded porch. The result is gorgeous… and also a little dim at 3 p.m.
The fix isn’t to ditch color; it’s to rebalance it. People often swap in more clear textured glass around
the colored sections or choose lighter opalescents that still blur visibility. Lesson: your porch lighting
(and roof cover) matter as much as the glass color.
The “Wind Turned My Panel Into a Musical Instrument” Moment
Hanging panels are adorableuntil the weather decides to audition your porch for a percussion ensemble.
Many people learn quickly that even sheltered porches get surprise gusts, and a swinging glass panel can
twist hardware, stress joints, or clink against nearby surfaces. The usual upgrade is simple: add a discreet
bottom anchor, side stabilizers, or switch to a framed installation. Lesson: movement looks whimsical in
photos, but stability feels better in real life.
The “Nighttime Privacy Surprise” Moment
Daytime privacy is easytextures and patterns do the job beautifully. Nighttime is where folks sometimes
get caught off guard: when your porch light is on and it’s dark outside, silhouettes can become more visible
through lighter, clearer panels. People who want stronger evening privacy tend to choose more diffuse glass
(frosted textures or opalescent sections) at typical eye level, leaving clearer textures higher up for light.
Lesson: test your visibility at night before you finalize the design.
The “I Didn’t Think About Cleaning Until Pollen Season” Moment
Spring arrives, pollen arrives, and suddenly everyone becomes aware that decorative glass shows grime more
than a basic screen. The good news: most panels clean easily with mild soap and water. The better news:
people who chose a protective outer pane find cleaning fasterbecause you’re wiping one smooth surface
instead of navigating every lead line and texture pocket. Lesson: if your porch faces trees or a busy road,
plan for easy-clean surfaces.
The “My Contractor Asked About Tempered Glass and I Panicked” Moment
This one comes up a lot near doors and railings. Homeowners get excited about art glass, then a contractor
asks, “Is it safety glass?” Cue confusion. The calm, practical path is to treat it like any other exterior
glazing decision: if the location is impact-prone, use a safety-glazed solution (tempered/laminated layers,
encapsulated units, or protected placement). People who plan for this upfront feel relieved laterbecause
nobody wants to redo a gorgeous porch upgrade for a preventable compliance issue. Lesson: stained glass and
safety glass can be friends; they just need proper introductions.
The overall theme in these porch stories is comforting: most “mistakes” are really just design tweaks.
When the panel is matched to the porch’s sun, wind, and traffic patterns, stained glass becomes that rare
home feature that’s both functional and joyfulprivacy you can smile at every day.