
Table of Contents >> Show >> Hide
- Why Winter Roof Protection Matters
- 1. Schedule a Roof Inspection Before the First Freeze
- 2. Clean Gutters and Downspouts Thoroughly
- 3. Repair Damaged or Missing Shingles
- 4. Inspect Flashing Around Chimneys, Vents, and Skylights
- 5. Improve Attic Insulation
- 6. Seal Attic Air Leaks
- 7. Keep Attic Ventilation Balanced
- 8. Trim Overhanging Tree Branches
- 9. Clear Roof Valleys and Low-Slope Areas
- 10. Plan for Safe Snow and Ice Management
- 11. Review Your Roof’s Age, Warranty, and Insurance Coverage
- Common Signs Your Roof Needs Attention Before Winter
- When to Call a Professional
- Best Time to Prepare Your Roof for Winter
- Experience-Based Tips: What Homeowners Learn the Hard Way
- Conclusion
Winter has a talent for finding every weak spot in a house. A loose shingle? Winter sees it. A gutter packed with leaves? Winter sends ice. A tiny gap around flashing? Winter invites water over for an extended stay. That is why protecting your roof before winter weather hits is one of the smartest home maintenance moves you can make before the first hard freeze.
Your roof does more than keep snow out of the living room. It manages rain, ice, wind, melting snow, falling branches, attic moisture, and sudden temperature swings. When it is prepared, your home stays warmer, drier, and less likely to surprise you with a ceiling stain that looks suspiciously like a map of Florida. When it is neglected, small problems can become expensive repairs.
The good news is that winter roof preparation does not have to be mysterious. Most problems come from a few predictable troublemakers: clogged gutters, damaged shingles, poor attic ventilation, inadequate insulation, weak flashing, and snow or ice that cannot drain properly. Tackle those before winter, and your roof has a much better chance of making it to spring without drama.
Why Winter Roof Protection Matters
Winter weather is rough on roofing systems because it combines weight, moisture, and repeated freeze-thaw cycles. Snow melts during warmer daylight hours, then refreezes when temperatures drop. Water expands as it freezes, pushing into gaps around shingles, flashing, gutters, and roof edges. Over time, that movement can loosen materials and create leaks.
Ice dams are another major winter roof threat. They form when heat escaping from the home warms the upper roof surface, melting snow. The water runs down to the colder eaves and refreezes. As ice builds up, it blocks drainage and can force water backward under shingles. The result may be damaged decking, wet insulation, stained ceilings, peeling paint, and mold-friendly moisture.
Heavy snow can also stress the roof structure, especially on low-slope roofs, older homes, additions, garages, and areas where drifting snow piles up unevenly. Even if your roof is built for your local climate, blocked drainage and neglected maintenance increase the risk of damage. A winter-ready roof is not just about surviving one storm; it is about reducing risk all season long.
1. Schedule a Roof Inspection Before the First Freeze
The best time to find roof problems is before the weather makes repairs difficult. A fall roof inspection gives you a chance to identify missing shingles, cracked sealant, loose flashing, damaged pipe boots, soft spots, sagging gutters, and suspicious stains in the attic.
If you are comfortable doing a visual inspection from the ground, use binoculars or your phone camera zoom. Look for curled, lifted, cracked, or missing shingles. Check whether roof valleys are packed with leaves or branches. Look around chimneys, skylights, vents, and dormers, because these are common leak zones.
For steep roofs, tall homes, older roofs, or anything that looks unsafe, hire a qualified roofing professional. The inspection cost is usually much friendlier than repairing water damage after a storm. Think of it as a roof wellness checkup, minus the awkward waiting room magazines.
2. Clean Gutters and Downspouts Thoroughly
Clean gutters are one of the simplest ways to protect your roof before winter weather hits. When gutters are clogged with leaves, pine needles, seed pods, or mystery sludge from last fall, water cannot flow away from the roof. Instead, it backs up under shingles, spills over fascia boards, freezes along the roof edge, and contributes to ice dams.
Remove all debris from gutters, then flush them with water to make sure downspouts drain freely. Pay close attention to elbows and underground extensions, where clogs like to hide. Downspouts should direct water away from the foundation, not dump it beside the basement wall like an unpaid plumbing intern.
If your property has lots of trees, consider gutter guards, but do not treat them as maintenance-free magic. They reduce debris, but fine material can still build up. Inspect them before winter and after major windstorms.
3. Repair Damaged or Missing Shingles
Shingles are your roof’s first line of defense. Once they are cracked, curled, missing, or loose, winter moisture has an easier path into the roof system. Wind-driven rain and melting snow can slip beneath damaged shingles and reach underlayment or roof decking.
Before winter, replace missing shingles and repair areas where shingles are lifting. Watch for exposed nails, worn granules, dark bald patches, and shingles that no longer lie flat. Granule loss is especially important because asphalt shingle granules help protect the material from sunlight and weathering.
A small shingle repair now can prevent a much larger leak later. If your roof has widespread damage, frequent repairs, or shingles that look brittle across large sections, it may be time to discuss replacement options with a licensed roofing contractor.
4. Inspect Flashing Around Chimneys, Vents, and Skylights
Flashing is the metal or waterproof material installed around roof transitions and penetrations. It is found around chimneys, skylights, vent pipes, dormers, walls, and roof valleys. In winter, flashing takes a beating because water, ice, and snow often collect in these areas.
Look for rust, gaps, lifted edges, cracked sealant, missing fasteners, or dried-out rubber boots around plumbing vents. Even a small opening can let water sneak in during a freeze-thaw cycle. Chimneys deserve special attention because cracked mortar, loose counterflashing, or missing chimney caps can create entry points for moisture.
Do not rely on a quick smear of caulk as a long-term fix for major flashing problems. Proper flashing repair requires the right materials, installation method, and drainage design. In other words, this is not the place to let “good enough” wear a tool belt.
5. Improve Attic Insulation
Many winter roof problems start in the attic, not on the shingles. If too much heat escapes from your living space into the attic, it warms the underside of the roof deck. That heat melts snow unevenly, setting up the classic ice dam cycle: melt, run, refreeze, repeat.
Proper attic insulation helps keep warm air in your living space and keeps the roof surface colder and more consistent. This reduces uneven snow melt and may improve comfort and energy efficiency at the same time. If your upstairs rooms are chilly, heating bills are climbing, or snow melts quickly on your roof while neighboring roofs stay snowy, your attic insulation may need attention.
Check insulation depth and condition. Wet, compressed, missing, or poorly installed insulation will not perform well. Be careful not to block soffit vents with insulation, because ventilation still needs a clear pathway. For best results, combine insulation upgrades with attic air sealing.
6. Seal Attic Air Leaks
Insulation slows heat movement, but air leaks let warm, moist air rush into the attic through gaps around light fixtures, plumbing pipes, attic hatches, ducts, wiring holes, and bathroom fan penetrations. That escaping air can warm the roof deck and add moisture to the attic.
Air sealing is one of the most overlooked ways to protect your roof before winter weather hits. Common materials include caulk, spray foam, weatherstripping, rigid foam, and metal flashing for heat-safe areas. Recessed lights, chimneys, and flues require special care because of fire safety rules, so use rated materials and professional help when needed.
A well-sealed attic helps reduce ice dam risk, improves indoor comfort, and makes insulation work better. It is not the most glamorous home project, but neither is putting a bucket under a ceiling leak at 2 a.m.
7. Keep Attic Ventilation Balanced
Attic ventilation helps remove moisture and keep the roof deck closer to outdoor temperatures. In winter, a cooler attic can reduce the chance of snow melting too quickly on the roof surface. Good ventilation usually depends on balanced intake and exhaust: cooler air enters through soffit or eave vents, and warmer air exits through ridge, roof, or gable vents.
Blocked soffit vents, insulation stuffed into intake openings, painted-over vents, or poorly designed exhaust systems can trap warm air and moisture. Signs of attic ventilation trouble include frost on nail tips, musty odors, damp insulation, mold on roof sheathing, and uneven snow melt on the roof.
Ventilation works as part of a system. More vents are not automatically better if airflow is unbalanced. A roofing or insulation professional can assess whether your attic has enough intake, exhaust, and clear air channels.
8. Trim Overhanging Tree Branches
Trees are lovely until winter loads them with ice and turns branches into roof-smacking clubs. Overhanging limbs can scrape shingles, drop leaves into gutters, break during storms, or create shaded areas where snow and moisture linger longer.
Trim branches that hang over the roof or sit too close to the home. Remove dead, cracked, or weak limbs before winter winds arrive. Also clear debris from roof valleys and flat areas where leaves can trap moisture.
If branches are large, high, or near power lines, call a certified arborist or tree service. Saving a few dollars is not worth recreating an action movie scene with a ladder, a chainsaw, and a deeply questionable plan.
9. Clear Roof Valleys and Low-Slope Areas
Roof valleys are where two roof planes meet, creating natural drainage channels. Because valleys carry large volumes of water, they must remain clear before winter. Leaves, pine needles, sticks, and debris can slow drainage and create mini dams that push water under shingles.
Low-slope sections, porch roofs, dormer tie-ins, and additions need special attention because snow may sit there longer. If water cannot move freely, it can refreeze and build up. Check these areas from the ground or have a professional remove debris safely.
Also look for signs of past drainage problems: stained fascia, peeling paint under roof edges, mossy patches, or water marks below valleys. These clues suggest that water may not be flowing where it should.
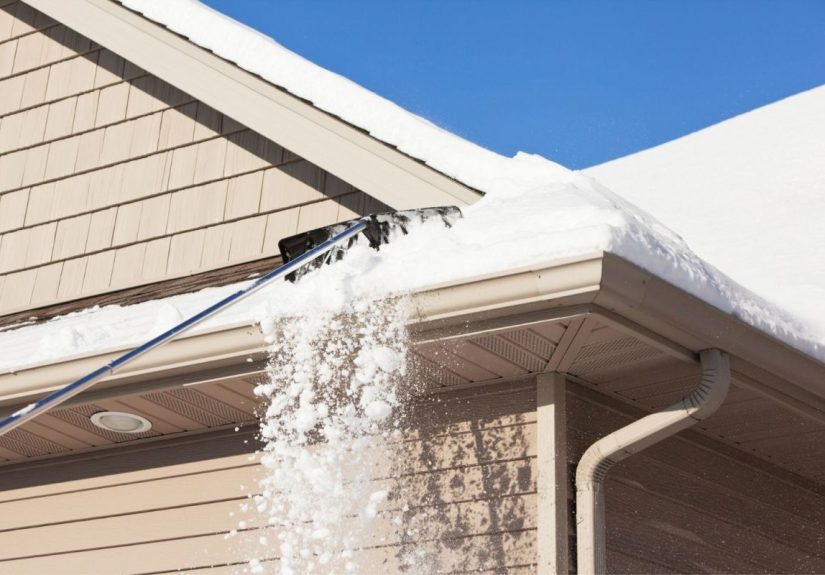
10. Plan for Safe Snow and Ice Management
In snowy climates, it helps to have a plan before the first big storm. A roof rake can remove snow from the roof edge while you remain on the ground. This may reduce the chance of ice dams and lighten snow load near eaves. Use the rake gently and leave a thin layer of snow rather than scraping shingles bare.
Never climb onto an icy roof. Never chip ice aggressively with an axe, shovel, hammer, or anything that looks like it belongs in a medieval village. Damaging shingles or gutters can create a bigger problem than the ice itself.
If an ice dam forms, a professional may use safe melting methods, steam, or approved ice-melt strategies. Calcium chloride may be used carefully in some situations, but rock salt can damage roofing materials, gutters, landscaping, and masonry. When in doubt, call a roofing pro or ice dam removal specialist.
11. Review Your Roof’s Age, Warranty, and Insurance Coverage
Winter preparation is also a good time to review your paperwork. Know your roof’s age, material, warranty terms, and maintenance history. Asphalt shingles, metal roofing, tile, wood shakes, and flat roofing systems all have different maintenance needs and expected lifespans.
Take photos of your roof, gutters, attic, and exterior before winter storms. Keep receipts for inspections, repairs, gutter cleaning, tree trimming, and professional maintenance. If storm damage occurs, documentation can make the insurance claim process smoother.
Review your homeowners insurance policy so you understand deductibles, exclusions, and responsibilities for maintenance. Insurance may cover sudden storm damage, but neglected maintenance can complicate claims. A little paperwork now can save plenty of confusion later.
Common Signs Your Roof Needs Attention Before Winter
You do not need to be a roofing expert to notice warning signs. Look for missing or curling shingles, granules collecting in gutters, water stains on ceilings, damp attic insulation, sagging gutters, rusted flashing, moss growth, cracked pipe boots, and daylight showing through attic boards.
Outside the home, watch for areas where water spills over gutters during rain. That usually means a clog, poor slope, or undersized drainage. After a light snow, observe how snow melts on the roof. Patchy melting may suggest attic heat loss, especially when melt patterns appear around vents, recessed lights, or attic bypasses.
Inside the attic, check for frost, musty smells, dark stains on roof decking, or compressed insulation. These signs may point to ventilation, air leakage, or moisture issues. Catch them early, and the fix may be straightforward. Ignore them, and winter will happily provide a more expensive reminder.
When to Call a Professional
Some roof maintenance tasks are reasonable for careful homeowners, such as cleaning low gutters, checking attic insulation, or inspecting from the ground. But many winter roof tasks are safer and better handled by professionals.
Call a roofing contractor if you see missing shingles, active leaks, sagging roof sections, damaged flashing, recurring ice dams, chimney leaks, soft decking, or widespread shingle wear. Call an insulation or energy-efficiency specialist if your attic has major air leaks, poor ventilation, or inconsistent insulation. Call a tree service for heavy branches over the roof.
Professional help is especially important for steep roofs, multi-story homes, metal roofs, icy conditions, and any situation that requires climbing. Roof repairs are cheaper than emergency room visits, and considerably easier to explain at dinner.
Best Time to Prepare Your Roof for Winter
The ideal time to winterize your roof is early to mid-fall, before freezing temperatures, heavy rain, or snow arrive. This gives contractors time to schedule repairs and gives materials a better chance to seal properly. Late summer is also a smart time in areas with early snow or intense fall storms.
If winter has already started, you can still take action. Clear accessible gutters when conditions are safe, monitor attic moisture, remove snow from roof edges with a roof rake, and call a professional for urgent repairs. Just avoid risky ladder work in icy or windy conditions.
Experience-Based Tips: What Homeowners Learn the Hard Way
After years of hearing winter roof stories from homeowners, one pattern becomes clear: the expensive problems usually started as small, boring ones. A handful of leaves in the gutter did not seem urgent. A cracked pipe boot looked harmless. A bathroom fan quietly vented into the attic instead of outdoors. Then winter arrived, added snow, ice, and pressure, and suddenly the “small thing” became a ceiling stain, a wet wall, or a contractor bill that ruined the holiday mood faster than fruitcake.
One of the most useful experiences homeowners share is to inspect during ordinary rain. A roof may look fine on a dry afternoon, but rain reveals the truth. Walk around the house during a steady shower and watch where water goes. Does it flow smoothly through gutters? Does it spill behind the gutter? Is one downspout barely trickling while another is blasting water like a fire hose? These simple observations often reveal problems before snow makes them harder to fix.
Another practical lesson is that ice dams are rarely solved by attacking the ice alone. Removing ice may stop immediate damage, but the root cause often lives in the attic. Homeowners who only melt the edge ice may see the same problem return after the next storm. The better long-term approach is to reduce attic heat loss, improve air sealing, verify insulation levels, and keep ventilation pathways open. In other words, do not just treat the icicle; investigate why the roof is auditioning for a frozen waterfall.
Many people also underestimate trees. A branch does not need to fall through the roof to cause damage. Branches that rub shingles can wear away granules. Leaves can clog valleys and gutters. Shade can slow drying and encourage moss. After a wet fall, those little piles of debris become icy blockages. Trimming trees before winter is one of those tasks that feels optional until a storm makes it very obvious that it was not.
Homeowners in snowy areas often learn to keep tools ready before they need them. A roof rake, sturdy gloves, a safe ladder for ground-level gutter access, gutter scoop, flashlight, and attic thermometer can make winter monitoring much easier. The key is to buy or prepare these items before the forecast says “winter storm warning.” Everyone suddenly wants the same tools the day before a blizzard, and stores have a magical way of selling out right when your roof starts looking nervous.
Documentation is another underrated habit. Take photos of your roof before winter, especially after maintenance or repairs. Photograph gutters, flashing, attic insulation, and any areas previously repaired. If damage happens later, these images can help you explain what changed. Keep invoices from roof inspections, gutter cleaning, insulation work, and tree trimming. Good records show that you maintained the home responsibly.
Finally, the best winter roof protection habit is consistency. Do not wait for the “perfect weekend” to do everything. Break the job into manageable pieces: inspect from the ground one day, clean gutters another day, check the attic the next, then schedule professional repairs if needed. Roof maintenance is not glamorous, but neither is explaining to guests why there is a saucepan catching roof water in the hallway. A little fall effort can make winter feel much less like a surprise test your house forgot to study for.
Conclusion
Protecting your roof before winter weather hits is about prevention, not panic. Clean gutters, solid shingles, sealed air leaks, balanced attic ventilation, proper insulation, secure flashing, trimmed trees, and safe snow management all work together to protect your home from leaks, ice dams, and storm damage.
You do not have to do everything in one weekend, and you do not have to climb onto a roof to be a responsible homeowner. Start with a ground-level inspection, clear drainage paths, check the attic, and call professionals for repairs or risky tasks. Winter will always bring cold, snow, and ice, but with the right preparation, your roof can handle the season like a pro instead of a contestant on a home-repair reality show.


