Table of Contents >> Show >> Hide
- Why 3D Print a Charging Dock for Your 3DS?
- Know Your 3DS Model Before You Print
- What Makes a Great 3D Printed 3DS Charging Dock?
- PLA, PETG, or Something Else?
- Recommended Print Settings for a 3DS Dock
- Using the Original Cable vs. Building Contact Pins
- Safety Notes for a 3DS Charging Dock
- Design Ideas to Make the Dock Look Better
- Common Mistakes to Avoid
- Step-by-Step: A Practical Build Plan
- Why This Project Still Matters
- Experience Notes: What It Feels Like to Use a 3D Printed 3DS Dock
- Conclusion
The Nintendo 3DS may no longer be the shiny new handheld on the shelf, but for millions of players, collectors, modders, and cozy gaming gremlins, it still has one magical power: it makes you want to pick it up “for five minutes” and somehow wake up two hours later in a Mario Kart 7 lobby, a Fire Emblem battle, or the quiet guilt of ignoring your Animal Crossing villagers again.
There is just one tiny problem. Charging a 3DS with a loose cable is not exactly a premium ritual. The cable flops. The handheld slides. The charging port gets tugged. Your desk begins to look like a spaghetti restaurant opened inside a GameStop. That is where a 3D printed charging dock for your 3DS becomes more than a fun weekend project. It becomes a practical upgrade, a retro-gaming display piece, and a satisfying little maker flex all in one.
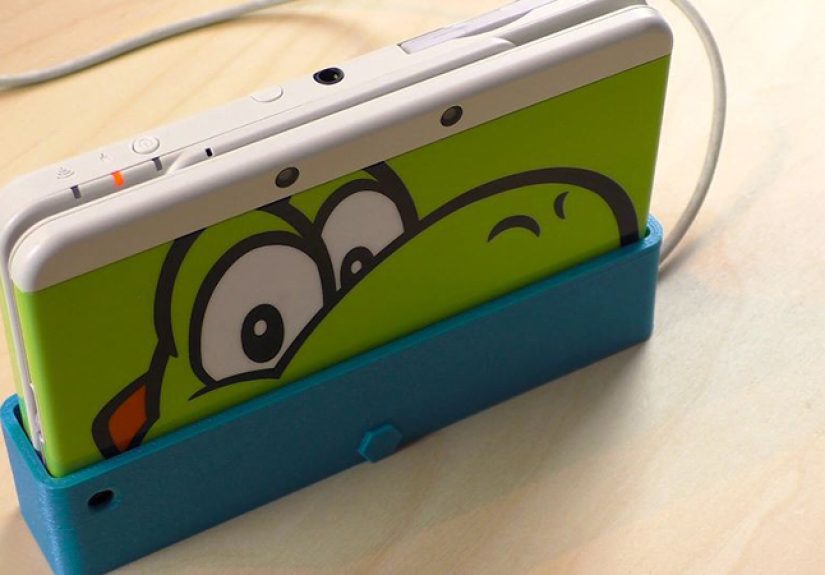
A good 3DS charging dock does three jobs at once: it holds the console at a comfortable angle, keeps the charging connector or cradle contacts aligned, and turns a handheld you love into something that looks intentionally parked instead of abandoned under a pile of cables. Whether you own an original Nintendo 3DS, New Nintendo 3DS, New 3DS XL, or one of the wider family models, the idea is simple: print a dock that fits your exact device and make charging feel like dropping the system into its own tiny throne.
Why 3D Print a Charging Dock for Your 3DS?
The most obvious reason is convenience. A dock means you can place the 3DS down, see the orange charging light, and walk away. No fishing for the plug, no holding the system at a weird angle, no suspicious “is it actually charging?” investigation every ten minutes. Official Nintendo cradles existed for some 3DS models, but they are not always easy to find in clean condition today, and not every used listing includes the right adapter, model compatibility, or price that feels sane.
3D printing solves the problem in the most maker-ish way possible: instead of hunting for a discontinued accessory, you create the version you actually want. Want a dock that matches your black New 3DS XL? Print it in matte black PETG. Want a ridiculous neon green stand because your 3DS is your personality now? Nobody can stop you. Want a desk setup where your handheld sits next to your Switch, Steam Deck, headphones, and other charging gadgets like a museum of “I promise I play all of these”? A custom print fits right in.
The second reason is preservation. The 3DS family is aging, and charging ports are not immortal. Repeatedly pushing a cable in and out can wear the port over time, especially if the cable is pulled sideways or the device gets knocked while charging. A dock can reduce everyday strain by giving the console a stable resting place. For models that use external charging contacts, a well-designed cradle can also let the dock meet the system instead of forcing the user to jam a connector into place.
Know Your 3DS Model Before You Print
Before downloading the first STL file that looks cool, identify your exact 3DS model. This matters more than many beginners expect. The original Nintendo 3DS, Nintendo 3DS XL, New Nintendo 3DS, New Nintendo 3DS XL, Nintendo 2DS, and New Nintendo 2DS XL do not all share the same shell shape, thickness, port location, or charging-contact layout.
A dock designed for the New 3DS may not fit the New 3DS XL. A cradle made for the original 3DS may hold the console at the wrong angle for another model. Even a tiny difference in thickness can make the dock feel either too tight, too loose, or tragically “almost perfect,” which is the official emotional state of 3D printing.
Check These Details Before Printing
Look at the model name, shell dimensions, charging connector location, and whether the design uses the charging port or the side contacts. If the model page includes comments, makes, remixes, or user photos, read them. Those details often reveal whether the print works well with a specific handheld revision, whether the designer updated the file, or whether users had to sand the slot for a cleaner fit.
Also check whether the dock expects an original Nintendo AC adapter or a third-party cable. The 3DS family uses a proprietary charging connector, and the North American WAP-002 adapter has region-specific electrical requirements. If you are outside the United States, use a charger designed for your local voltage and outlet standard. A dock should organize charging; it should not turn your desk into a science fair volcano.
What Makes a Great 3D Printed 3DS Charging Dock?
A great 3D printed 3DS charging dock is not just a plastic triangle with ambition. It needs stability, alignment, durability, and enough clearance to handle real-world printing tolerances. The console should slide in smoothly without scraping the shell. The charging connector should meet the port or contacts without forcing pressure. The base should be wide enough that a gentle bump does not send your beloved handheld doing an Olympic floor routine.
Stable Base
A wide, weighted-looking base is your friend. The 3DS is not extremely heavy, but an upright dock can tip if the footprint is too narrow. If the design includes rubber feet, even better. If it does not, small adhesive silicone pads can improve grip and protect your desk.
Correct Charging Alignment
The most important part of the dock is the charging interface. Some designs simply hold the original cable in a fixed position, allowing the 3DS to slide down onto the plug. Others use metal contacts, bits of wire, or spring-loaded solutions to touch the console’s charging pads. The second approach feels more like an official cradle, but it requires more careful building. Poor contact alignment can lead to inconsistent charging, and too much pressure can stress the console.
Easy Printing
Look for models designed to print without heavy supports. Support material wastes filament, leaves marks, and makes post-processing annoying. Many clever dock designs are split into parts or shaped so the printer can handle the overhangs cleanly. If the file includes swappable front plates or decorative panels, that is a bonus for anyone who believes function is important but matching colors is a sacred art.
PLA, PETG, or Something Else?
PLA is the easiest material for most beginners. It prints cleanly, holds detail well, and works fine for a display dock that lives indoors. If your dock is mostly a stand and does not involve clips, snap-fits, or flexible stress points, PLA can do the job nicely. It is also available in every color known to humanity, including several that appear to have been invented by energy drink companies.
PETG is often the better choice for a functional dock. It has more toughness and flexibility than standard PLA, making it useful for parts that may flex slightly, hold a cable, or deal with repeated insertion. PETG can be stringier and a little more annoying to print, but the extra durability is worth it for a charging accessory that gets used daily.
ABS and ASA can also work, but they usually require more controlled printing conditions and better ventilation. Unless you already know how your printer handles those materials, PLA or PETG is the more sensible path. For most home users, PETG is the sweet spot: durable enough for regular use, printable on many common machines, and forgiving enough that one failed print does not become a personal character arc.
Recommended Print Settings for a 3DS Dock
Settings depend on the specific model, printer, nozzle, and filament, but a practical starting point is a 0.2 mm layer height, three or four wall/perimeter lines, and 15% to 25% infill. The dock does not need to be solid plastic, but it should feel rigid. For small connector brackets, clips, or cable holders, consider increasing walls rather than only increasing infill. Walls often do more for functional strength than a dramatic honeycomb interior you will never see again.
Print orientation matters. If the dock includes tabs, clips, or contact holders, orient the part so the stress does not split along layer lines. Layer adhesion is the hidden boss fight of functional 3D printing. A part may look perfect and still fail if the force pulls directly between layers. For a simple stand, orientation is usually straightforward. For a more complex cradle with moving or springy parts, follow the designer’s recommended orientation whenever available.
For fit-sensitive areas, do a small test print if the model allows it. A narrow slot that holds the 3DS should not clamp the console like a hungry crab. It should guide the handheld gently and leave just enough clearance for normal printer variation. Many FDM printers need around 0.4 mm to 0.6 mm of clearance for parts that must fit reliably, though your exact machine may differ.
Using the Original Cable vs. Building Contact Pins
There are two popular approaches to a 3D printed 3DS charging dock. The first is the cable-holder design. This dock captures the original charging plug in a fixed position. You slide the 3DS into the stand, the connector enters the port, and charging begins. This approach is simple and usually safer for beginners because it does not require custom electrical contacts.
The downside is alignment. The connector must sit at exactly the right angle. If it is too high, too low, too far forward, or too tight, it may put stress on the charging port. A good design supports the console so the weight of the 3DS is held by the dock, not by the plug.
The second approach is the contact-based dock. Some 3DS models have charging contacts that can be used by a cradle. Maker designs have shown creative ways to build this using simple conductive contacts and small springs. The advantage is that the console can drop into place more like an official dock. The disadvantage is that this requires careful assembly, clean contact points, and basic understanding of polarity. If you are not comfortable checking positive and negative connections, use a simpler cable-based dock or ask someone experienced for help.
Safety Notes for a 3DS Charging Dock
A 3D printed dock should never force the 3DS into position. If the system does not sit naturally, stop and inspect the fit. Sand the contact area, reprint with adjusted tolerances, or choose a better model. Do not use the dock if the connector bends, the cable gets pinched, the charging light flickers constantly, or the console feels unusually warm during charging.
Use a reliable charger made for the 3DS family and your local electrical region. Do not modify the battery, do not open the console just to make a dock work, and do not rely on mystery power adapters from the bottom drawer of doom. The goal is a clean charging setup, not a dramatic repair bill.
If your 3DS charges in a cradle but not directly through the port, that may point to a port issue. If it charges directly but not in the dock, that may point to a dock alignment issue. Troubleshooting should begin with the simple things: clean contacts, test the official charger, inspect the cable, and confirm the dock is not applying sideways pressure.
Design Ideas to Make the Dock Look Better
The fun part of 3D printing is that your dock does not have to look like a bland office accessory. A 3DS dock can be themed around your favorite game, color-matched to your console, or styled like a miniature display stand. You can print the base in black and the front plate in red, blue, white, translucent filament, silk filament, or whatever color makes your shelf look less like “cable management crisis” and more like “curated retro gaming corner.”
Swappable faceplates are especially clever. They let you keep the same functional dock while changing the front design. You could create a clean Nintendo-inspired look, a pixel-art plate, a Poké Ball-style accent, or a simple label that says “3DS” for people who somehow forgot what joy looks like.
For a premium finish, sand visible layer lines lightly, use a deburring tool around edges, and add rubber feet under the base. A small cable channel in the rear makes the dock look cleaner and keeps the cable from dragging the stand backward. If the print has enough room, you can add a tiny slot for game cartridges or a stylus holder, though moderation is wise. A dock should not become a plastic Swiss Army knife unless you enjoy reprinting things at 1 a.m.
Common Mistakes to Avoid
Printing the Wrong Model
This is the classic mistake. The file says New 3DS, you own a New 3DS XL, and suddenly your dock is a decorative object with trust issues. Always verify model compatibility before printing.
Ignoring Tolerances
A CAD-perfect fit is not always a real-world fit. FDM printers produce small variations, and a snug digital slot can become a too-tight physical slot. Leave room for the console to slide in without rubbing.
Letting the Connector Carry the Weight
The dock should support the 3DS body. The charging plug or contacts should only make electrical contact, not act as a structural pillar. If the plug is the thing holding everything up, redesign or choose a different file.
Skipping Post-Processing
Even a good print may need a little cleanup. Remove stringing, smooth rough edges, and check for blobs near the slot. A tiny plastic bump can scratch the console or stop the 3DS from seating properly.
Step-by-Step: A Practical Build Plan
First, identify your exact 3DS model. Second, choose a dock design made for that model and read the notes from the creator. Third, select PLA for an easy display-style print or PETG for a tougher daily-use dock. Fourth, slice the file with enough walls and a reasonable infill. Fifth, print slowly enough to preserve dimensional accuracy around the connector area.
After printing, test the 3DS fit before installing any cable or contact hardware. The console should slide in and out smoothly. Next, route the cable or assemble the contact mechanism according to the design. Plug the charger into power only after everything is seated and stable. Finally, place the 3DS into the dock and confirm the orange charging LED turns on. When charging is complete, the light should go out.
If the charging light does not appear, do not wiggle the handheld aggressively. Remove it, inspect alignment, check the charger, and test direct charging. A dock should make charging easier, not require a tiny ritual dance every time.
Why This Project Still Matters
The 3DS era represents one of Nintendo’s most charming handheld periods. It gave players glasses-free 3D, StreetPass, dual-screen gameplay, a huge library of physical games, and the strange joy of carrying a little clamshell console that felt both toy-like and futuristic. As digital stores close, accessories disappear, and used hardware becomes more collectible, practical preservation projects matter more.
A 3D printed charging dock keeps the device visible, usable, and cared for. Instead of tossing the console in a drawer until nostalgia strikes, you give it a permanent spot on your desk. That small change can be the difference between “I should play my 3DS again sometime” and actually opening it up for a quick session of Animal Crossing: New Leaf, The Legend of Zelda: A Link Between Worlds, Kid Icarus: Uprising, or whatever cartridge has been patiently judging you from its case.
Experience Notes: What It Feels Like to Use a 3D Printed 3DS Dock
The first thing you notice after using a 3D printed 3DS charging dock for a few days is how much friction it removes from the whole handheld routine. A loose cable makes charging feel like a chore. A dock turns it into a habit. You finish playing, close the clamshell, drop the console into place, and the little orange LED confirms that everything is working. It feels oddly satisfying, like putting a sword back into a scabbard, except the sword has Pokémon X in it and probably needs a firmware update you will ignore.
The second thing you notice is that the dock makes the 3DS look intentional. Without a dock, the console often ends up face-down on a desk, next to a keyboard, under a receipt, or in the mysterious zone where charging cables go to become tangled forever. In a dock, it becomes part of the setup. The top screen is protected because the system is closed. The cable exits cleanly from the back. The device stands upright enough to display the shell color, special edition artwork, stickers, or whatever battle scars it earned from being carried in a backpack during its glory years.
Print quality affects the experience more than expected. A slightly rough dock still works, but a clean PETG or well-tuned PLA print feels much better in daily use. Smooth edges make insertion easier. A flat base prevents wobble. Rubber feet make the whole thing feel less like a prototype and more like an accessory you could have bought at retail. If the dock has a swappable faceplate, the emotional value doubles instantly. Suddenly you are not just charging a 3DS; you are curating a tiny retro display.
The most important experience lesson is to respect the fit. A dock that is too tight becomes annoying fast. You should not have to push the console down hard or tug it out like you are removing Excalibur from a stone. The best dock has a gentle guided fit: snug enough that the 3DS does not wobble, loose enough that the shell never feels trapped. If it takes one hand to place the console and one hand to hold the dock still, add rubber feet or increase the base weight. If the charging light flickers when the desk moves, revisit the connector alignment.
In real use, the dock also encourages better battery habits. Because the 3DS has a home, you are more likely to keep it charged instead of discovering a dead battery exactly when nostalgia attacks. It is also easier to keep the cable in one place, which is a gift to anyone who has ever owned more than three handheld devices and zero cable discipline.
The best part is that the project feels personal. Anyone can buy a stand, but printing one means you choose the material, color, finish, and style. You learn a little about tolerances, a little about cable routing, a little about functional prints, and maybe a little about patience when the first version almost fits but not quite. That is the charm of the project. It is practical, small, affordable, and rewarding. It gives an aging handheld a better daily life, and it gives your desk one less cable disaster. For a device as beloved as the 3DS, that feels like the right kind of upgrade.
Conclusion
3D printing a charging dock for your 3DS is one of those rare maker projects that is simple enough to be approachable but useful enough to earn a permanent spot on your desk. It solves a real annoyance, protects your charging routine from unnecessary cable strain, and gives your console a display-worthy home. The key is choosing the right model for your exact 3DS version, printing with sensible tolerances, using a reliable charger, and refusing to force anything that does not fit naturally.
Whether you go with a minimalist PLA stand, a tougher PETG dock, or a fancy swappable-faceplate design, the result is the same: your 3DS becomes easier to charge, nicer to display, and harder to forget in a drawer. In a world full of disposable accessories, a custom 3D printed dock feels refreshingly personal. It is retro, practical, slightly nerdy, and absolutely worth the filament.
Note: This article is written for web publication and is based on real 3DS charging behavior, official support guidance, and practical 3D printing design principles. External source links are intentionally not included in the article body.