Table of Contents >> Show >> Hide
- What Is a Board and Batten Feature Wall?
- What Are 3D Wall Panels?
- Why Combine Board and Batten with 3D Wall Panels?
- Popular Design Ideas for Board and Batten with 3D Panels
- Materials You May Need
- How to Plan the Layout
- Basic Installation Steps
- Best Paint Colors for This Feature Wall
- Common Mistakes to Avoid
- Cost Considerations
- Is This a Beginner-Friendly DIY Project?
- Experience-Based Tips for a Better Board and Batten Feature Wall with 3D Wall Panels
- Conclusion
A plain wall is like a blank slice of toast. It does the job, technically, but nobody is writing poetry about it. A board and batten feature wall with 3D wall panels, on the other hand, is the avocado toast of interior design: textured, layered, photogenic, and surprisingly doable when you have the right plan.
This wall treatment blends two popular design ideas into one bold upgrade. Board and batten brings timeless architectural structure with vertical or geometric trim. 3D wall panels add depth, shadow, movement, and a modern designer look. Put them together, and you get a feature wall that feels custom without requiring a mansion, a design degree, or a contractor named Sebastian who only communicates through invoices.
Whether you want to refresh a bedroom, create a dramatic TV wall, upgrade a hallway, or give a home office a more polished background, this guide will walk you through design ideas, materials, planning tips, installation basics, mistakes to avoid, and real-world experience from working with textured wall features.
What Is a Board and Batten Feature Wall?
A board and batten wall is a decorative wall treatment made with flat boards and narrow trim pieces called battens. Traditionally, the style was used on exterior siding, but indoors it has become a favorite for accent walls, wainscoting, entryways, dining rooms, bedrooms, and stair walls.
The classic version uses vertical battens spaced evenly across the wall. Modern versions may include square grids, picture-frame molding, diagonal patterns, tall rectangles, half-wall designs, or full-wall layouts that stretch from baseboard to ceiling. The look can be farmhouse, coastal, traditional, transitional, minimalist, or moody and modern depending on paint color and spacing.
Why Board and Batten Works So Well
Board and batten succeeds because it gives a wall rhythm. Instead of one flat surface, your eye sees lines, panels, depth, and proportion. It can make low ceilings feel taller, wide rooms feel more balanced, and boring walls look intentionally designed.
It is also flexible. A white board and batten wall feels crisp and classic. A charcoal or navy wall feels dramatic. A soft green wall feels calm and organic. A beige or greige wall gives quiet luxury energy without whispering, “I spent my entire savings on throw pillows.”
What Are 3D Wall Panels?
3D wall panels are decorative panels with raised textures, grooves, waves, flutes, geometric shapes, or sculptural surfaces. They are designed to add visual depth and tactile interest to interior walls. Some panels are made from MDF, wood, PVC, gypsum, plant fiber, foam, acoustic material, or composite products.
Common styles include fluted panels, slat-look panels, wave panels, diamond patterns, ribbed panels, hexagon panels, and modern geometric tiles. Some are paintable, while others come prefinished in wood tones, matte colors, stone looks, or waterproof surfaces.
Why 3D Panels Are a Smart Add-On
Flat paint can change a wall’s color. 3D panels change its personality. They catch light throughout the day, create shadows, and make a wall look more expensive than it usually is. When used inside a board and batten layout, 3D panels can turn each section into a mini design moment.
Think of board and batten as the frame and 3D panels as the artwork. Together, they create a finished feature wall that feels layered instead of random.
Why Combine Board and Batten with 3D Wall Panels?
Combining board and batten with 3D wall panels gives you the best of both design worlds: structure and texture. Board and batten provides clean lines, symmetry, and architectural detail. 3D panels bring movement, depth, and a contemporary edge.
This combination is especially effective when you want a feature wall that looks custom-built. Instead of simply applying panels from edge to edge, the board and batten trim gives the wall a clear layout. It helps separate textures, hide seams, create borders, and make the final result feel planned rather than pasted on during a caffeine-fueled Saturday experiment.
Best Rooms for This Wall Treatment
A board and batten feature wall with 3D wall panels works beautifully in many spaces, including:
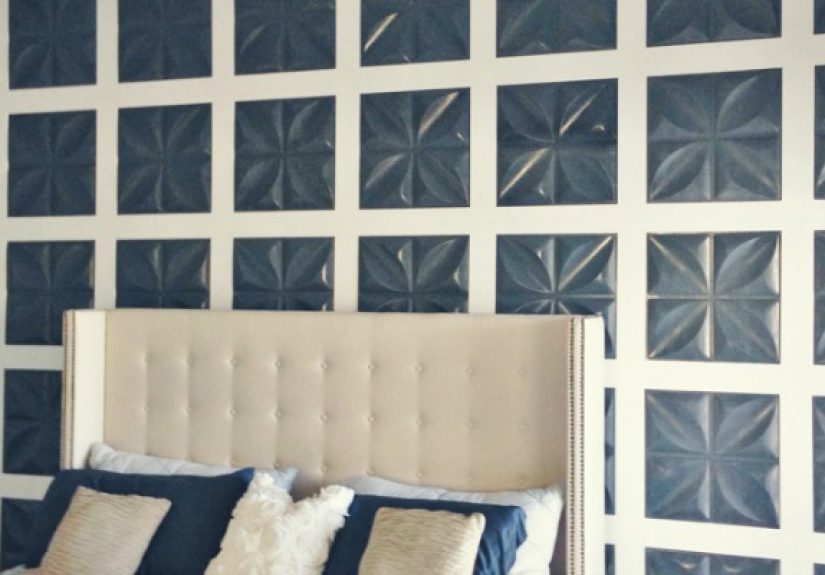
- Bedrooms: Use it behind the bed as a dramatic headboard wall.
- Living rooms: Create a textured TV wall or sofa backdrop.
- Dining rooms: Add elegance with half-wall board and batten and subtle panel inserts.
- Home offices: Build a professional video-call background that says “organized adult.”
- Entryways: Make a small foyer feel more custom and welcoming.
- Hallways: Add interest to long, narrow spaces that usually get ignored.
Popular Design Ideas for Board and Batten with 3D Panels
1. Full-Wall Board and Batten with Textured Inserts
In this design, the entire wall is divided into vertical or rectangular sections using battens. Inside each section, you can install 3D wall panels. This creates a high-impact look, especially behind a bed or sofa.
For a modern finish, choose wide vertical rectangles and fluted or ribbed panels. Paint everything one color for a seamless built-in look. The texture will still show through because of shadow and light.
2. Half-Wall Board and Batten with 3D Panels Above
This layout works well in dining rooms, powder rooms, nurseries, and hallways. The lower half of the wall uses traditional board and batten, while the upper half features 3D panels or textured wallpaper-style panels.
It gives you contrast without overwhelming the room. The lower trim feels classic, while the upper texture adds personality. Add a small ledge or cap rail between the two sections for a polished transition.
3. 3D Panel Centerpiece Framed by Battens
If you want drama without covering the whole wall, create one large framed center section. Install 3D panels inside that frame, then surround it with board and batten trim. This works especially well behind a console table, fireplace, headboard, or TV.
This design is ideal for beginners because it requires fewer panels and less cutting. It also allows you to use a bold 3D pattern without making the entire room feel like a futuristic spaceship lounge.
4. Fluted Panels with Slim Battens
Fluted wall panels are one of the most popular choices for modern interiors. Their narrow vertical grooves pair naturally with board and batten because both emphasize height. Use slim battens to frame large sections of fluted panels for a refined, contemporary look.
This style works beautifully in warm neutrals, black, olive green, creamy white, and natural wood finishes.
5. Geometric Board and Batten with Smooth 3D Accents
For a more creative wall, use diagonal battens or an asymmetrical pattern, then add simpler 3D panels in selected areas. This creates energy and movement without making the wall feel chaotic.
The trick is restraint. If your board and batten pattern is busy, keep the 3D panel texture subtle. If your panels are bold, keep the trim layout clean.
Materials You May Need
The exact materials depend on your design, wall size, and panel type, but most projects use a combination of the following:
- MDF boards, pine boards, poplar trim, or PVC trim
- 3D wall panels, fluted panels, ribbed panels, or textured tiles
- Construction adhesive or panel adhesive
- Brad nails or finish nails
- Caulk and wood filler
- Primer and interior paint
- Sandpaper or sanding block
- Painter’s tape and drop cloths
- Level, tape measure, pencil, and stud finder
- Miter saw, circular saw, utility knife, or panel cutting tool depending on material
MDF vs. Wood vs. PVC Trim
MDF is smooth, affordable, and easy to paint, making it a common choice for interior board and batten. However, it is not ideal for damp spaces unless you choose moisture-resistant MDF and seal it well.
Wood trim is stronger and more durable, but it may have knots, grain, or slight warping. It can be painted or stained depending on the design.
PVC trim is moisture-resistant and useful in bathrooms, laundry rooms, or basements. It can be more expensive, but it handles humidity better than standard MDF.
How to Plan the Layout
Planning is where the magic happens. It is also where you prevent your wall from looking like it was measured by a raccoon holding a pencil.
Measure the Wall Carefully
Start by measuring the full width and height of your wall. Do not assume your wall is perfectly square, because houses enjoy keeping secrets. Measure at the top, middle, and bottom. If the numbers are slightly different, use the smallest measurement when planning cuts.
Decide on Full Wall or Partial Wall
A full-wall board and batten design feels bold and custom. A half-wall version feels classic and easier to execute. A framed panel section gives you a smaller focal point with less labor.
For bedrooms, a full wall behind the bed often works best. For dining rooms and hallways, half-wall board and batten may feel more balanced. For a TV wall, consider framing the TV area with panels and leaving room for outlets, cords, and mounting hardware.
Calculate Batten Spacing
Even spacing is the key to a professional-looking board and batten feature wall. A common approach is to subtract the total width of all battens from the wall width, then divide the remaining space by the number of openings.
For example, if your wall is 120 inches wide and you want six vertical battens that are each 3 inches wide, the battens take up 18 inches. That leaves 102 inches for the open spaces. If you want five spaces between the battens, each opening would be 20.4 inches wide.
Always draw the layout on paper first. Better yet, mark it on the wall with painter’s tape. Painter’s tape is cheaper than regret.
Basic Installation Steps
Step 1: Prepare the Wall
Clean the wall, remove outlet covers, patch holes, sand rough spots, and make sure the surface is dry. If the wall is glossy, lightly sand it so adhesive and primer can grip better. Good prep is not glamorous, but neither is watching a panel peel off like a sad tortilla.
Step 2: Install the Main Boards or Frame
Start with the horizontal boards if your design includes a top rail, bottom rail, or center rail. Use a level and attach the boards with construction adhesive and nails. If possible, nail into studs for a stronger hold.
Check each board as you go. A tiny tilt at the beginning can turn into a very noticeable problem by the end.
Step 3: Add the Vertical Battens
Measure and cut each batten to fit. Dry-fit the pieces before attaching them. Use a level to make sure every batten is straight. Secure the battens with adhesive and brad nails.
If your wall is uneven, you may notice small gaps behind the boards. Caulk can help hide minor gaps, but large bows in the wall may need extra attention before installation.
Step 4: Install the 3D Wall Panels
Cut the 3D panels to fit inside your framed sections. Some panels can be trimmed with a utility knife, while thicker MDF or wood panels may require a saw. Always follow the panel manufacturer’s instructions for cutting and adhesive.
Apply adhesive evenly to the back of the panel, press it into place, and check that it is level. For heavier panels, you may need nails, screws, clips, or additional support. Keep panel seams aligned, especially with fluted or repeating patterns.
Step 5: Fill, Caulk, Sand, and Prime
Fill nail holes with wood filler. Caulk the seams where trim meets the wall or panels. Sand dried filler smooth. Prime raw MDF, wood, or paintable panels before applying finish paint.
This step separates “DIY but impressive” from “DIY and emotionally complicated.” Take your time.
Step 6: Paint or Finish the Wall
For a seamless look, paint the battens and panels the same color. For contrast, paint the board and batten one color and leave the 3D panels in wood tone or a different shade.
Use a brush for grooves, corners, and trim edges, then a roller for larger areas. Thin coats usually look better than thick coats. Thick paint in 3D grooves can hide detail, and nobody installs texture just to bury it under a paint landslide.
Best Paint Colors for This Feature Wall
Color changes the entire mood of your board and batten feature wall. Here are a few dependable options:
- Warm white: Clean, timeless, and bright.
- Greige: Soft, neutral, and easy to decorate around.
- Sage green: Calm, natural, and popular for bedrooms and offices.
- Navy blue: Bold, classic, and excellent for dining rooms or bedrooms.
- Charcoal: Dramatic and modern, especially with fluted panels.
- Terracotta or clay: Warm, earthy, and distinctive.
- Black: Sleek and high-contrast, best in rooms with good lighting.
Common Mistakes to Avoid
Skipping the Tape Layout
A design may look perfect in your head and strange on the wall. Painter’s tape lets you preview the spacing, height, and proportions before cutting anything.
Ignoring Outlets and Switches
Plan around electrical outlets, switches, thermostats, vents, and wall-mounted TVs. A batten landing half on an outlet can make the final wall look awkward and create extra work.
Using the Wrong Material in Damp Areas
Bathrooms, laundry rooms, and basements need moisture-conscious materials. Standard MDF can swell if exposed to humidity or water. Use moisture-resistant products and proper paint finishes in these spaces.
Forgetting About Panel Thickness
Some 3D panels are thicker than expected. Make sure the panel depth works with your battens, baseboards, outlets, and trim. If the panels stick out farther than the frame, the design may look unfinished.
Rushing the Finish Work
Caulking, filling, sanding, and priming are not optional extras. They are the difference between “custom feature wall” and “weekend project with visible emotional damage.”
Cost Considerations
The cost of a board and batten feature wall with 3D wall panels varies widely. A small DIY wall with MDF battens and paintable panels can be relatively budget-friendly. A large wall using premium wood panels, acoustic panels, or custom millwork will cost more.
Major cost factors include wall size, trim material, panel type, adhesive, paint, tools, and whether you hire a professional. If you already own basic tools, your project will be much more affordable. If you need to buy a saw, nailer, level, stud finder, and half the hardware aisle, your “simple weekend project” may start behaving like a home renovation with a tiny mustache.
Is This a Beginner-Friendly DIY Project?
Yes, but with a small warning label. A simple board and batten wall is beginner-friendly if you can measure carefully, cut straight, use a level, and stay patient. Adding 3D wall panels increases the difficulty slightly because you must manage panel cuts, seams, depth, and pattern alignment.
Beginners should start with a smaller wall, simple vertical battens, and easy-to-cut panels. Avoid complex diagonal layouts or intricate geometric panels on your first try unless you enjoy solving math problems while covered in sawdust.
Experience-Based Tips for a Better Board and Batten Feature Wall with 3D Wall Panels
After working with this style of wall treatment, one lesson becomes clear very quickly: the wall is only as good as the planning. The most successful projects begin before any board is cut. A few minutes with a tape measure, pencil, notebook, and painter’s tape can save hours of patching and re-cutting later.
One practical experience is that walls are rarely perfect. Even newer homes can have corners that are slightly out of square, baseboards that are not level, or drywall that waves just enough to make trim installation interesting. For that reason, it is smart to measure each batten individually instead of cutting every piece the same length. Two battens may look identical on paper but need slightly different cuts in real life.
Another helpful tip is to paint strategically. If your 3D wall panels have deep grooves or small repeating patterns, pre-painting or at least priming them before installation can make the final coat easier. Once the panels are on the wall, reaching into every groove with a brush can feel like painting a very stylish cheese grater. A small angled brush is useful for corners, but a sprayer can be even better for heavily textured surfaces if you know how to use one safely and protect the surrounding room.
Adhesive choice also matters. Lightweight panels may only need panel adhesive, but heavier MDF or acoustic panels often need mechanical fastening as well. Do not rely on hope as a fastening method. Hope is lovely for birthday candles, not wall panels. Always check the weight and manufacturer’s installation recommendations before deciding how to attach the panels.
Seams deserve special attention. With fluted panels, align the grooves carefully from one panel to the next. If one panel is slightly off, the repeating lines will reveal it immediately. With geometric panels, dry-fit the design on the floor first so you know how the pattern will continue across the wall. Numbering the backs of panels can help you install them in the right order.
Lighting is another detail people often underestimate. A textured feature wall looks different in morning light, afternoon light, and artificial light. Before choosing a paint color, tape a sample board or painted panel to the wall and observe it throughout the day. Dark colors can look rich and elegant, but they also highlight dust and may make a small room feel more enclosed. Light colors show off texture softly and can make a room feel larger.
If the wall will sit behind a bed, sofa, or TV, consider furniture placement before finalizing the layout. You do not want a vertical batten hidden awkwardly behind the center of a headboard or a panel seam running directly behind a mounted TV bracket. Mark furniture height and TV placement on the wall with tape before installing anything.
One of the best experience-based design choices is to keep the surrounding decor simpler. A board and batten wall with 3D panels already has plenty of visual interest. Pair it with clean bedding, simple art, warm lamps, woven textures, or a few plants. Let the wall be the main character. Not every pillow, vase, and candle needs to audition for the role.
Finally, allow more time than you think you need. The cutting may go quickly, but caulking, filling, sanding, cleaning dust, priming, and painting take patience. The final 10 percent of the project often creates 90 percent of the polished look. If you slow down at the finish line, your wall will look intentional, custom, and far more expensive than it actually was.
Conclusion
A board and batten feature wall with 3D wall panels is one of the most effective ways to add texture, depth, and custom style to a room. It combines the timeless charm of trim work with the modern drama of sculptural wall panels. The result is a wall that feels architectural, creative, and personal.
The key is balance. Choose a layout that fits the room, select materials that suit the space, plan your spacing carefully, and do not rush the finishing details. Whether you prefer a soft neutral bedroom wall, a bold black TV wall, a fluted home office backdrop, or a classic dining room upgrade, this project can transform an ordinary wall into the best-looking surface in the house.
And the best part? Every time someone asks, “Wow, who did your wall?” you get to casually say, “Oh, that? I made it.” Try not to grin too hard. You earned it.