Table of Contents >> Show >> Hide
- Introduction: When Your Smart Lock Needs a Little “Door Surgery”
- What Is Inside a Smart Lock?
- Why Disassemble a Smart Lock?
- Before You Begin: Safety, Permission, and Preparation
- Step-by-Step: Safe Disassembly of a Smart Lock
- Step 1: Open the Door and Keep It Open
- Step 2: Remove the Battery Cover
- Step 3: Disconnect Power Before Removing the Interior Assembly
- Step 4: Find the Interior Mounting Screws
- Step 5: Remove the Interior Housing
- Step 6: Remove the Mounting Plate
- Step 7: Remove the Exterior Assembly
- Step 8: Remove the Deadbolt Latch If Needed
- What to Inspect While the Smart Lock Is Apart
- Reassembly Tips That Prevent Headaches
- Common Mistakes During Smart Lock Disassembly
- When You Should Not Disassemble the Lock Yourself
- Maintenance After Disassembly
- Real-World Examples of Smart Lock Disassembly Problems
- Extra Experience Section: Lessons Learned From Disassembling Smart Locks
- Conclusion
Note: This guide is written for homeowners, renters with permission, technicians, and DIYers working on a smart lock they own or are authorized to service. It focuses on safe removal, inspection, cleaning, maintenance, and reassemblynot bypassing, defeating, or tampering with someone else’s lock.
Introduction: When Your Smart Lock Needs a Little “Door Surgery”
A smart lock is one of those gadgets that feels magical right up until it starts acting like a moody robot guarding your front door. Maybe the keypad stops responding. Maybe the thumbturn feels stiff. Maybe the battery cover has become more mysterious than a tax form. At some point, you may need to take the lock apartnot to break into anything, but to clean it, replace batteries, inspect wiring, move it to a new door, or troubleshoot a problem before calling in reinforcements.
The disassembly of a smart lock is usually less dramatic than it sounds. Most residential smart deadbolts are built around a familiar mechanical lock structure: an exterior keypad or key cylinder, an interior motor housing, a mounting plate, a deadbolt latch, screws, batteries, and sometimes a cable or sensor. The “smart” part may include Bluetooth, Wi-Fi, Thread, Matter, fingerprint readers, door-position sensors, and app-based calibration. The “lock” part is still very much about alignment, screws, metal, friction, and whether your door has decided to swell like a sponge cake in humid weather.
This in-depth guide explains how smart locks are commonly assembled, how to safely remove one from a door, what to inspect during disassembly, and how to avoid common mistakes. The goal is practical: protect the device, protect your door, and avoid turning a five-minute battery change into a three-hour drama starring one tiny missing screw.
What Is Inside a Smart Lock?
Before you grab a screwdriver, it helps to know what you are looking at. Smart locks vary by brand and design, but many use similar components. Full-replacement smart locks replace both the interior and exterior portions of your deadbolt. Retrofit models, such as interior-only smart locks, may keep the existing outside key cylinder and replace only the thumbturn side. Either way, the lock is a combination of mechanical hardware and electronics.
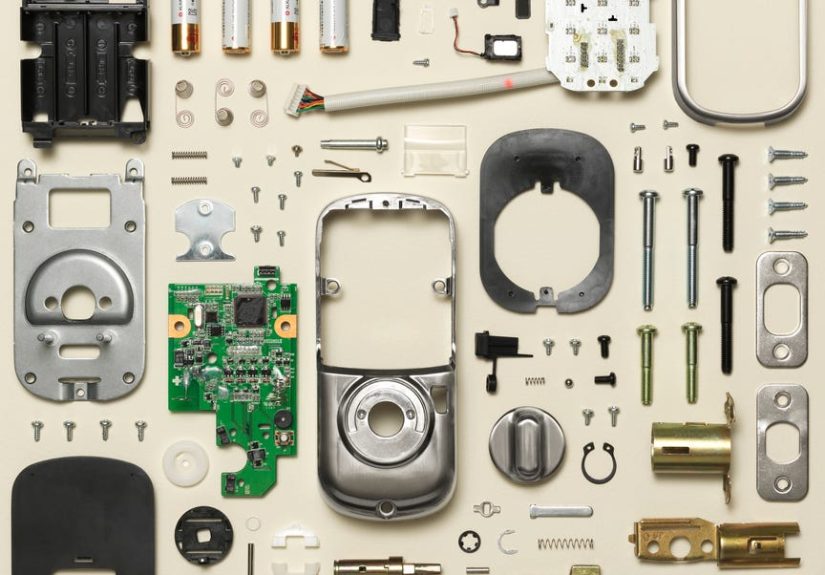
Common Smart Lock Components
Most smart locks include an exterior assembly, an interior assembly, a mounting plate, a deadbolt latch, strike plate hardware, batteries, and small screws. The exterior side may include a keypad, fingerprint sensor, keyway, emergency power contacts, or weather-resistant shell. The interior side usually contains the motor, battery compartment, setup button, status light, thumbturn, and wireless module.
Some models also include a cable that passes through the door from the exterior keypad to the interior assembly. This cable is often thin and easy to pinch if the lock is installed too tightly or at the wrong angle. Treat it like a phone charger made of angel hair: sturdy enough for normal use, but not something you want to yank.
Smart Lock Types You May Encounter
Full deadbolt replacement locks remove the old deadbolt and install a new smart exterior and interior unit. These are common for keypad, fingerprint, and Wi-Fi deadbolts.
Retrofit smart locks keep the outside hardware and keyway but replace the interior thumbturn. They are popular for renters or homeowners who want to keep their existing keys.
Smart lever locks replace a door handle or lever instead of a deadbolt. They are often used for interior doors, offices, side entries, or rental units.
Concealed smart locks hide electronics inside a more traditional-looking lock body. These can be elegant, but the battery location and service steps may be less obvious.
Why Disassemble a Smart Lock?
There are several legitimate reasons to disassemble a smart lock. You might be replacing batteries, moving out of a rental, upgrading to a newer model, cleaning corrosion from battery contacts, checking why the deadbolt binds, replacing a mounting plate, or inspecting a loose interior assembly. Sometimes the lock works perfectly on the table but fails when installed, which usually points to alignment or pressure rather than a haunted circuit board.
Another common reason is troubleshooting. If the motor strains, the app reports jammed operation, or the deadbolt does not fully extend, disassembly can reveal whether the bolt is rubbing against the strike plate, the mounting screws are over-tightened, the tailpiece is misaligned, or the door has shifted. Smart locks are not tiny construction workers; they cannot force a bad door alignment into becoming a good one.
Before You Begin: Safety, Permission, and Preparation
Only work on a lock you own or have clear permission to service. If the lock is on a rental, shared property, commercial building, dorm, or fire-rated exit door, check the rules first. Some doors have code requirements, building rules, alarm integrations, or landlord restrictions. In those cases, a licensed locksmith or qualified building technician is the safer choice.
Also, avoid disassembling the internal electronic board unless the manufacturer specifically supports that repair. Opening sealed electronics may void the warranty, damage water resistance, or create future failure points. For most users, “disassembly” should mean removing the lock from the door, separating the major assemblies, replacing batteries, cleaning accessible contacts, and reinstalling the unit properly.
Tools You Will Usually Need
For most residential smart locks, a Phillips screwdriver is enough. A small flat plastic pry tool can help remove a battery cover without scratching it. A tray or magnetic parts dish is useful for screws. Painter’s tape can hold the exterior half of the lock in place while you remove interior screws. A phone camera is extremely helpful: take photos before each step so reassembly does not turn into an archaeological reconstruction.
Avoid power drills unless the manufacturer allows them for a specific step. Over-tightening screws can warp the mounting plate, pinch cables, bind the deadbolt, or crack plastic housings. Smart locks appreciate confidence, not brute force.
Step-by-Step: Safe Disassembly of a Smart Lock
The exact sequence depends on the model, but most smart deadbolts follow the same general logic. Work slowly, keep the door open, and test the mechanical deadbolt before and after each major step.
Step 1: Open the Door and Keep It Open
Start with the door open. This matters because you do not want the deadbolt accidentally locked into the door frame while batteries are removed or the motor housing is detached. With the door open, extend and retract the bolt by hand. Notice whether it moves smoothly. If it feels rough while the door is open, the problem may be inside the lock or latch. If it feels smooth while open but jams when closed, the issue is probably door alignment or the strike plate.
Step 2: Remove the Battery Cover
Most smart locks have an interior battery cover that slides up, pulls outward, or releases with a small tab. Use gentle pressure. If it resists, look for a small retaining screw. Some brands include a security screw to prevent the cover from being removed casually. Do not pry aggressively with a metal screwdriver unless you enjoy decorative scratches and regret.
Once the cover is off, remove the batteries. If the lock uses AA batteries, remove all of them and note their orientation. If it uses a lithium battery pack or CR-style battery, follow the manufacturer’s instructions. Check for leakage, swelling, corrosion, or white crust on the terminals. Damaged batteries should be handled carefully and recycled or disposed of according to local guidance.
Step 3: Disconnect Power Before Removing the Interior Assembly
Removing batteries prevents the motor from activating while you work. It also reduces the chance of shorting contacts if a connector shifts. If the lock includes a removable smart module, many manufacturers recommend removing batteries before inserting or removing that module. This is a simple habit that prevents complicated problems.
Step 4: Find the Interior Mounting Screws
Look inside the battery compartment and along the edges of the interior housing. Many smart locks hide two long mounting screws behind the battery cover. These screws pass through the mounting plate and hold the exterior assembly against the door. Loosen them gradually and evenly. If possible, support the exterior side with your hand or use painter’s tape so it does not fall to the floor and perform an expensive gymnastics routine.
Step 5: Remove the Interior Housing
After the screws are loose, gently pull the interior assembly away from the door. If a cable connects it to the exterior keypad, do not yank. Find the connector and release it carefully. Some connectors pull straight out; others have a small clip. If you are unsure, pause and inspect. A broken cable can turn a normal disassembly into a replacement-parts scavenger hunt.
Step 6: Remove the Mounting Plate
With the interior assembly removed, you will usually see a metal or plastic mounting plate. This plate keeps the lock aligned and distributes pressure across the door. Remove the screws holding it in place. Keep these screws separate from the battery cover screws because they may be different lengths. Mixing them up is how innocent DIY projects develop plot twists.
Step 7: Remove the Exterior Assembly
Once the mounting plate is off, the exterior keypad or key cylinder should come away from the outside of the door. Feed any cable through the bore hole gently. Pay attention to the tailpiecethe flat bar or spindle that passes through the deadbolt latch. Its orientation matters during reassembly. A tailpiece installed upside down or rotated incorrectly can cause locking direction problems, failed calibration, or a thumbturn that acts like it has forgotten its job.
Step 8: Remove the Deadbolt Latch If Needed
If you are fully removing the smart lock, unscrew the latch faceplate on the door edge and slide the deadbolt latch out. Then remove the strike plate from the door frame if you are replacing it. If you are only troubleshooting the electronics or changing batteries, you may not need to remove the latch. However, inspecting the latch is useful when the motor sounds strained or the bolt does not travel freely.
What to Inspect While the Smart Lock Is Apart
Disassembly gives you a rare chance to see what is really happening behind the elegant plastic cover. Take advantage of it. A smart lock may blame “motor jam” in the app, but the actual cause could be a crooked strike plate, overtightened screw, pinched cable, dirty battery terminal, or door that has shifted with temperature and humidity.
Check the Battery Contacts
Battery contacts should be clean, dry, and springy. If you see corrosion, remove the batteries and clean the accessible contacts gently. Do not flood the lock with liquid. Use a lightly dampened cotton swab only where appropriate, then let everything dry completely before reinstalling batteries. If corrosion has spread into the electronics, contact the manufacturer or replace the unit.
Inspect the Cable and Connector
Look for pinched insulation, bent pins, loose connectors, or cable damage near the door bore. During reassembly, route the cable exactly as recommended so it does not sit under screw pressure. A smart lock cable should be tucked, not crushed. Think of it as a tiny bridge between the keypad and the brain.
Examine the Mounting Plate
A mounting plate should sit flat against the door. If it is tilted, bowed, or overtightened, the motor may struggle. Many smart lock problems appear after final tightening because the assembly shifts slightly. If the bolt works before tightening but fails afterward, the mounting plate alignment deserves suspicion.
Test the Deadbolt Latch by Hand
Slide the deadbolt in and out manually. It should move smoothly without scraping. If it drags, check whether the latch is centered in the door edge, whether screws are too tight, and whether the door hole is clean. A smart lock motor is designed to turn a properly aligned bolt, not grind through friction like a tiny bulldozer.
Check the Strike Plate Alignment
Close the door gently and watch where the bolt enters the frame. If it rubs the top, bottom, or side of the strike opening, adjust the strike plate or door alignment. This is one of the most common causes of smart lock failure. The lock may be perfectly healthy; the door frame may simply be arguing with physics.
Reassembly Tips That Prevent Headaches
Reassembly is the reverse of disassembly, but with one important rule: test as you go. Install the latch, exterior assembly, mounting plate, and interior housing, but do not fully tighten everything until you confirm smooth operation. Screws should be snug, not heroic.
Keep the tailpiece centered and correctly oriented. Route cables through the proper opening. Make sure the interior thumbturn lines up with the deadbolt position specified by the lock’s instructions. Install batteries only after the hardware is secure and the cable is connected. Then run the lock’s handing, calibration, or setup process in the app if required.
Test With the Door Open First
Always test lock and unlock cycles with the door open before testing with the door closed. If the bolt fails while open, stop and inspect the assembly. If it works open but fails closed, focus on the strike plate and door alignment. This simple test can save you from blaming software for a hardware problem.
Update the App and Firmware
After reassembly, check the manufacturer’s app for firmware updates. Smart locks are connected devices, and updates can improve reliability, compatibility, and security. Use a strong account password and enable two-factor authentication when available. Your front door does not need to share a password with your old pizza coupon account from 2014.
Common Mistakes During Smart Lock Disassembly
The first mistake is removing screws without supporting the exterior assembly. Gravity is undefeated. The second is mixing screws of different lengths. The third is pulling a cable instead of releasing its connector. The fourth is overtightening the lock during reassembly. The fifth is skipping calibration and then wondering why the lock thinks left is right, locked is unlocked, and reality is optional.
Another common mistake is ignoring the door itself. Smart locks are often blamed for problems caused by old hinges, swollen doors, misaligned frames, or strike plates installed slightly off-center. If you have to push, pull, lift, or hip-check the door to lock it manually, the smart lock will struggle too. It may be smart, but it is not a weightlifter.
When You Should Not Disassemble the Lock Yourself
Do not continue if the lock is on a door you are not authorized to service. Do not proceed if the door is part of a required emergency exit, commercial access system, or fire-rated assembly unless you are qualified to work on it. Do not open sealed electronics if the device is under warranty or shows signs of water damage, burnt smell, swollen batteries, or melted plastic.
You should also call a locksmith if the door is locked shut and normal authorized entry methods are not working. This guide is for safe service when the door is open and accessible. Trying to force hardware can damage the door, frame, lock, or wiringand in the end, a professional visit is often cheaper than replacing everything you accidentally “improved.”
Maintenance After Disassembly
Once your smart lock is reassembled and working, give it a small maintenance routine. Replace batteries as a set, using the type recommended by the manufacturer. Keep the keypad clean and dry. Check that the door closes without rubbing. Review app access and remove old guest codes. Confirm that backup keys or emergency power options are available where applicable.
For battery disposal, follow local rules. Many communities offer battery recycling through retailers, municipal programs, or household hazardous waste events. Lithium batteries should not be tossed casually into household trash or mixed recycling because they can create fire risks when damaged or improperly handled.
Real-World Examples of Smart Lock Disassembly Problems
Imagine a homeowner who removes a smart lock because the app says “jammed.” After taking off the interior housing, everything looks fine. The cable is intact, the batteries are fresh, and the motor turns. Then the homeowner tests the deadbolt by hand and finds it drags only when the door is closed. The real villain? A strike plate that is one millimeter too low. That tiny misalignment makes the motor strain every time. The fix is not a new lock; it is proper strike plate adjustment.
Another example: a renter uses an interior retrofit smart lock that keeps the outside key cylinder. When moving out, they remove the smart interior unit and reinstall the original thumbturn. Because they saved the screws in a labeled bag and took photos before installation, the process takes ten minutes. This is the rare DIY story with no dramatic music.
A third case involves a keypad smart lock that stops responding after reinstallation. The batteries are new, but the keypad is dead. During disassembly, the owner notices the cable was routed under the mounting plate and pinched by a screw. Once the cable is properly routed and reconnected, the keypad wakes up. The lesson: cable routing is not decorative. It is survival.
Extra Experience Section: Lessons Learned From Disassembling Smart Locks
After working with smart locks, reading installation manuals, studying repair guides, and seeing the same problems appear across many models, one lesson stands out: smart lock disassembly is usually more about patience than technical genius. You do not need to be an engineer with a secret laboratory. You do need to slow down, document each step, and respect the fact that small parts have a talent for disappearing into alternate dimensions.
The best experience-based advice is to start with the door open and the batteries removed. This sounds basic, but it prevents many stressful situations. A smart lock without power may not behave the way you expect, and a door that closes during service can turn a calm repair into a locked-door problem. Keeping the door open gives you control. It also lets you test the deadbolt without involving the door frame, which is the easiest way to separate lock problems from alignment problems.
Another practical lesson is that photos are better than memory. Before removing the battery cover, take a picture. Before disconnecting a cable, take a picture. Before removing the mounting plate, take another picture. Your future self will look at those photos with gratitude, especially when deciding which screw goes where. Smart lock screws may look similar, but different lengths can matter. A screw that is too long may bind parts; one that is too short may fail to hold the assembly securely.
Do not underestimate door alignment. Many people assume electronics are the problem because the device is called a smart lock. But the motor can only operate well if the mechanical deadbolt moves freely. If your old deadbolt required a shoulder bump or a dramatic upward lift of the handle, installing a smart lock does not magically fix that. In fact, it exposes the issue. A smart lock is honest. Sometimes brutally honest.
Battery habits also matter. Replace all batteries at the same time, use recommended battery types, and avoid mixing old and new cells. If the lock sits unused for a long period, check for leakage. Battery corrosion can quietly damage contacts and create intermittent failures that look like software bugs. If the lock reports low battery often, inspect for binding, poor signal strength, cold-weather exposure, or a motor working harder than it should.
One of the most overlooked experiences is the “final tightening problem.” During installation, the deadbolt may work perfectly while the screws are loose. Then, after everything is tightened, the bolt starts dragging. This usually means the lock shifted under pressure. The solution is to loosen the mounting screws slightly, realign the exterior and interior assemblies, test the bolt, and tighten gradually. The goal is even pressure, not maximum torque. You are installing a precision device, not assembling a backyard trebuchet.
It is also wise to label removed parts if you plan to store or move the lock. Put screws, plates, adapters, and covers in separate small bags. Write the lock model on the bag. If you are moving from one home to another, keep the original manual or download it before uninstalling. Some smart locks need model-specific adapters, tailpiece positions, or calibration steps. Losing those parts is like losing one sock, except the sock controls your front door.
Finally, know when to stop. If a connector will not release, if a screw is stripped, if the door is locked shut, or if the lock belongs to a property with special rules, call a professional. Good DIY is not about doing everything yourself; it is about knowing which tasks are safe, legal, and reasonable. A smart lock protects your home. Treat it like security hardware, not just another gadget with batteries.
Conclusion
The disassembly of a smart lock is a manageable project when approached carefully. Most locks are held together with accessible screws, battery covers, mounting plates, cables, and standard deadbolt hardware. The key is to work only on authorized locks, keep the door open, remove power first, document each step, protect delicate cables, and test the deadbolt before blaming the electronics.
A smart lock is both a mechanical device and a connected gadget. That means good maintenance includes physical alignment, clean battery contacts, careful reassembly, app calibration, firmware updates, and responsible access-code management. Do it right, and your lock returns to its quiet job of guarding the door. Do it wrong, and you may discover that one tiny screw can humble the entire household.