Table of Contents >> Show >> Hide
- What Is Homemade Wax for Hair Removal, Really?
- Ingredients for Homemade Wax: What Each One Does
- Easy Homemade Wax Recipes to Try
- How to Use Homemade Wax Safely
- Best Tips for Better Results
- Common Homemade Wax Problems and How to Fix Them
- Aftercare: What to Do After Sugaring
- When Homemade Wax Is a Bad Idea
- Homemade Wax vs. Store-Bought Wax
- Final Thoughts
- Experience Corner: What Homemade Wax Actually Feels Like in Real Life
- SEO Tags
Note: This guide is for educational purposes. Always patch-test first, let the mixture cool fully before it touches your skin, and skip DIY waxing on broken, sunburned, recently retinoid-treated, or highly irritated skin. In other words: smooth skin is great, but not at the price of turning your bathroom into a caramel-themed regret.
If you have ever looked at a jar of waxing product and thought, “Why does this cost more than my lunch?” welcome to the sticky, thrifty world of homemade hair removal wax. The good news is that the most popular DIY version is made from pantry basics. The even better news is that, when done carefully, it can leave skin smooth for weeks. The bad news? If you rush it, overheat it, or slap it onto angry skin, homemade wax can go from spa day to “why is my leg mad at me?” in record time.
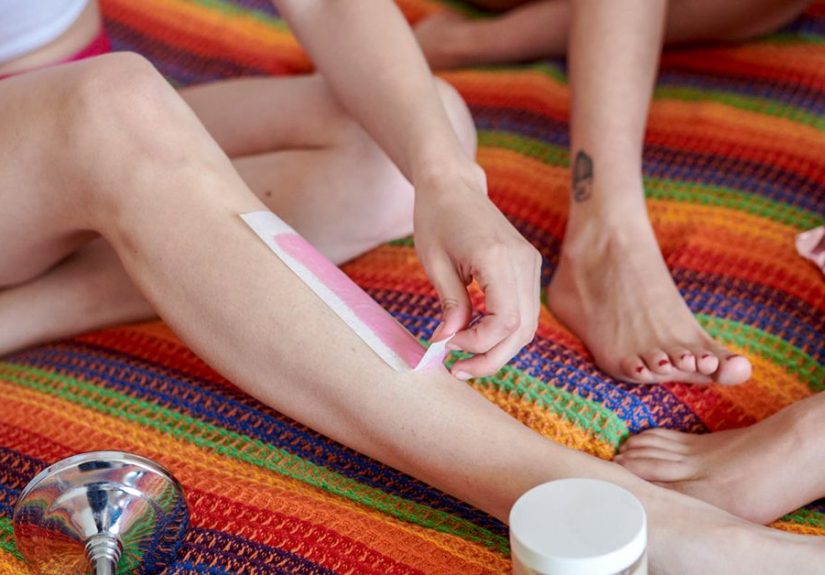
Most so-called homemade wax is actually sugar wax, also known as sugaring. It is not the same as traditional salon wax made with resins and oils. Sugaring is usually a simple blend of sugar, lemon juice, and water, sometimes with honey added in some DIY variations. It is applied differently from standard wax, too: the paste usually goes on against hair growth and comes off with hair growth. That detail matters because it is one reason many people find it gentler on the skin.
In this guide, you will learn what homemade wax really is, which ingredients matter, two easy recipes to try, how to use the paste safely, what mistakes to avoid, and how to deal with the bumps, stickiness, and drama that can happen when DIY confidence outruns DIY technique.
What Is Homemade Wax for Hair Removal, Really?
When people search for homemade wax for hair removal, they are usually looking for a DIY sugar wax recipe. Sugaring has been around for a very long time, but it has become especially popular because the formula is simple, washable, and less intimidating than hot resin wax.
Here is the short version:
Homemade sugar wax is usually made with:
- Sugar
- Lemon juice
- Water
Why people like it:
- It uses a short ingredient list.
- It is water-soluble, so cleanup is much easier than traditional wax.
- It can be used at room temperature or just slightly warm.
- Many people find it less painful or less irritating than hot wax.
- Results can last for several weeks because the hair is removed from the root.
That said, “natural” does not automatically mean “foolproof.” Sugar can still burn if it is too hot, lemon can sting sensitive skin, and any hair-removal method that pulls hair from the root can lead to redness, irritation, folliculitis, or ingrown hairs. So yes, it is simple. No, it is not invincible.
Ingredients for Homemade Wax: What Each One Does
1. Sugar
Sugar is the star of the show. Once heated with liquid, it transforms into a sticky paste that grabs hair. It also lightly exfoliates by helping lift away some dead skin cells. Regular white granulated sugar is the standard choice because it melts consistently and gives the most predictable texture.
2. Lemon Juice
Lemon juice helps balance the mixture and contributes to the paste texture. It is often used in classic sugar wax recipes, but it can be irritating on freshly waxed or sensitive skin if residue is left behind. That is one reason rinsing well after sugaring matters.
3. Water
Water helps the sugar dissolve and keeps the mixture from turning into a candy brick. Too little water can create a paste that hardens too fast. Too much can leave you with sugary syrup that removes exactly zero hairs and maybe your dignity.
4. Honey (Optional in Some Recipes)
Some homemade wax recipes add honey for a softer, more spreadable texture. Honey can make the mixture a little more flexible, though classic sugaring does not require it. If your skin is extra reactive, keep the recipe simple at first so you know exactly what your skin is responding to.
Easy Homemade Wax Recipes to Try
These recipes are popular because they use common ingredients and produce a workable paste when made carefully. The goal is a thick, amber mixture that can be spread without being runny and can cool without becoming a rock. Think soft caramel, not candy sculpture.
Recipe #1: Classic Sugar Wax
Ingredients:
- 2 cups white sugar
- 1/4 cup lemon juice
- 1/4 cup water
Directions:
- Add the sugar, lemon juice, and water to a saucepan.
- Heat gently over medium heat, stirring until the sugar dissolves.
- Let it bubble until the mixture turns amber.
- Remove it from the heat and transfer it carefully to a heat-safe container.
- Let it cool completely before testing it on your skin.
Texture check: If the mixture is too runny, it may need a little more cooking time next round. If it sets like a jawbreaker, it cooked too long. Homemade sugar wax is basically skincare with a tiny side hustle in chemistry.
Recipe #2: Honey Sugar Wax
Ingredients:
- 1 cup white sugar
- 1/4 cup honey
- 1 tablespoon lemon juice
Directions:
- Combine the ingredients in a heat-safe bowl or saucepan.
- Warm the mixture gradually until it blends into a thick paste.
- Stir well and let it cool completely.
- Patch-test a small area before using it more broadly.
This variation is often a bit softer and can feel easier for beginners who struggle with a batch that sets too firm. Still, the same rule applies: if it feels too hot for the inside of your wrist, it is too hot for your legs, underarms, or face.
How to Use Homemade Wax Safely
Step 1: Let the Hair Grow a Bit
Hair should not be super short. A good rule of thumb is to wait until it is around 1/4 inch long. If the hair is too short, the wax may not grip well. If it is too long, the process can feel rougher and messier.
Step 2: Exfoliate the Day Before
Gently exfoliate one day before waxing, not five minutes before. This helps remove dead skin cells and may lower your chance of ingrown hairs. Use a gentle scrub, washcloth, or exfoliating mitt. The keyword here is gently. You are prepping the runway, not sanding a deck.
Step 3: Clean and Dry the Skin
Wash the area with mild soap and warm water, then dry it thoroughly. Sugaring works best on clean, dry skin. A very light dusting of powder can help absorb excess moisture if your skin is damp.
Step 4: Test the Temperature
Always test a tiny amount on the inside of your wrist first. Homemade wax should feel warm or room temperature, never hot enough to sting. If the paste feels suspiciously lava-adjacent, back away and wait.
Step 5: Apply and Remove Properly
Take a small amount of paste and spread it against the direction of hair growth. Hold the skin taut, then remove the paste in the direction of hair growth with a quick motion. If you are brand-new to sugaring, start on legs or arms before trying sensitive areas.
Step 6: Rinse and Soothe
Because sugar wax is water-soluble, you can rinse away any leftover stickiness with warm water. Follow with a simple, fragrance-free moisturizer or soothing gel if your skin tolerates it well.
Best Tips for Better Results
Start with easy areas
Legs are usually more beginner-friendly than underarms or the face. Sensitive skin areas are less forgiving and more likely to complain loudly.
Work in small sections
Trying to wax half your leg in one heroic swipe is how people end up questioning every life choice that led them there. Small sections give you more control and cleaner results.
Keep the skin taut
This helps the paste remove hair more efficiently and can make the process feel less harsh.
Do not keep going over the same spot
Repeated passes can irritate the skin, even with sugar wax. If a few hairs remain, trim expectations before you trim your patience.
Patch-test first
If you have sensitive skin, patch-test a small area 24 hours ahead of time. This is especially smart if you are using lemon juice or trying a new recipe.
Skip DIY waxing on compromised skin
Avoid waxing over cuts, active rashes, sunburn, peeling skin, or areas that feel extra sensitive. If you use strong acne treatments, retinoids, or have taken isotretinoin recently, it is better to skip at-home waxing and check with a dermatologist.
Common Homemade Wax Problems and How to Fix Them
The wax is too hard
You probably cooked it too long. Next time, stop heating sooner. For the current batch, a tiny amount of warm water and gentle reheating may soften it, but do not overdo it.
The wax is too runny
It likely needs more cooking time. Sugaring paste thickens as it cools, so wait first before declaring it a total failure. Your wax may simply be having a dramatic phase.
It will not grab the hair
Your skin may be too damp, oily, or recently moisturized. Clean and dry the area again, dust lightly with powder, and make sure the hair is long enough.
The paste sticks everywhere
That usually means the mixture is too warm or too soft. Let it cool more. The good news is that sugar wax rinses away with water, unlike traditional wax, which often behaves like it has squatters’ rights.
You got redness or bumps
Mild redness right after waxing is common. What you do next matters: avoid scratching, avoid picking at bumps, and do not immediately re-wax the same irritated area.
Aftercare: What to Do After Sugaring
Post-wax care is where a lot of people get lazy, and then suddenly wonder why smooth skin turned into tiny protest bumps. A little aftercare goes a long way.
Aftercare basics:
- Rinse away residue with warm water.
- Use a gentle, fragrance-free moisturizer if your skin likes it.
- Wear loose clothing if the area feels irritated.
- Avoid scratching or picking at bumps.
- Resume gentle exfoliation later, not immediately, to help prevent ingrown hairs.
If you develop an ingrown hair, a warm compress and gentle exfoliation later on may help. If the area becomes increasingly painful, swollen, or looks infected, stop the DIY experiments and get medical advice.
When Homemade Wax Is a Bad Idea
DIY sugar wax is not for everyone, and that is perfectly fine. Sometimes the smartest beauty move is knowing when to let a pro handle it.
Skip homemade wax if:
- Your skin is sunburned, broken, or actively irritated.
- You are using strong acne medications or topical retinoids on the area.
- You have very reactive skin and do not tolerate exfoliation well.
- You are planning to wax a very sensitive or hard-to-reach area by yourself.
- You have a skin condition that tends to flare with friction or hair removal.
If your skin gets angry with almost everything, homemade wax may not be your soulmate. A dermatologist or experienced esthetician can help you figure out whether sugaring, shaving, laser hair removal, or something else is a better fit.
Homemade Wax vs. Store-Bought Wax
Homemade sugar wax has some obvious advantages: it is affordable, easy to rinse off, and made from simple ingredients. It also tends to be less messy than classic wax once you understand the texture. On the other hand, store-bought wax kits can be more predictable, especially for beginners who do not want to play “is this caramel done yet?” on a Tuesday night.
If you want the cheapest, simplest route and do not mind a learning curve, homemade wax can be a solid option. If you want convenience and consistency, a ready-made product or a professional appointment may save time, stress, and some very creative vocabulary.
Final Thoughts
Homemade wax for hair removal can absolutely work, especially if what you really want is a basic sugar wax recipe made from ingredients already hanging out in your kitchen. It is inexpensive, relatively easy to clean up, and can leave skin smooth for weeks. But technique matters. So does patience. So does not putting hot syrup directly on your body like you are glazing a donut.
The best DIY wax routine is the one that keeps your skin calm: use simple ingredients, let the mixture cool, prep the skin properly, start with an easy area, and do not try to win a speed record. Smooth skin is nice. Smooth skin without burns, bumps, or regret is nicer.
Experience Corner: What Homemade Wax Actually Feels Like in Real Life
The funny thing about homemade sugar wax is that everyone imagines the same dreamy scenario at first. You picture yourself in a fluffy robe, stirring a tiny saucepan like a kitchen witch with excellent skincare, then emerging twenty minutes later with smooth legs and a powerful sense of personal achievement. Real life is usually a little less cinematic and a little more “why is there sugar on the bathroom doorknob?”
For a lot of beginners, the first experience starts with surprise. Surprise at how quickly the mixture changes in the pan. Surprise at how important cooling time is. Surprise at the fact that the paste can go from “perfect” to “glass sculpture” with one distracted minute. And then there is the second surprise: once the texture is right, the method can actually work really well.
One common beginner experience goes like this: the first section is awkward, the second section is better, and by the third section you suddenly understand why people swear by sugaring. The paste starts to make sense in your hands. You learn how much pressure is enough, how small a section should be, and why holding the skin taut is not just a cute suggestion. There is a learning curve, but it is not impossible. It is more like learning to make pancakes. The first one is weird. The second is acceptable. The third makes you irrationally confident.
Another thing people notice is that homemade wax feels less scary when they start on their legs or arms. These areas are more forgiving. You can slow down, test the texture, rinse off mistakes, and regroup. That first successful pull can feel absurdly satisfying. Not because it is glamorous, but because you made something in your kitchen and it actually did the job. It is the beauty version of assembling furniture without swearing at the instructions.
Of course, not every experience is magical. Some people realize their skin hates lemon. Some discover that they exfoliated too aggressively the day before and now their skin feels dramatic. Others find out that homemade waxing right before a beach day, gym class, or sweaty afternoon was not their strongest scheduling choice. And nearly everyone who tries it at least once learns the golden rule: never rush the cooling step. Hot sugar does not care about your plans.
The more positive experiences usually come from small, sensible habits: patch-testing, starting with a small area, working slowly, and not treating the first attempt like a full-body championship event. People who do well with homemade wax also tend to be realistic. They know that perfect results are not required. A few stray hairs are not a moral failure. Smooth enough is still smooth.
In the long run, the experience of using homemade wax tends to become less about perfection and more about rhythm. You learn when your hair is the right length. You learn what texture your paste should have. You learn what your skin tolerates and what it absolutely does not. That trial-and-error process is part of the topic, and honestly, part of the appeal. Homemade wax is not just a recipe. It is a skill. A sticky one, yes, but still a skill.
So if your first attempt is messy, do not panic. Most DIY beauty routines have an awkward first date phase. With care, patience, and a little humor, homemade sugar wax can go from “what have I done?” to “okay, that was actually worth it.”