Table of Contents >> Show >> Hide
- Why Thrift Store Finds Make the Best Christmas Gnome Garland
- What to Look for at the Thrift Store
- Supplies You Will Need
- Choose Your Garland Style Before You Start
- How to Make DIY Christmas Gnome Garland Made From Thrift Store Finds
- Easy Ways to Make Your Garland Look More Expensive
- Where to Hang a DIY Christmas Gnome Garland
- Common Mistakes to Avoid
- Experience: What Making a Thrifted Christmas Gnome Garland Is Really Like
- Final Thoughts
- SEO Tags
If Christmas decorating had a mascot for “adorably chaotic but deeply charming,” it would absolutely be the gnome. Not the scary garden kind that looks like it knows your secrets. I mean the cozy holiday gnome: pointy hat, fuzzy beard, round nose, zero visible eyes, suspiciously high cuteness levels. Now turn a whole crowd of those little guys into a garland made from thrift store finds, and suddenly your mantel, bookshelf, or staircase looks like it belongs in a festive cottage where cookies appear without warning.
This DIY Christmas gnome garland is the kind of project that checks every holiday box. It is budget-friendly, beginner-friendly, delightfully imperfect, and full of personality. Better yet, it gives thrifted materials a second life. Old sweaters become hats. Faux fur trims become beards. Wooden beads, fabric scraps, ribbon, twine, bells, and random baggies of “I have no idea what this was for” become Christmas magic.
If you have ever wandered through a thrift store holding a plaid scarf in one hand and a bag of mystery pompoms in the other, wondering whether you were a creative genius or simply unsupervised, good news: this project says you are both. Here is how to make a DIY Christmas gnome garland from thrift store finds that looks charming, lasts through the season, and costs far less than the fancy boutique version pretending it was handcrafted by woodland elves with a design degree.
Why Thrift Store Finds Make the Best Christmas Gnome Garland
There is something extra cozy about holiday decor that looks collected instead of factory-perfect. A thrifted garland has texture, history, and a little bit of “I found this treasure next to a ceramic duck and a bread maker.” That is part of the charm.
Using thrift store finds for a Christmas gnome garland also makes the project more affordable. You can often find old knitwear, felted wool, faux fur trim, holiday ribbon, wooden beads, ornaments, bells, and even embroidery floss for a fraction of craft-store prices. If you score a bag of mixed holiday supplies, congratulations, you have officially entered the elite tier of thrifting known as “craft goblin victory.”
It is also a smart way to create a layered, collected holiday look. New materials can sometimes feel too matched. Thrifted materials naturally mix textures and shades, which gives your garland more depth. A slightly faded red ribbon, a chunky cream sweater, and a handful of unfinished wood beads can create that warm handmade style people usually describe with phrases like “Scandinavian-inspired,” “rustic modern,” or “I paid too much for this in a boutique downtown.”
What to Look for at the Thrift Store
You do not need a strict shopping list, but it helps to know what kinds of secondhand materials work best for a gnome garland. The secret is to hunt for lightweight items that can be cut, glued, tied, or strung without a full engineering team.
Best thrift store finds for this project
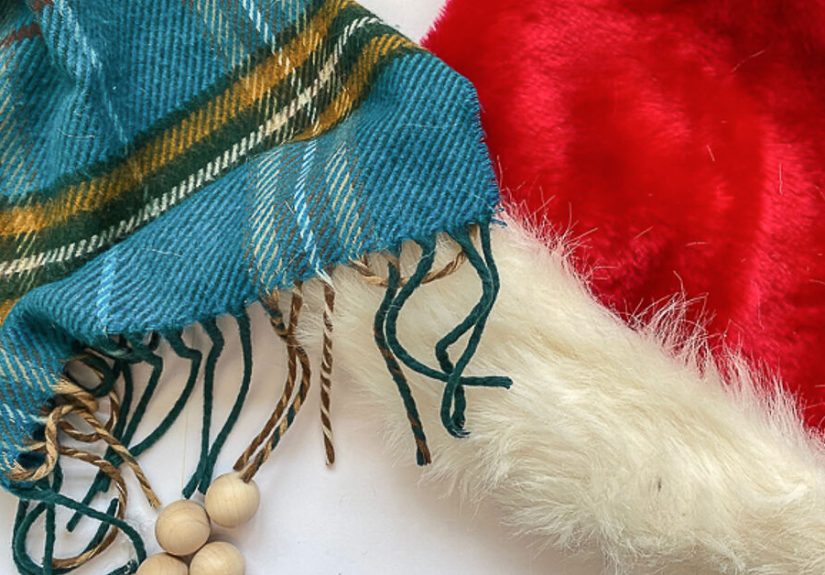
- Old sweaters, scarves, flannel shirts, or knit hats for gnome hats
- Faux fur trim, fuzzy collars, old stockings, or fluffy fabric for beards
- Wooden beads or old bead strands for noses and spacers
- Ribbon, twine, yarn, or thin cording for the garland base
- Small jingle bells, mini ornaments, pom-poms, or tassels for accents
- Holiday fabric scraps for extra texture and color
- Mini clothespins, buttons, or trim if you want more detail
Stick with fabrics that feel soft and flexible. Thick upholstery fabric may look promising, but it can become bulky fast. Lightweight wool blends, felted knits, flannel, fleece, and faux fur are much easier to work with. Also, choose decorations that are not too heavy. Your garland should drape gracefully, not sag like it had a rough December.
Supplies You Will Need
You can customize the exact materials, but here is a reliable setup for a garland that looks polished without becoming precious about it.
- Thrifted fabric for hats
- Thrifted faux fur or fuzzy fabric for beards
- Wooden beads, felt balls, or small pom-poms for noses
- Jute twine, cotton cording, ribbon, or yarn for the garland base
- Scissors
- Hot glue gun and glue sticks
- Fabric glue or needle and thread for optional reinforcement
- Cardboard or scrap paper for making a template
- Mini bells, ribbon scraps, greenery bits, or wood beads for optional accents
If you want your gnomes to look more uniform, make a paper template first. If you want them to look a little quirky and handmade, freehand it. Holiday gnomes do not submit to perfectionism, and frankly, I respect that about them.
Choose Your Garland Style Before You Start
Before cutting anything, decide what kind of garland you want. This will help you shop more intentionally and keep the finished piece looking cohesive.
Classic Nordic style
Use neutral sweaters, cream faux fur, unfinished wood beads, and jute twine. This style looks calm, minimal, and expensive in a “quiet luxury but for elves” kind of way.
Traditional Christmas style
Use red, green, white, and plaid fabrics. Add bells, ribbon, and mini greenery. This version feels cheerful, nostalgic, and ready to sit next to a mug of cocoa.
Vintage thrifted style
Mix old floral fabric, faded velvet ribbon, mismatched buttons, and antique-looking trims. This style leans into the beauty of secondhand materials and looks wonderfully collected over time.
Playful colorful style
Use bright felt, pom-poms, striped socks, and bold patterned scraps. This version is excellent for kids’ rooms, playful mantels, or homes that believe beige is merely a suggestion.
How to Make DIY Christmas Gnome Garland Made From Thrift Store Finds
Step 1: Prep and sort your thrifted materials
Wash or lightly clean any fabrics first. You do not need to treat this like a museum restoration, but a quick refresh helps. Then lay out your finds and group them by color, texture, and possible use. Put all your beard options together, your hat fabrics together, and your trim or bead options together.
This is where the design starts making sense. You may discover that the red plaid scarf works beautifully with the ivory faux fur, while the green sweater sleeve would make excellent hats. Or you may realize your “faux fur” is actually a very committed bathroom mat. Either way, useful information.
Step 2: Make a simple gnome template
Cut a triangle template for hats out of cardboard or paper. Most garland gnomes look best when they are about 4 to 6 inches tall, depending on where you plan to hang them. For each gnome, you will need a triangle hat and a rounded or slightly pointed beard shape.
If you want a fuller gnome, cut a wider beard. If you want a slim modern look, keep it narrow. The hat should overlap the top of the beard just enough to create that classic “nose peeking out from under a floppy hat” look.
Step 3: Cut the hats and beards
Use your thrifted sweater, scarf, flannel, or felted fabric to cut triangles for the hats. Then cut the beards from faux fur or fuzzy fabric. When cutting faux fur, trim only the backing if possible instead of slicing straight through the fur fibers. This keeps the beard edges looking soft rather than blunt.
You can keep all the hats the same or alternate patterns and colors for more personality. A repeating sequence often works well, such as plaid, solid, stripe, plaid, solid, stripe. That gives the garland rhythm without making it look rigid.
Step 4: Add the noses
Glue a wooden bead, felt ball, or pom-pom near the top center of the beard. Then place the hat over the bead so the nose peeks out from beneath the brim. That little hidden-eye, round-nose situation is what makes a gnome instantly recognizable and ridiculously cute.
If your bead has a hole and you want a cleaner look, position the hole sideways or downward. Nobody wants a gnome nose that looks like it is also a whistle.
Step 5: Shape and secure the hats
Fold or slightly roll the bottom edge of each hat for more dimension. You can let some hats droop to one side for a whimsical effect. Use hot glue to secure the hat to the beard. For extra durability, especially if you plan to store and reuse the garland every year, add a couple of hand stitches or a dab of fabric glue at key stress points.
This is also the moment to add tiny embellishments if you want them: a jingle bell at the tip of the hat, a mini pom-pom trim, a velvet ribbon bow, or a small faux greenery sprig. Do not overdo it. One or two details per gnome is charming. Seven details per gnome is a cry for help.
Step 6: Plan the spacing on your garland base
Lay out your twine, ribbon, or cording on a table and arrange the gnomes before attaching anything. Add wood beads, knots, felt balls, tassels, or mini bells between them if you want more visual movement. This is the easiest way to test balance before glue gets involved and starts making permanent decisions on your behalf.
Most garlands look good with 4 to 8 inches of space between each gnome, depending on size. If you want a fuller, more decorative look, shorten the spacing and add accents. If you want a cleaner look, leave more breathing room.
Step 7: Attach the gnomes to the garland
You have a few options here. You can glue the backs of the gnomes directly onto the twine, stitch small loops onto the backs and slide them onto the cord, or use tiny clothespins for a removable design. Direct glue is easiest. Loops are the most durable and easiest to adjust later.
If you are using wood beads in between, thread them onto the twine first. Then add knots on either side of each bead cluster to keep everything from migrating into one sad little crowd at the center of the garland.
Step 8: Hang and fluff
Once assembled, hang the garland and make small adjustments. Fluff the beards, angle the hats, straighten the spacing, and trim any wild threads. Tiny finishing touches make a huge difference. Your goal is “cozy handmade charm,” not “craft supplies survived a windstorm.”
Easy Ways to Make Your Garland Look More Expensive
A DIY garland can absolutely look elevated, even if it was born from a thrifted sweater sleeve and sheer determination. The trick is using repetition, texture, and restraint.
- Repeat two or three colors throughout the whole design
- Mix matte textures like felt or knit with one shiny detail like bells or metallic thread
- Use wood beads or simple knots to create clean spacing
- Keep the gnome shapes similar, even if the fabrics vary
- Add one natural element, such as faux greenery, dried orange slices, or pinecones nearby when styling
In other words, let the thrifted variety feel intentional. “Collected” is lovely. “Random craft avalanche” is less lovely.
Where to Hang a DIY Christmas Gnome Garland
This is not just a mantel project, although it looks terrific there. A handmade gnome garland works almost anywhere you need a little holiday softness and whimsy.
- Across a fireplace mantel
- Along a staircase railing
- Over a bookshelf or open shelving
- Across a window frame
- On an entryway console
- Around a Christmas tree as a tree garland
- Across a child’s bed or playroom shelf for a festive touch
If you hang it on a tree, keep the gnomes lightweight and use a thinner cord. If you hang it across a mantel, you can go fuller and add beads or mini ornaments between the gnomes.
Common Mistakes to Avoid
Using materials that are too heavy
Heavy beads, chunky trims, or thick fabric can pull the garland down and distort the shape. Lightweight materials almost always work better.
Skipping the layout step
Do not attach everything as you go unless you enjoy discovering that all your best fabrics ended up clumped on one side.
Making the noses too small
The nose is the whole gnome plot twist. If it disappears, the design loses its signature look.
Over-decorating each gnome
One trim or accent is charming. Too many accents can make the garland look busy and less cohesive.
Forgetting storage
If you want to reuse the garland next year, store it flat or loosely wrapped in tissue paper. Do not cram it into a box where the beards will emerge looking like they lost an argument.
Experience: What Making a Thrifted Christmas Gnome Garland Is Really Like
The best part of making a DIY Christmas gnome garland from thrift store finds is that the project feels different from buying decor. It becomes part craft, part treasure hunt, part holiday memory. You are not just gluing fabric together. You are building a tiny lineup of weirdly lovable winter roommates.
The thrifting part is half the fun. You start with a loose idea, maybe “I need a red scarf and some fuzzy trim,” and fifteen minutes later you are holding a bag of wooden beads, an old wool sweater, and a ribbon spool from 2004 that somehow still looks perfect. Every find starts giving you ideas. A plaid shirt sleeve becomes three gnome hats. A faux fur collar becomes a whole choir of beards. A broken bead necklace becomes the cutest spacer detail on the garland. The project rewards imagination more than perfection, and that is honestly refreshing during a season that can get a little too polished.
There is also something deeply satisfying about the way thrifted materials naturally create character. New craft supplies tend to match exactly, which can be beautiful, but secondhand finds have more personality. One red is darker, one cream is warmer, one knit is chunkier, and suddenly the garland looks layered and lived-in. It has that collected-over-time charm that people try very hard to fake in catalogs.
Another thing you notice while making it: holiday crafts go much more smoothly when you let them be a little quirky. Maybe one gnome hat flops farther to the side. Maybe one beard is extra fluffy and makes the others look like they need beard conditioner. Maybe one wooden bead is slightly larger and gives that gnome main-character energy. Good. That is the magic. A handmade garland should not look cloned in a laboratory. It should look like it came together with warmth, humor, and maybe one or two moments where hot glue tried to claim your fingerprints.
If you make the garland with family or friends, it becomes even better. People start picking favorite gnomes. Someone insists the plaid one looks like an uncle. Someone else adds bells to every hat because apparently subtlety left the building. You end up laughing, snipping threads, moving beads around, and drinking something warm while the room slowly gets more festive. It is not just a decoration at that point. It is part of the holiday atmosphere.
And then comes the best moment: hanging it up. A project that looked like random scraps on the table suddenly becomes a finished holiday piece with charm, texture, and a surprising amount of style. Across a mantel, it softens the whole room. On a bookshelf, it makes the space feel intentionally seasonal. On a tree, it adds that handmade layer that makes everything feel more personal. You see the sweater sleeve, the thrifted ribbon, the little wood beads, and you remember exactly where they came from.
That is why this kind of Christmas decor sticks. It is inexpensive, yes. It is cute, definitely. But it also carries the story of how it was made. And in a season built around nostalgia, generosity, and home, that story matters. Your thrifted Christmas gnome garland is not just another decoration pulled from a box. It is the holiday craft that earned its place.
Final Thoughts
If you want a Christmas craft that is affordable, charming, and full of personality, a DIY Christmas gnome garland made from thrift store finds is hard to beat. It turns secondhand materials into something cheerful and custom, and it proves that great holiday decor does not need to be expensive to be memorable.
Use what you find. Let the textures mix. Keep the shapes simple. Add a little humor, a little imperfection, and a lot of cozy detail. The end result will feel more original than anything mass-produced, and every tiny gnome will look like it showed up ready to spread holiday cheer and mild mischief.
In other words, this is not just a garland. It is festive proof that thrift stores are basically Santa’s workshop for people with glue guns.