Table of Contents >> Show >> Hide
- Why Homeowners Love Pedestal Sinks
- What You Need Before You Start
- How to Install a Pedestal Sink in 12 Steps
- Step 1: Read the Sink’s Spec Sheet Like It Owes You Money
- Step 2: Shut Off Water and Empty the Area
- Step 3: Remove the Old Vanity and Sink
- Step 4: Check the Rough Plumbing
- Step 5: Add Blocking or Reinforcement in the Wall
- Step 6: Repair and Finish the Wall and Floor
- Step 7: Dry-Fit the Sink and Mark Centerlines
- Step 8: Drill the Mounting Holes and Install Hardware
- Step 9: Assemble the Faucet and Drain on the Sink
- Step 10: Set the Basin and Pedestal in Place
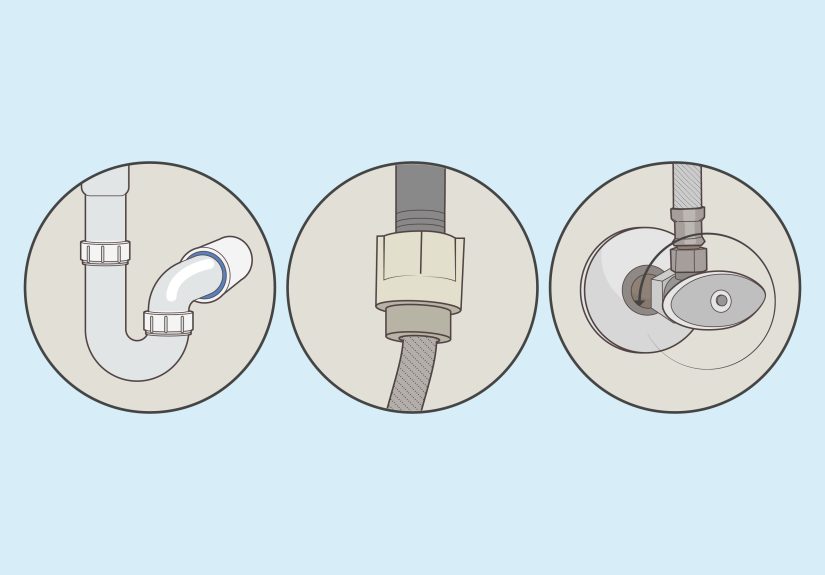
- Step 11: Connect the Trap and Water Supply Lines
- Step 12: Test for Leaks, Caulk, and Finish the Look
- Common Mistakes to Avoid
- Pro Tips for a Better-Looking Install
- Experience and Lessons From Real Pedestal Sink Projects
- Final Thoughts
A pedestal sink has a special talent: it can make a cramped bathroom feel less like a closet with plumbing and more like an actual room. That is why homeowners keep coming back to it. The look is classic, the footprint is small, and the whole setup has a clean, almost sculptural vibe. The trade-off, of course, is that a pedestal sink gives you style instead of storage. In other words, it is gorgeous, but it is not holding your twelve backup toothpaste tubes.
Still, if you are remodeling a powder room or upgrading a tiny bath, installing a pedestal sink can be a smart move. The job is not impossible for a careful DIYer, but it does demand good measurements, patience, and respect for porcelain, which looks tough but can chip if you treat it like a bowling ball. The trick is to get the rough plumbing, wall support, and sink alignment working together. Once those pieces cooperate, the rest of the project gets much less dramatic.
This guide breaks the process into 12 simple steps, with practical advice, real-world cautions, and a few lessons learned the hard way by people who have already crawled around a bathroom floor asking, “Why did I think this would only take an hour?” Let’s make sure your install goes better than that.
Why Homeowners Love Pedestal Sinks
Pedestal sinks are popular for small bathrooms because they open up visual space and floor area. Without a bulky vanity cabinet, the room feels lighter and less crowded. That makes them especially useful in guest baths, half baths, and older homes where every inch matters. They also work well in traditional, transitional, and even modern bathrooms, depending on the shape of the basin and pedestal.
But before you fall in love with the elegant silhouette, remember the practical side. A pedestal sink usually exposes more of the plumbing than a vanity sink, and that means sloppy rough-in work becomes part of the decor. Charming. So the best installs start long before the sink touches the wall.
What You Need Before You Start
Most pedestal sink projects require a sink and pedestal set, faucet, drain assembly, shutoff valves, supply lines, P-trap, fasteners or hanger bolts, drill and bits, adjustable wrench, channel-lock pliers, level, tape measure, stud finder, utility knife, bucket, safety glasses, and caulk. Some models also need wall blocking or a mounting bracket. Always check the manufacturer’s instructions before buying hardware because the exact mounting method can vary by model.
One more thing: if your old vanity hid ugly plumbing sins, your new pedestal sink will not be nearly as forgiving. If supply lines are crooked, spaced badly, or sticking out like elbows in a crowded elevator, this is the time to fix them.
How to Install a Pedestal Sink in 12 Steps
Step 1: Read the Sink’s Spec Sheet Like It Owes You Money
Before demo starts, check the installation guide and rough-in sheet for your exact pedestal sink. This matters because different models place mounting holes, drain openings, supply lines, and pedestal clearances in different spots. Some need a wall bracket. Some need blocking behind the wall. Some are more forgiving than others, and some are divas. Measure your bathroom and compare it to the manufacturer’s dimensions before you touch a wrench.
Step 2: Shut Off Water and Empty the Area
Turn off the sink’s shutoff valves or the home’s main water supply if there are no local stops. Open the faucet to relieve pressure, then place a bucket under the trap and disconnect the drain and supply lines. Remove everything around the vanity area so you are not working around rugs, baskets, or random bathroom clutter that somehow multiplies when no one is looking.
Step 3: Remove the Old Vanity and Sink
Cut through any caulk along the backsplash and countertop. Disconnect the old vanity top, remove wall screws, and pull the cabinet out carefully. Do not be surprised if the wall behind it looks rough or if the floor color changes where the vanity used to sit. Vanities are excellent at hiding cosmetic crimes. Plan for patching, painting, or small flooring repairs before the new sink goes in.
Step 4: Check the Rough Plumbing
Now is the moment of truth. Dry-fit the pedestal and basin near the wall and see how the existing drain and supply lines line up. In a good install, the drain sits where the sink wants it, and the hot and cold supplies are level, evenly spaced, and positioned so they can hide neatly behind the pedestal. If your plumbing is off, correct it now. This is often the difference between a polished result and a bathroom that looks like it lost a fight with chrome tubing.
Step 5: Add Blocking or Reinforcement in the Wall
Many pedestal sinks need solid framing support behind the finished wall. That can mean installing a 2×6 or 2×8 brace between studs, depending on the model and instructions. Cut open the wall as needed, install the reinforcement flush where the anchor screws or bracket will land, and make sure everything is level. The pedestal helps support the basin, but the wall connection keeps the sink from shifting, loosening, or behaving in ways that make plumbers sigh deeply.
Step 6: Repair and Finish the Wall and Floor
Patch the drywall, sand the repair, and finish any painting or tile work before installation. This step is easy to underestimate because it feels like a side quest. It is not. Once the sink is installed, repainting behind it is annoying and patching around it is worse. If the old vanity left unfinished flooring, fix that too. Your pedestal sink may be elegant, but it cannot distract from a missing rectangle of vinyl flooring forever.
Step 7: Dry-Fit the Sink and Mark Centerlines
Place the pedestal near the wall, set the basin on top, and move the whole assembly into position. Use a level to check the sink front to back and side to side. Mark the centerline on the wall and floor, then mark the mounting-hole locations on the wall and any pedestal anchor point on the floor if your model uses one. A careful dry fit saves you from drilling twice, and drilling twice is how a “simple Saturday project” becomes a long conversation with spackle.
Step 8: Drill the Mounting Holes and Install Hardware
Move the sink out of the way and drill pilot holes at the marked spots. Install the bracket, hanger bolts, or anchor screws according to the manufacturer’s instructions. Do not guess on this part. Mounting hardware is not decorative. It is the difference between “securely installed” and “surprisingly mobile.” If the wall is hollow and the manufacturer offers a mounting kit, use the right kit instead of improvising with mystery fasteners from a coffee can in the garage.
Step 9: Assemble the Faucet and Drain on the Sink
It is usually much easier to install the faucet, pop-up drain, and sometimes even the supply lines while the sink is still off the wall. Apply sealing putty or the gasket specified for the drain, tighten connections evenly, and wipe away excess. Be careful not to overtighten anything on porcelain or decorative finishes. This is one of those jobs where “a little snug” is professional and “just one more turn” is how people end up shopping for replacement parts online at midnight.
Step 10: Set the Basin and Pedestal in Place
Guide the basin onto the wall-mounted hardware and align it with the pedestal. Depending on the model, you may set the basin first and slide the pedestal under it, or position both together during installation. Either way, work slowly and use a helper if the basin is large or heavy. Once aligned, add washers and nuts and tighten by hand first. Confirm the sink is level before final tightening. If the pedestal sits unevenly on the floor, use manufacturer-approved pads or adjustments rather than forcing the sink to compensate.
Step 11: Connect the Trap and Water Supply Lines
Attach the P-trap to the drain tailpiece and wall drain, then connect the hot and cold supply lines from the faucet to the shutoff valves. Hand-tighten first, then snug the fittings with a wrench. In some cases, you may need to trim the tailpiece or trap arm for proper alignment. Keep everything neat and centered because exposed plumbing is part of the visual package. Flexible lines work, but in a visible setup, rigid chrome supplies often look cleaner and more intentional.
Step 12: Test for Leaks, Caulk, and Finish the Look
Turn the water back on slowly and check every connection. Run hot and cold water, fill the basin, and drain it while inspecting the trap, supply lines, and drain seal. Once you are confident everything is watertight, apply a neat bead of caulk where the sink meets the wall if recommended by the manufacturer. Clean the porcelain, polish the faucet, and step back for the satisfying reveal. Congratulations: your small bathroom now looks bigger, classier, and significantly less vanilla.
Common Mistakes to Avoid
Skipping wall support: This is the big one. A pedestal sink should not rely on hope and drywall alone.
Ignoring the spec sheet: Rough-in dimensions vary. “Close enough” is not a plumbing strategy.
Overtightening fasteners: Porcelain can crack, and once it cracks, the mood changes immediately.
Leaving crooked shutoff valves: Exposed plumbing turns small details into big visual distractions.
Forgetting storage: A pedestal sink is lovely, but it will not hold extra towels, cleaners, or your twelve skincare products with very serious names.
Pro Tips for a Better-Looking Install
If you are remodeling from scratch, try to center the drain and keep the hot and cold supplies evenly spaced on either side. That alone makes the finished sink look more deliberate. Install a nearby medicine cabinet or floating shelves before the room starts feeling too minimalist for actual human life. And if the pedestal does not fully hide the plumbing, lean into the look with polished metal traps and clean escutcheons rather than pretending no one will notice.
Also, plan your faucet carefully. Not every faucet works beautifully with every pedestal sink. Some widespread styles need more deck space, and some faucet packages specifically note that they may not suit pedestal installations. Match the faucet hole configuration and physical fit before checkout, not after delivery.
Experience and Lessons From Real Pedestal Sink Projects
The first time most people install a pedestal sink, they expect the hardest part to be hooking up the plumbing. That is only half true. Yes, connecting the drain and supply lines in a narrow space can feel like trying to tie your shoes inside a cereal box. But the real challenge is usually the planning. A pedestal sink rewards accuracy and punishes improvisation. You can get away with minor rough-in flaws when a vanity cabinet hides everything. A pedestal sink, on the other hand, is basically the brutally honest friend of bathroom fixtures.
One common experience is discovering that the old vanity covered a surprising amount of bad decision-making. Maybe the drain is slightly off center. Maybe one shutoff valve sticks out farther than the other. Maybe the wall is less flat than anyone would like to admit. These are not unusual problems. In fact, they are so common that experienced installers often spend more time prepping the wall, fixing the plumbing layout, and adjusting alignment than actually setting the sink.
Another lesson people learn quickly is that dry-fitting is not optional. Setting the pedestal and basin in place before drilling gives you a chance to see how the sink really lands in the room. That is when you notice things like baseboard interference, a pedestal foot that rocks slightly on tile, or faucet connections that will be annoyingly hard to reach once the sink is mounted. Catching those issues early feels boring in the moment, but it saves real frustration later.
There is also the surprisingly emotional phase of tightening things carefully. Pedestal sinks are sturdy in everyday use, but during installation they deserve gentle handling. People who regularly work with wood are often shocked by how little force porcelain wants. The right approach is patient, even pressure, not heroic wrenching. Think “secure and supported,” not “I must defeat this nut with my forearms.”
Then there is the victory moment at the end, which is honestly one of the most satisfying parts of bathroom remodeling. Once the water is back on, the drain is dry, and the sink sits square and level, the whole room changes. It feels taller, cleaner, and more intentional. Even better, the upgrade often makes a tiny half bath look like it got a full design refresh, even if the footprint never changed at all.
If there is one experience shared by nearly everyone who installs a pedestal sink, it is this: the project goes best when you respect the prep. Measure twice. Dry-fit everything. Follow the spec sheet. Add blocking if needed. Keep the plumbing tidy. And know when to call a plumber if moving drain lines or supply lines gets beyond your comfort zone. Do that, and the final result looks less like “weekend experiment” and more like “smart renovation decision,” which is really what most of us are after.
Final Thoughts
Installing a pedestal sink is one of those projects that looks simple from across the room and reveals its personality once you begin. The good news is that it is absolutely manageable when broken into clear steps. Focus on the rough-in, reinforce the wall properly, assemble carefully, and keep everything level and neat. Do that, and you will end up with a sink that saves space, elevates the room, and proves that classic bathroom design is still very much alive.