Table of Contents >> Show >> Hide
- Why MacBook GPU Failure Happens
- What BGA Soldering Actually Means
- The Clever Part: Bypassing the Dead Discrete GPU
- What You Gainand What You Lose
- Diagnosis Comes Before the Soldering Iron
- Reflow, Reball, Replace, or Bypass?
- Tools and Skills Needed for the BGA Soldering Hack
- Why This Hack Matters for Repair Culture
- Specific Example: A Practical Rescue Scenario
- Mistakes to Avoid
- Is This Hack Worth Trying?
- Experience Notes: What This Repair Teaches in the Real World
- Conclusion
- SEO Tags
A dead MacBook GPU usually feels like a tiny funeral with a very expensive aluminum casket. One day your trusty machine is editing photos, compiling code, or keeping seventeen browser tabs alive like a champ. The next day it shows distorted graphics, boots to a gray screen, panics during startup, or acts as if the display cable has joined a silent monastery. For owners of older MacBook Pro modelsespecially the infamous 2011 15-inch and 17-inch machines with discrete AMD Radeon graphicsGPU failure became more than an occasional annoyance. It became a whole personality trait.
But here is the interesting part: a dead discrete GPU does not always mean the entire laptop is dead. Some MacBook Pro models contain both a power-hungry discrete GPU and a lower-power integrated Intel GPU. When the dedicated chip fails, the machine may still have a perfectly usable graphics processor sitting inside the CPU package, waiting like a backup drummer who knows every song. The challenge is forcing the computer to ignore the failed GPU and rely on the integrated one.
That is where the BGA soldering hack enters the story. This is not a “rub toothpaste on the logic board and whisper to Steve Jobs” trick. It is a serious microsoldering workaround involving tiny pads, fine wire, board-level knowledge, and the kind of hand stability usually associated with watchmakers and people defusing movie bombs. Done properly by someone with the right skills, it can revive a MacBook that would otherwise be considered electronic waste. Done badly, it can turn a repairable board into a shiny, expensive coaster.
Why MacBook GPU Failure Happens
Many older MacBook Pro models used two graphics systems: an integrated GPU for lighter tasks and a discrete GPU for heavier work such as video editing, gaming, external displays, and graphics acceleration. The design made sense. Use less power when writing emails, use more power when pushing pixels. Elegant, efficient, and very Appleuntil the dedicated GPU starts throwing tantrums.
GPU failure can be caused by several overlapping problems. Heat cycles expand and contract the logic board and chip package. Lead-free solder joints can become stressed over time. The chip itself may degrade. Dust-clogged fans, dried thermal paste, heavy workloads, and years of thermal abuse can all help the problem along. In the 2011 MacBook Pro line, the AMD Radeon GPU issue became widely known because many machines developed similar symptoms: scrambled video, boot loops, black screens, sudden restarts, or failure to reach the desktop.
The tricky part is that the failure does not always look identical. One MacBook may boot only in Safe Mode. Another may show blue vertical stripes. Another may start normally until macOS loads the graphics driver, then crash spectacularly. The user sees “my screen is broken,” but the board-level reality may be far more specific: the discrete GPU path is failing while other parts of the machine are still alive.
What BGA Soldering Actually Means
BGA stands for Ball Grid Array. Instead of visible metal legs around the sides of a chip, a BGA chip connects to the board through a grid of tiny solder balls hidden underneath the package. This allows dense, high-performance chips like GPUs, CPUs, memory controllers, and system controllers to communicate quickly with the rest of the board. It also makes inspection and repair much harder because the important connections are literally under the chip.
Think of BGA soldering as apartment plumbing in a building with no basement access. Everything important is below the floor, and the only way to see the pipes is with expensive tools, careful inference, or destructive investigation. A proper BGA repair often requires preheating the board, controlling airflow, using flux correctly, lifting the chip without warping the PCB, cleaning pads, reballing the chip, aligning it precisely, and reflowing it under a controlled thermal profile. This is not the same as waving a heat gun around until hope smells like burning flux.
That distinction matters. Many “GPU reflow” fixes temporarily revive dead laptops by heating the chip enough to reconnect cracked solder joints. Sometimes the laptop comes back for a week, a month, or even longer. But a crude reflow often does not solve the root cause. If the GPU die itself is failing, if the package is damaged internally, or if the board has warped, reheating the chip is basically a hardware version of pressing snooze on a fire alarm.
The Clever Part: Bypassing the Dead Discrete GPU
The most interesting MacBook GPU hacks do not try to resurrect the failed Radeon chip forever. Instead, they accept reality and route the machine toward the integrated Intel GPU. On some affected MacBook Pro models, the logic board uses switching circuitry to decide which graphics system drives the display. If the machine insists on using a dead discrete GPU during boot, it crashes before the healthy integrated graphics can save the day.
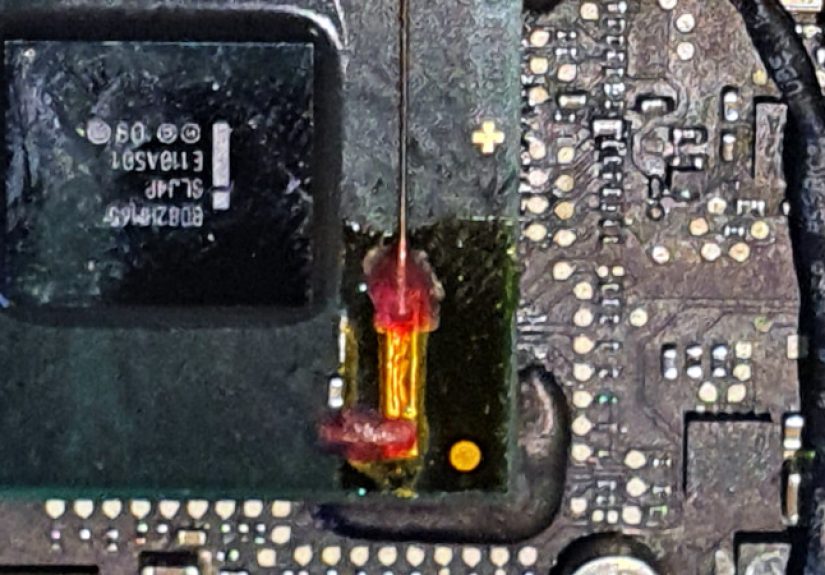
The BGA soldering hack changes that equation. In community-developed versions of this repair, technicians identify a signal path involved in GPU switching and modify the board so the MacBook can operate using the Intel GPU. One version involved soldering a tiny wire to an exposed pad, reinforcing it with copper tape for mechanical support, then routing the wire to another point on the board. Paired with firmware or logic changes, the machine can be revived without replacing the failed GPU.
That is the beautiful engineering lesson: sometimes the winning move is not repairing the broken part. Sometimes it is convincing the system to stop asking the broken part for help. It is less “make the Radeon young again” and more “retire the Radeon, give it a tiny gold watch, and let Intel handle the display.”
What You Gainand What You Lose
A successful integrated-GPU workaround can bring a dead MacBook Pro back to usable life. It may boot normally, run basic productivity software, browse the web, handle writing, manage files, and serve as a secondary computer. For students, tinkerers, repair shops, hobbyists, or anyone who wants to recover data without replacing the entire machine, that is a big win.
However, this hack comes with trade-offs. The integrated Intel GPU is less powerful than the discrete Radeon GPU. Heavy graphics workloads will suffer. Some external display configurations may not work as before. Certain macOS updates may undo software-level changes or reactivate drivers that cause trouble. Depending on the exact method used, features like brightness control may be affected unless the repair includes additional hardware or firmware refinements.
In other words, the repaired MacBook is not transformed into a brand-new workstation. It becomes a rescued machine with limitations. That is still valuable. A laptop that can write papers, run terminal tools, stream media, and access old files beats a laptop that only displays glitch art and despair.
Diagnosis Comes Before the Soldering Iron
Before attempting any BGA soldering hack, confirm that the GPU is actually the problem. A black screen can also come from a failed backlight circuit, bad display cable, damaged LCD, liquid corrosion, RAM issues, power rail failure, bad storage, or even software corruption. Good repair begins with boring discipline, not dramatic heat.
Common symptoms of discrete GPU failure include:
- Distorted or scrambled video during boot
- Blue, pink, or vertical lines on the display
- Unexpected restarts when graphics acceleration loads
- Black screen while the MacBook still chimes or powers on
- Booting successfully only after disabling graphics drivers
- Crashing when using an external display or graphics-heavy app
Basic checks should include testing with an external monitor, resetting NVRAM and SMC where applicable, booting into Safe Mode, running Apple Diagnostics if the machine can reach it, checking whether the Mac has both integrated and discrete graphics, and inspecting the board for corrosion or physical damage. If the laptop contains valuable data, prioritize data recovery before experimenting. A repair attempt should never be the first backup plan. The first backup plan should be an actual backup.
Reflow, Reball, Replace, or Bypass?
When people search for a dead MacBook GPU fix, they often encounter four options: reflow the GPU, reball the GPU, replace the logic board, or bypass the discrete GPU. Each has a different risk profile.
Reflow
Reflow means reheating solder joints until they melt and reconnect. It is the fastest and most tempting option, which is why it appears in so many questionable “bake your laptop” stories. A controlled professional reflow is one thing; putting a logic board in a kitchen oven is another. The kitchen-oven method can damage plastic connectors, cook capacitors, release fumes, warp the board, and make future professional repair harder. Also, your cookies may taste like flux. Nobody wins.
Reball
Reballing means removing the BGA chip, cleaning it, replacing the solder balls, and reinstalling it. This is more advanced and more legitimate than a casual reflow, but it still may not solve the issue if the GPU package or silicon is internally damaged. Reballing requires proper equipment, temperature control, alignment, flux management, and inspection. For a high-value board, it belongs in the hands of someone who has practiced on scrap boardsnot someone whose only qualification is owning a heat gun and confidence.
Logic Board Replacement
Replacing the whole logic board is straightforward in theory but often expensive. On older MacBooks, donor boards may have the same design weakness. On newer models, board replacement can raise data, calibration, Touch ID, and pairing issues. Full replacement may make sense for some users, but it is not always the most economical path.
GPU Bypass Hack
The bypass method is attractive because it avoids pretending the discrete GPU can be made reliable forever. It changes the system behavior so the integrated GPU becomes the primary survivor. This can be the most practical route for a machine that is otherwise healthy but not worth a costly board swap.
Tools and Skills Needed for the BGA Soldering Hack
This is not a beginner soldering project. The work may involve a microscope, fine enameled wire, precision tweezers, quality flux, micro soldering tips, board schematics or boardview knowledge, hot air equipment, Kapton tape, a multimeter, and a steady understanding of signal routing. The wire may be thinner than a human hair, and the target pad may be smaller than your patience after the third failed boot.
Good microsoldering also means good habits. Disconnect the battery. Protect nearby components. Use proper ventilation. Avoid overheating the board. Control electrostatic discharge. Clean flux residue. Secure jumper wires mechanically so they do not tear pads off the board later. Test continuity before reassembly. Then test again, because tiny mistakes enjoy hiding until the bottom case is screwed back on.
The real skill is not only soldering the wire. It is knowing why that wire belongs there, what signal it affects, what the expected voltage or logic state should be, and how the MacBook should behave after the modification. Copying a photo from a forum without understanding the board is a shortcut to sadness.
Why This Hack Matters for Repair Culture
The BGA soldering hack is more than a MacBook trick. It represents a repair mindset: do not throw away complex electronics just because one subsystem failed. Modern laptops are tightly integrated, and manufacturers often encourage board replacement rather than component-level repair. That may be efficient for warranty service, but it can be wasteful when the actual fault is narrow and repairable.
Board-level repair keeps devices in use longer, reduces electronic waste, preserves data, and teaches valuable engineering lessons. It also reminds us that “dead” is not always a diagnosis. Sometimes it is just a challenge with poor documentation.
Of course, repair culture also requires honesty. Not every machine is worth saving. A severely liquid-damaged board with burned internal layers may be beyond practical repair. A laptop with multiple failing subsystems may cost more to revive than replace. And a 2011 MacBook Pro running only on integrated graphics will not compete with a modern Apple silicon MacBook. But usefulness is personal. A restored laptop can become a writing machine, a Linux project box, a music server, a diagnostic station, or a sentimental victory over planned obsolescence.
Specific Example: A Practical Rescue Scenario
Imagine a 2011 15-inch MacBook Pro that powers on, chimes, shows the Apple logo, then freezes with striped graphics. Safe Mode works inconsistently. External display output fails. The owner has old project files on the internal drive and does not want to spend hundreds replacing a board that may fail again.
A technician confirms the machine uses both integrated Intel graphics and a discrete AMD Radeon GPU. The symptoms appear when the system switches to or initializes the discrete GPU. The technician rules out the display assembly, storage, RAM, and backlight. Instead of attempting another temporary GPU reflow, the technician performs an integrated-GPU bypass modification, carefully solders the required jumper, applies the related firmware or software adjustment, and tests the machine under load.
The result is not perfect. Graphics performance drops. Some GPU-heavy tasks are off the table. But the MacBook boots, the display works, files are accessible, and the laptop becomes useful again. For the owner, that is not a downgrade. That is a resurrection with a reasonable haircut.
Mistakes to Avoid
The first mistake is assuming every GPU failure can be repaired with heat. Heat is a tool, not a strategy. The second mistake is skipping diagnosis and attacking the biggest chip on the board because it looks guilty. The third mistake is using too much flux, too much air, too much temperature, or too much force. In microsoldering, “more” often means “congratulations, you now need a donor board.”
Another common mistake is ignoring software. On dual-GPU MacBooks, macOS graphics drivers, NVRAM variables, startup settings, and system updates can affect whether the workaround remains stable. Hardware and software must agree. If the hardware says “use integrated graphics” but the operating system keeps inviting the dead Radeon to the party, the party ends quickly.
Finally, do not forget thermal maintenance. If the machine is revived, clean the fans, replace dried thermal compound, check the heatsink, and monitor temperatures. A rescued MacBook deserves better than being sent straight back into the dust sauna that helped kill it.
Is This Hack Worth Trying?
For most everyday users, the answer is: do not try it yourself unless you already have microsoldering experience. Paying a reputable board-level repair technician may be cheaper than destroying the logic board during a learning adventure. However, for experienced repair hobbyists, electronics students, and technicians, this hack is a fascinating example of practical reverse engineering.
It is worth considering when the MacBook has sentimental value, contains needed data, is otherwise functional, or would be useful even with reduced graphics performance. It is less attractive when the battery is swollen, the keyboard is failing, the display is damaged, the SSD is unreliable, and the owner mainly wants a modern video-editing workstation. Be realistic. A clever hack can defeat one failure, not time itself.
Experience Notes: What This Repair Teaches in the Real World
Working around a dead MacBook GPU teaches patience faster than any motivational poster. The first lesson is that symptoms lie. A user may say, “The screen is dead,” but the board may be booting just fine behind a failed graphics path. Another may say, “It needs a new motherboard,” because that is what a shop told them after a five-minute look. In reality, board-level diagnosis often reveals a more interesting story. Power rails may be present. The CPU may run. The fans may spin normally. The machine may even appear on the network. The dead part is not always the whole computer; sometimes it is one stubborn section holding the rest hostage.
The second lesson is that old hardware can still be worth saving. A revived MacBook may not win benchmark contests, but not every computer needs to be a rocket ship. One repaired machine can become a writing laptop for a student, a garage diagnostic computer, a music library station, or a dedicated terminal for coding practice. The internet loves to call older devices useless, usually while using a brand-new phone to complain about e-waste. Repair gives hardware a second job instead of a landfill appointment.
The third lesson is respect for physical scale. BGA and microsoldering work looks almost magical on video because experts make tiny movements appear casual. In person, those pads are brutally small. A jumper wire that looks neat in a close-up photo may be nearly invisible without magnification. One slip can lift a pad, bridge a component, or damage a trace buried in a multilayer board. This is why practice boards matter. Nobody should learn pad repair for the first time on a beloved MacBook full of family photos.
The fourth lesson is that temporary success is not the same as a repair. A quick reflow that boots once can feel like victory, but reliability is the real test. Can the machine cold boot tomorrow? Can it sleep and wake? Can it run for hours? Can it survive a minor macOS update? A good repair is boring after it is finished. It simply works. If the owner must perform a ritual every morning involving Safe Mode, fan prayers, and holding the laptop at a 37-degree angle, the repair is not done; it is negotiating.
The final lesson is humility. The best technicians know when to stop. Sometimes the right answer is a bypass. Sometimes it is data recovery. Sometimes it is recycling the machine and saving the display, screws, and charger for parts. But when the conditions are right, the BGA soldering hack is deeply satisfying. It turns a “dead GPU” diagnosis into a working computer and proves that clever repair is not just about replacing parts. It is about understanding systems well enough to give them a second chance.
Conclusion
A dead MacBook GPU should not automatically end the story. On certain dual-GPU MacBook Pro models, especially those known for discrete graphics failure, the integrated GPU can offer a practical escape route. The BGA soldering hack is not simple, risk-free, or suitable for beginners, but it is a brilliant example of repair thinking: isolate the failure, understand the board, modify the system intelligently, and keep useful hardware alive.
The big takeaway is simple. Do not confuse a failed GPU with a worthless computer. With proper diagnosis, realistic expectations, and skilled microsoldering, a supposedly dead MacBook can still boot, work, and serve a purpose. It may not be the graphics powerhouse it once was, but it can still be a dependable machine. Sometimes survival is not glamorous. Sometimes it is a tiny wire, a steady hand, and the refusal to let one bad chip win.
Note: This article is for educational and informational purposes. BGA soldering, GPU bypass work, and logic board repair can permanently damage hardware if performed incorrectly. For valuable devices or important data, consult an experienced board-level repair technician before attempting any modification.