Table of Contents >> Show >> Hide
- Why This Classic Soft Pretzel Recipe Works
- Classic Soft Pretzel Ingredients
- How to Make Classic Soft Pretzels
- Tips for the Best Homemade Soft Pretzels
- Classic Soft Pretzel Variations
- What to Serve With Soft Pretzels
- How to Store and Reheat Soft Pretzels
- Common Soft Pretzel Problems and Fixes
- Experience Notes: What Making Classic Soft Pretzels Teaches You
- Conclusion
A classic soft pretzel recipe should do three things very well: give you a chewy golden crust, a soft pull-apart center, and that unmistakable bakery-style flavor that makes everyone suddenly “not hungry” until the tray comes out of the oven. Then, mysteriously, they are all starving.
The good news is that homemade soft pretzels are much easier than they look. They use simple pantry ingredientsflour, yeast, water, a little sugar, salt, butter, and baking sodabut the result feels like something from a stadium stand, mall kiosk, Oktoberfest table, or cozy weekend kitchen. The twisty shape may look fancy, but it is really just a rope of dough doing a little yoga.
This guide walks you through a reliable, beginner-friendly soft pretzel recipe with practical baking analysis, troubleshooting tips, flavor variations, storage advice, and real-life experience notes at the end. Whether you want salty pretzels for game day, buttery pretzels for movie night, or warm pretzels with mustard and cheese dip because dinner needs more joy, this recipe has you covered.
Why This Classic Soft Pretzel Recipe Works
The magic of a soft pretzel comes from contrast. The inside should be tender and bread-like, while the outside should be chewy, shiny, and deeply golden. That signature pretzel crust does not happen by accident. It comes from dipping or briefly boiling the shaped dough in a baking soda bath before baking.
Baking soda makes the water alkaline. That alkaline coating changes how the surface of the dough browns in the oven, helping create the traditional pretzel color, flavor, and chewy skin. Professional bakeries often use food-grade lye for a more intense Bavarian-style crust, but baking soda is safer and easier for home bakers. You still get a beautiful pretzel without needing safety goggles or a chemistry degree.
The Texture Goal
A perfect homemade soft pretzel is not just bread in a knot. It should have a little resistance when you bite into it, then give way to a warm, fluffy interior. The dough needs enough gluten development to create chew, enough fat to keep it tender, and enough salt to make the flavor pop.
The Flavor Goal
Pretzels are simple, so every ingredient matters. Brown sugar or granulated sugar helps feed the yeast and adds subtle sweetness. Butter gives the dough richness. Coarse salt on top provides crunch and balance. The baking soda bath creates the slightly nutty, toasty flavor that makes a pretzel taste like a pretzel instead of a dinner roll wearing a disguise.
Classic Soft Pretzel Ingredients
This recipe makes 8 large soft pretzels. You can also divide the dough into smaller pieces to make pretzel bites, pretzel sticks, or mini pretzels.
For the Pretzel Dough
- 1 1/2 cups warm water, about 105°F to 110°F
- 2 1/4 teaspoons active dry yeast or instant yeast
- 1 tablespoon light brown sugar or granulated sugar
- 1 teaspoon fine salt
- 3 tablespoons unsalted butter, melted and slightly cooled
- 4 to 4 1/2 cups all-purpose flour, plus more for dusting
For the Baking Soda Bath
- 9 cups water
- 1/2 cup baking soda
For Topping
- 1 egg yolk beaten with 1 tablespoon water, optional but recommended for shine
- Coarse pretzel salt, kosher salt, or flaky sea salt
- 2 tablespoons melted butter for brushing after baking, optional
How to Make Classic Soft Pretzels
Step 1: Wake Up the Yeast
In a large mixing bowl, combine warm water, yeast, and sugar. Let the mixture sit for 5 to 10 minutes, until it looks foamy on top. If nothing happens, your yeast may be old or your water may have been too hot or too cold. Yeast is dramatic, but it has standards.
The water should feel warm, not hot. If it feels like a relaxing bath, you are in the right zone. If it feels like something you would use for tea, back away slowly.
Step 2: Mix the Dough
Add the salt and melted butter to the yeast mixture. Stir in 4 cups of flour, one cup at a time, until a soft dough forms. If the dough is extremely sticky, add the remaining flour a few tablespoons at a time.
The dough should be soft and slightly tacky, but not wet. Too much flour can make pretzels dense, so resist the urge to bury the dough in a snowstorm of flour.
Step 3: Knead Until Smooth
Knead the dough by hand on a lightly floured surface for 6 to 8 minutes, or use a stand mixer fitted with a dough hook for about 5 minutes. The dough is ready when it feels smooth, elastic, and springy.
To test it, gently poke the dough. If it slowly bounces back, you are on track. If it slumps like it just heard bad news, knead a little longer.
Step 4: Let the Dough Rise
Place the dough in a lightly greased bowl, cover it with a clean towel or plastic wrap, and let it rise in a warm spot for 45 to 60 minutes, or until it is noticeably puffy and nearly doubled.
A longer rise gives the pretzels more flavor, while a shorter rise gives you pretzels faster. Both paths lead to snacks, so there is no wrong philosophy here.
Step 5: Divide and Shape
Punch down the dough gently, then divide it into 8 equal pieces. Roll each piece into a rope about 24 to 28 inches long. To shape a pretzel, form the rope into a U. Cross the ends over each other once, twist them, then bring the twisted ends down and press them onto the bottom curve of the U.
If your first pretzel looks more like a tangled shoelace, welcome to the club. By the third one, your hands will understand the assignment.
Step 6: Prepare the Baking Soda Bath
Preheat the oven to 425°F. Line two baking sheets with parchment paper and lightly grease the parchment to prevent sticking.
In a large pot, bring 9 cups of water to a boil. Carefully add the baking soda. The mixture may foam quickly, so use a deep pot and add the baking soda slowly. This is not the moment to discover your pot has commitment issues.
Step 7: Dip or Boil the Pretzels
Working with one or two pretzels at a time, lower the shaped dough into the baking soda bath for 20 to 30 seconds. Use a slotted spatula to lift each pretzel out, letting excess water drain off. Place the pretzels on the prepared baking sheets.
Do not skip this step. The baking soda bath is the difference between a classic soft pretzel and a confused breadstick.
Step 8: Add Egg Wash and Salt
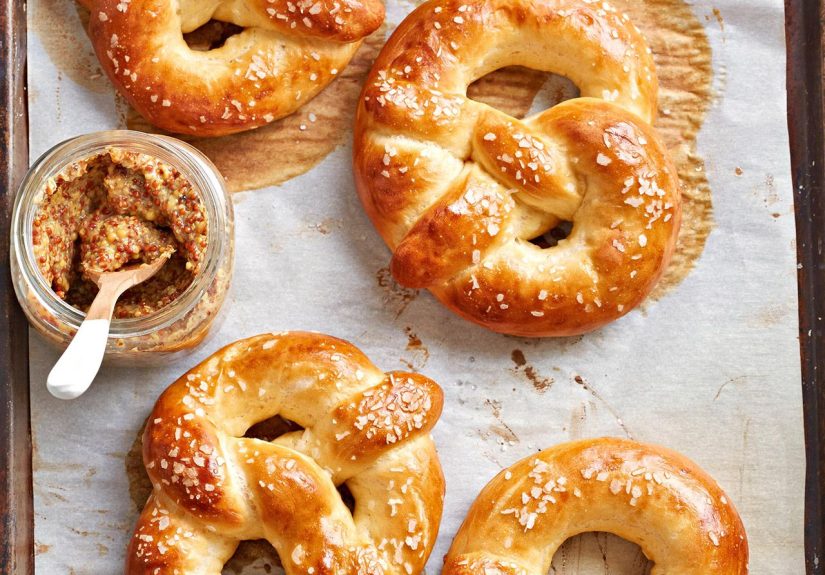
Brush each pretzel with the egg yolk mixture for extra shine and color. Sprinkle generously with coarse salt. If you prefer a lighter salt level, sprinkle with a careful hand. Pretzels should be salty, not a dare.
Step 9: Bake Until Golden
Bake for 12 to 15 minutes, rotating the pans halfway through if needed, until the pretzels are deeply golden brown. The tops should look glossy and the edges should feel firm.
Brush the hot pretzels with melted butter right after baking if you want that classic mall-style finish. Serve warm with mustard, cheese dip, honey mustard, ranch, or cinnamon sugar if you skip the salt.
Tips for the Best Homemade Soft Pretzels
Use the Right Amount of Flour
Flour is the most common place where pretzels go wrong. If you scoop flour directly from the bag, you can accidentally pack in too much. For best results, spoon flour into the measuring cup and level it off. Even better, use a kitchen scale if you have one.
Do Not Over-Boil the Dough
A quick baking soda bath is enough. If the pretzels stay in the water too long, they can taste bitter or develop a thick, tough exterior. Aim for 20 to 30 seconds per pretzel.
Roll Long Ropes
Short ropes make chubby pretzels with tiny holes. That is not a disasterthey will still taste greatbut long ropes create the classic shape and better crust-to-center balance.
Salt Right Before Baking
Add coarse salt after the baking soda bath and before baking, while the surface is still damp or lightly brushed with egg wash. This helps the salt stick.
Classic Soft Pretzel Variations
Garlic Parmesan Pretzels
Brush baked pretzels with melted butter mixed with garlic powder, then sprinkle with grated Parmesan and chopped parsley. These are excellent with marinara sauce and disappear suspiciously fast.
Cinnamon Sugar Pretzels
Skip the coarse salt. After baking, brush pretzels with melted butter and coat them in cinnamon sugar. Serve with cream cheese glaze or vanilla icing for a dessert-style pretzel.
Jalapeño Cheddar Pretzels
Add finely chopped pickled jalapeños and shredded cheddar to the dough during mixing. Keep the pieces small so the dough still rolls smoothly.
Pretzel Bites
Instead of shaping pretzels, cut the dough ropes into 1 1/2-inch pieces. Dip them in the baking soda bath, salt, and bake for 10 to 12 minutes. Pretzel bites are ideal for parties because nobody has to commit to a full pretzel, although everyone will eat six bites and pretend that is different.
What to Serve With Soft Pretzels
Classic soft pretzels love dips. Spicy brown mustard is traditional, sharp, and wonderfully simple. Beer cheese dip is rich and perfect for game day. Honey mustard adds sweetness, while queso brings the snack-table drama.
Pretzels can also become lunch. Slice one horizontally and use it as a sandwich bun for ham, turkey, roast beef, or grilled vegetables. A warm pretzel sandwich with mustard and melted Swiss cheese is the kind of meal that makes leftovers feel like a personal achievement.
How to Store and Reheat Soft Pretzels
Soft pretzels are best the day they are baked, especially while warm. Store leftovers in an airtight container at room temperature for up to 2 days. For longer storage, freeze them in a sealed freezer bag for up to 2 months.
To reheat, warm pretzels in a 300°F oven for 8 to 10 minutes, or until soft and fragrant again. If reheating from frozen, bake at 325°F for 12 to 15 minutes. A microwave works in a hurry, but the oven brings back the best texture.
Common Soft Pretzel Problems and Fixes
My Pretzels Are Pale
Pale pretzels usually need a stronger baking soda bath, a longer bake, or a hotter oven. Make sure the water is boiling and the pretzels are dipped before baking.
My Pretzels Taste Bitter
Too much baking soda residue can cause bitterness. Boil briefly, drain well, and avoid leaving the dough in the bath too long.
My Dough Is Too Sticky
Add flour one tablespoon at a time while kneading. The dough should be tacky but manageable. Sticky dough often becomes wonderfully soft pretzels, so do not panic too early.
My Pretzels Lost Their Shape
Press the ends firmly into the bottom curve after shaping. The baking soda bath also helps set the shape before baking, but loose ends may still pop up like tiny bread antennas.
Experience Notes: What Making Classic Soft Pretzels Teaches You
Making a classic soft pretzel recipe at home is one of those kitchen projects that feels more complicated in your imagination than it does in real life. Before you start, the process sounds like a full baking marathon: yeast, kneading, rising, shaping, boiling, baking. But once you do it, you realize it is really a series of small, friendly steps. It is less “professional bakery challenge” and more “weekend snack with a little personality.”
The first big lesson is that pretzel dough is forgiving. It does not need to be perfect to be delicious. One rope might be thicker on one side. Another might twist awkwardly. A third may look like it is trying to become a pretzel but got distracted halfway through. Bake them anyway. The oven is surprisingly kind, and melted butter covers many artistic disagreements.
The second lesson is that shaping gets easier fast. At first, rolling a rope of dough into a long, even strand can feel like trying to reason with a rubber band. If the dough keeps shrinking back, let it rest for 5 minutes. That short rest relaxes the gluten, making the dough easier to stretch. This one little pause can turn pretzel shaping from mildly annoying to oddly satisfying.
The baking soda bath is the step that makes people nervous, but it is also the step that makes the kitchen smell like a pretzel shop. Use a large pot, add the baking soda slowly, and lower the pretzels gently. Once you see how the dough firms up slightly in the water, the process makes sense. It is like giving each pretzel a quick costume change before the final performance.
Another experience-based tip: do not walk away near the end of baking. Pretzels can go from golden to deeply browned quickly, and that final color matters. A pale pretzel tastes fine, but a rich brown pretzel tastes more authentic. Watch for a glossy, burnished crust. That is your signal.
Fresh pretzels also have a way of gathering people. You can set out cookies and get polite interest. You can set out warm soft pretzels and suddenly everyone appears, asking if “that smell” is what they think it is. Pretzels are casual, nostalgic, and slightly theatrical. They invite dipping, sharing, tearing, and reaching for just one more piece.
The best part is that this recipe improves with repetition. The first batch teaches timing. The second teaches shaping. The third teaches your personal preferences: more salt, more butter, a darker bake, smaller pretzel bites, or a cinnamon sugar finish. Soon, you will not just be following a homemade soft pretzel recipe; you will be making it your own.
Conclusion
This classic soft pretzel recipe proves that bakery-style pretzels are absolutely possible in a home kitchen. With a simple yeasted dough, a quick baking soda bath, coarse salt, and a hot oven, you can make chewy, golden, buttery pretzels that taste fresh, nostalgic, and far better than anything that has been sitting under a heat lamp since noon.
Serve them warm, share them generously, and do not be surprised when the first batch disappears faster than expected. That is not a recipe flaw. That is pretzel success.