Table of Contents >> Show >> Hide
- What “RH Weathered Oak” Really Means (So You Can Copy It on Purpose)
- Start Smart: Choose Your Wood and Your Finish Strategy
- Materials and Tools You’ll Actually Use
- Step-by-Step: The “Gray Wash + Subtle Grain Pop” RH-Style Method
- Step 1: Prep the surface like you mean it
- Step 2: Make sample boards (yes, even if you’re “pretty sure”)
- Step 3: (Optional) Conditioner for tricky woods
- Step 4: Lay down the base “weathered” tone
- Step 5: Fix the undertone (the “orange panic” solution)
- Step 6: Add subtle grain definition (your RH secret sauce)
- Step 7: Seal it with the right sheen (matte is the mood)
- Three Alternative “Recipes” Depending on Your Starting Point
- Troubleshooting: Fixes That Save Projects (and Friendships)
- How to Make It Look “Store-Bought” Instead of “Weekend Experiment”
- Conclusion
- Workshop Notes: Real Experiences Getting the Weathered Oak Look (About )
You know the look: that effortlessly expensive “Restoration Hardware weathered oak” vibesoft gray-brown, a little sun-faded, a little beach-house,
and somehow it makes even a basic table feel like it should come with a free linen shirt and a charcuterie board.
The good news is you can get very close at home. The better news is you don’t need a secret handshake or a warehouse membership.
The trick is understanding what you’re actually seeing: not one magic stain color, but a layered finish that balances warmth and gray,
keeps the grain visible, and ends with a low-sheen topcoat that doesn’t scream “I just refinished this yesterday.”
Let’s build it the way pros do: with samples, smart prep, and a finish recipe you can adjust to your lighting and your oak.
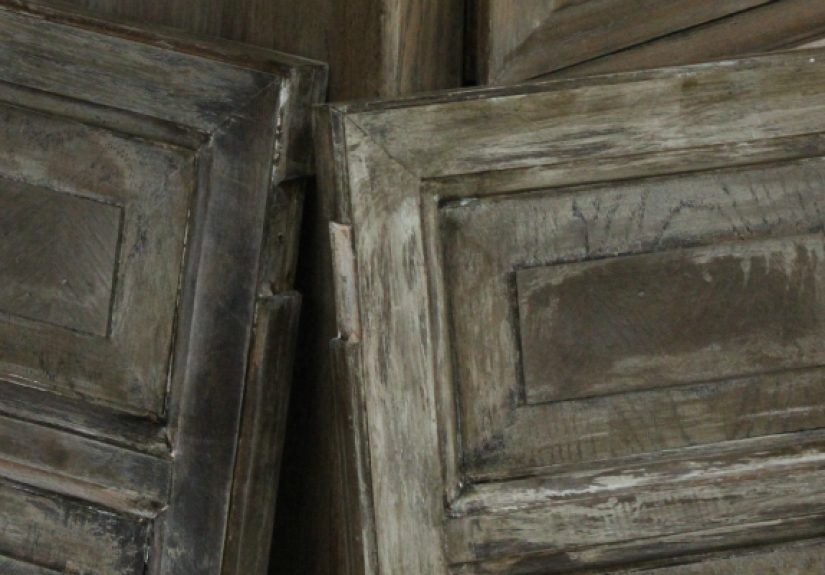
What “RH Weathered Oak” Really Means (So You Can Copy It on Purpose)
The most convincing RH-style weathered oak finishes usually share four traits:
- Muted undertone: more taupe/greige than “silver gray,” so it still feels like wood, not driftwood cosplay.
- Visible grain: oak texture is celebrated, not buried under thick pigment.
- Subtle contrast: pores and grain lines read slightly lighter or darker, creating depth.
- Matte to satin sheen: the finish feels calmno shiny “gym floor” reflection.
If you keep those four goals in mind, your finish becomes a set of adjustable knobs:
more gray, less gray; more grain highlight, less; more warmth, less. That’s how you hit “RH-ish” even if your oak isn’t identical to theirs.
Start Smart: Choose Your Wood and Your Finish Strategy
Pick the right oak (and why it matters)
White oak is the classic choice for this look. It generally takes “weathered” tones beautifully and avoids some of the pinkish/orange drama you can get
with red oak. That said, you can still do this on red oakyou’ll just lean harder on gray-taupe layers to calm the warmth.
If you’re buying new lumber, look for boards with clean, consistent grain (rift-sawn or quarter-sawn styles look especially “high end”).
If you’re refinishing an existing piece, don’t panic: your goal is consistency through prep and sampling, not perfection through wood shopping.
Choose one of these three “routes” to the look
-
The Classic Layered Stain Route (recommended): stain for the base tone + a light grain-enhancing step + matte topcoat.
Most DIY-friendly and easiest to control. -
The Lightening Route: lighten the wood first (best for very orange/dark pieces), then add weathered tones.
This can be more complicatedconsider doing it with an experienced adult or a pro if strong chemicals are involved. -
The Cerused Route: deepen/open the grain + add a white/neutral “limed” accent into the pores.
Gorgeous on oak when done subtly (not 1980s pickled oak… we’re healing as a society).
Materials and Tools You’ll Actually Use
- Sandpaper (80, 120, 180/220 grits) and/or a random-orbit sander
- Tack cloth or microfiber + vacuum (dust is the enemy of smooth finishes)
- Stain options: “weathered oak,” “classic gray,” or a gray-brown/greige stain
- Optional: pre-stain conditioner (especially if you’re working on softwoods or blotchy woods)
- Grain accent product (choose one): liming wax, whitewash/glaze, or a very light neutral wash
- Topcoat: matte or flat water-based poly, or a hardwax-oil system (low sheen)
- Application supplies: lint-free rags, foam brush, quality bristle brush, gloves
Safety note: Many finishing products have strong fumes. Work in a well-ventilated area and follow product labels.
If a step involves stripping agents, strong bleaches, or fumes, have an experienced adult helpor hire a refinishing shop.
Step-by-Step: The “Gray Wash + Subtle Grain Pop” RH-Style Method
This method is built for control. You’re going to create a base that feels naturally aged, then lightly emphasize the oak texture,
and finally lock it in with the right sheen.
Step 1: Prep the surface like you mean it
If you’re starting with raw oak, greatsand it smooth and keep going.
If you’re refinishing a sealed piece, your goal is to reach clean bare wood (or at least remove the glossy film so stain can bite).
Many people skip prep and then wonder why their “weathered” stain looks like a sad gray smudge. Prep is the difference between “designer” and “detention desk.”
Sand in stages: start at 80 grit only if you need to remove old finish quickly, then move to 120 to refine, and finish at 180 or 220 for smoothness.
Vacuum and wipe between grits so you’re not grinding old dust back into the pores.
Step 2: Make sample boards (yes, even if you’re “pretty sure”)
Cut a few scrap pieces of your same oak (or use the underside/back of your furniture). Label each sample.
Your home lighting will change the final look more than your confidence will.
Make at least three samples: Cool, Neutral, and Warm-neutral.
Step 3: (Optional) Conditioner for tricky woods
If your piece is not oak (or it’s pine/softwood), a pre-stain conditioner can help the stain soak in more evenly.
Oak usually behaves better than pine, but “optional” doesn’t mean “never”it means “test it.”
Step 4: Lay down the base “weathered” tone
Apply a gray-brown “weathered oak” style stain as your base. Work in manageable sections.
Wipe it on, let it sit briefly, then wipe off in the direction of the grain. The longer it sits, the deeper it goesso your timing matters.
Pro control move: dilute your stain slightly (or choose a lighter stain) if you want that “barely-there, sun-kissed” look.
The finish you’re chasing typically isn’t dark; it’s nuanced.
Step 5: Fix the undertone (the “orange panic” solution)
If your oak still reads warm/orange after the first stain, don’t fight it with more stain immediately.
Instead, add a very thin neutral wash:
something that nudges the color toward greige without turning it chalky.
The easiest DIY-friendly approach is a light whitewash or glaze step applied sparingly, then wiped back hard.
Think: “whisper,” not “snowstorm.”
Step 6: Add subtle grain definition (your RH secret sauce)
This is where the oak starts to look expensive. You have two easy options:
-
Liming wax (classic): Work a white/neutral liming wax into the grain, then wipe/buff it back so it stays mainly in the pores.
The surface should still feel like woodnot like frosting. -
Whitewash-as-glaze (modern): Use a whitewash product like a glaze layer, then wipe back until it’s subtle.
This is great if you want a cleaner, more contemporary “washed oak” look.
If you want more texture contrast, lightly brushing the grain (or using a stiff brush along the grain) before the accent step can help.
Keep it gentleyour goal is refined character, not “I wrestled this table behind a barn.”
Step 7: Seal it with the right sheen (matte is the mood)
Topcoat is where many DIY finishes accidentally become “plastic.”
Choose a matte or flat clear coat if you want that RH calmness.
Apply thin coats, let them dry fully, and sand very lightly between coats if the product recommends it.
Two to three coats is typical for tabletops depending on the system you choose.
Three Alternative “Recipes” Depending on Your Starting Point
Recipe A: The “New White Oak, Minimalist RH” version
- Sand and clean thoroughly.
- Use a very light weathered/greige stain (or diluted stain) to mute raw brightness.
- Add a subtle liming wax or white glaze to pop grain.
- Seal in matte.
This is the cleanest path if you’re starting with light wood and you want that airy showroom feeling.
Recipe B: The “Too Orange, Help Me” rescue version
- Sand deeper to remove as much warm old finish as possible.
- Use a cooler gray-brown base stain.
- Glaze lightly with a neutral/whitewash layer, wiped back aggressively.
- Finish with liming wax (optional) and matte topcoat.
The key is layering instead of trying to erase orange in one aggressive step.
Recipe C: The “Dramatic Grain, Cerused Luxe” version
- Sand and (optionally) open the grain gently with brushing along the grain.
- Apply a deeper base tone (gray-brown or even a smoky brown).
- Work a white/neutral accent into pores (liming wax or ceruse glaze), then wipe back.
- Seal in matte/satin.
This version is stunning on oak built-ins, cabinet doors, and large tablesespecially if you keep the white accent restrained.
Troubleshooting: Fixes That Save Projects (and Friendships)
Problem: Blotchy stain
Usually caused by inconsistent sanding, leftover finish, or an unevenly porous surface.
Fix it by sanding back to a consistent base, then staining again with better wipe technique.
For woods prone to blotching, add a conditioner step next time.
Problem: Too gray, looks cold
Warm it slightly with a thin taupe or light brown glaze layer, wiped back. Don’t jump straight to “walnut.”
Think “a latte walked past the table.”
Problem: Too white / chalky
You used too much whitewash or didn’t wipe back enough. Buff it down, or apply a very light tinted coat over the top to re-unify the tone.
Then reseal.
Problem: The topcoat looks shiny
Switch sheen. Matte topcoats are not all created equal; some “satin” products still flash shiny under certain lighting.
If it’s already sealed, scuff-sand lightly and apply a true matte/flat final coat designed for that purpose.
How to Make It Look “Store-Bought” Instead of “Weekend Experiment”
- Always do samples in your actual lighting (morning and evening). That’s where the truth lives.
- Keep layers thin; RH-style depth comes from subtlety, not heavy pigment.
- Wipe with the grain like it’s your job (because it kind of is).
- Choose matte unless you’re intentionally going more traditional.
- Let it cure before heavy usedry-to-touch isn’t always “ready for pizza night.”
Conclusion
A Restoration Hardware weathered oak finish isn’t one magical canit’s a smart sequence: clean prep, a controlled gray-brown base,
a gentle grain-enhancing step, and a low-sheen topcoat that keeps everything looking natural.
If you remember nothing else, remember this: make samples. The “perfect” weathered oak is the one that looks perfect in your room,
under your lights, next to your floors, with your paint colorand that’s a moving target.
Nail the balance, and your piece will read like it came from a showroom… not from a panic-scroll at 1 a.m. titled “why is my table orange.”
Workshop Notes: Real Experiences Getting the Weathered Oak Look (About )
The first time I tried to chase that RH weathered oak finish, I made the classic rookie move: I grabbed a “weathered oak” stain, slapped it on,
and waited for the heavens to open and angels to sing in greige. Instead, I got something that looked like a gray filter on warm woodfine,
but not “quiet luxury.” It taught me the big lesson fast: the RH look is layering, not labeling.
The biggest breakthrough came from making samples like a mildly obsessive scientist. I taped three little boards to the wall near the piece
and lived with them for a full day. Morning light made one sample look perfect. At night, the same sample turned slightly blue-gray,
like it was trying to become a coastal Pinterest board without permission. The board I disliked at noon? It became the winner at 8 p.m.
That’s when I realized your “best” finish can be more about your bulbs and windows than your stain brand.
Another time, I tried to get extra grain definition and went too hard with brushing. Up close, it looked “textured.”
From six feet away, it looked like the table had seen things. The fix was surprisingly simple: I dialed back the grain highlight step,
used a subtler liming application, and let the matte topcoat do some visual smoothing. Lesson: texture is great, but restraint is what reads expensive.
I also learned that wiping technique is basically 50% of finishing. On one test board I wiped randomly (because I was “in a hurry”),
and I got streaks that looked like the wood had brushed its teeth wrong. When I slowed down and wiped with the grain using clean rag sections,
everything calmed down immediately. It’s not glamorous advice, but it’s true: your rag is your paintbrush.
The funniest moment was when I finally nailed the color and then ruined the vibe with the wrong sheen.
Under overhead lights, the satin topcoat I used looked shinier than expectedsuddenly my “weathered oak” felt like a gymnasium floor wearing a disguise.
I scuff-sanded and switched to a flatter sheen, and the whole piece transformed. Same color, same grain, totally different mood.
That’s why RH finishes feel so “soft”: the sheen is part of the color story.
Now I treat every RH-style project like a recipe you taste as you go. I start lighter than I think I need, build slowly,
and stop as soon as the wood looks natural. If you overshoot, you can sand backbut if you creep up on it, you often land right on the sweet spot.
And when you do? It’s incredibly satisfying: the grain looks intentional, the tone looks lived-in, and people assume you spent way more money than you did.
Which is, honestly, the most Restoration Hardware thing of all.